- Safety: This is potentially a Class IIIb laser (though I've never
actually gotten 5 mW) and the power supply is also capable of a painful (if
not lethal) shock. Once the wiring is complete, the electrical hazards are
minimal as all the exposed surfaces are at ground potential (assuming the
ballast resistor is double insulated as suggested below). Although the
circulating photons inside the resonator can possibly exceed 1 watt with
super refleftive mirrors, the output beam is likely to be in the 3 to 5 mW
range with an optimal OC - about the intensity of a decent laser pointer.
So, reasonable precautions should suffice - don't stare into the beam with
your remaining good eye. :) For additional safety information, see the
chapter: Laser Safety.
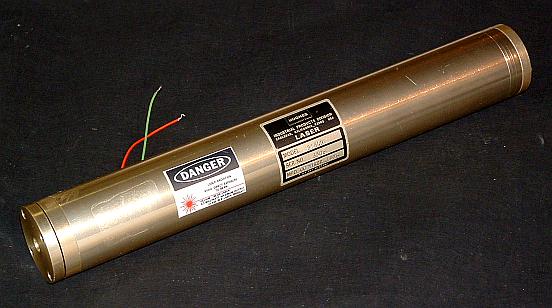
- Powering the Hughes laser head:
The red wire on the laser head is positive and the green wire is negative.
An anode ballast resistance external to the laser head may be needed to
guarantee stability. It may be possible to get away without this for some
power supplies but 50K to 75K ohms is recommended. It is also a
good idea to ground the case if the return of your power supply is also
grounded (as it is with the 05-LPM-379). However, the case and tube
are NOT connected together internally.
A 05-LPM-379 power supply works
fine and should be set for about 6 mA (though some of the tubes take awhile
to start but always do eventually). To set the current, put
a DC milliameter in between the fat black HV return wire (negative of meter)
and the thin green wire of the laser head (positive of meter); adjust for
6 mA after warmup. This is the optimal operating current for most of
these but if you are monitoring output, adjust for maximum output. The
operating voltage is around 1,600 VDC across the red and green wires.
Note that the ballast resistor included in the cable is around 50K to 60K
ohms - there is an additional 32K ballast resistor inside the laser head.
- Wiring up the Melles Griot 05-LPM-379 power supply: If your unit
came with this power supply, you need to provide a 3 wire grounded line cord
for 115 VAC and 1/2 to 1 amp fuse or circuit breaker.
THIS IS CRITICAL as I've heard of power supply
bricks from various manufacturers exploding if there is an internal fault and
no current limiting! A sticker on the power supply shows the wiring color
code. With the CDRH loop (if present) intact, there will be a 3 to 4 second
delay from application of AC power to startup. Cut the loop to disable this
delay. A power switch, power-on indicator, and fancy box are optional. :)
Once the wiring is complete and power is applied, the laser head should
produce a beam if the mirror mount screws have not been touched. If
the tube doesn't light after a few seconds (there may be a 3 to 4 second delay
built in to the power supply - cut the CDRH loop violet wire to disable
this), check the wiring and that your outlet is powered. (The discharge
can be seen via the rear mirror (away from the wiring-end).
Assuming the tube lights but there is no red beam, the alignment might
have gotten altered somehow, though this is really very unlikely to have
happened in shipping. Who touched the screws?! :)
WARNING: DO NOT disconnect the Alden connectors while the unit is running!
If you disconnect it just after powering down, there may still be some
residual charge on the male Alden pins attached to the laser head due to
stray capacitance. Don't jump too high. :)
- Mounting: Devise a suitable scheme to securely attach the tube to
your baseplate in such a way that the ends are accessible. Padded clamps
may be used but not too tight. DO NOT use any of the holes in the end
plate as the end plates will need to be removed to use this as anything but
an excessively high prices laser pointer.
It's a good idea to arrange the ballast resistor away from wandering fingers,
metal brackets, or materials like plastics since it has the high voltage on
it (and the insulation may not be that great) and it gets hot enough to melt
bubble wrap!
Although the diagrams photos show the B-window facing up and this
is the most convenient orientation for display and cleaning, it is also
the one that collects dust quickest. Facing it to the side or down
will result in a much longer running/storage time between cleanings.
So, arrange the wiring to the side or underneath.
- Mirrors: It isn't possible to use both Hughes mirrors mounted
externally because the original configuration is a near-hemispherical
cavity. Increasing the mirror spacing by even 1 inch will likely result
in an unstable cavity. The Radius of Curvature (RoC), reflectivity
(R), and quality of your mirrors will determine what's possible:
- The HR (High Reflector, R approaches 100%, non-output end) in the
Hughes laser is a planar mirror. This may be used and will likely
result in the highest output power since the bore of the Hughes tube
is tapered.
- An OC (Output Coupler) with R of around 99% and a Radius of Curvature
(RoC) of about 60 cm (like the one supplied in the kit) will result
in decent (though perhaps not maximum) output power and reasonably
easy (as these things go) alignment.
High quality laser mirrors are recommended but dichroic mirrors from HeNe
laser based barcode scanners may work as HRs.
The RoC of the mirrors will determine what range of locations are result in
a stable resonator (and thus lasing). These can be found from the
equations involving g1 and g2.
See the section: Resonator
Stability.
Matching the mode volume to the tapered bore will result in the most output
power but any stable configuration should lase. Probably something like
3.5 to 4 mW if matched, 2 or 3 mW otherwise.
- Optics cleaning: Your output and circulating power will be a strong
function of the cleanliness of the Brewster windows and external mirrors.
The Brewsters can be cleaned with alcohol. Spectroscopic grade isopropyl
or methanol alcohol is best but drugstore rubbing alcohol (70 percent
isopropyl) or medicinal alcohol (91 percent isopropyl) will work just fine
as long as it doesn't contain any ingredients other than alcohol and water.
Use a fresh Q-tip (cotton swab) or lens tissue. Once the window has been
cleaned, all you should have to do is dust it off from time-to-time with a
new (clean) Q-tip. Break a new Q-tip in half, use each part exactly once,
then discard it. With the laser lasing, dust and other debris will light
up like a beacon so it is easy to see what is there. It will never be
perfect - and will degrade in anything but a clean room environment.
Accept this as a fact of life! With the relatively high gain of this tube
(at least relative to a one-Brewster tube that does green!), the laser will
still work quite well after a week in a dusty basement environment though
its output power will be way down if measured on a power meter.
As for the mirror, if you start with a nice clean mirror, it will likely stay
fairly clean as long as (1) you don't put your grubby fingers on its surface
and (2) your environment doesn't have any tobacco smoke or cooking grease
vapors. :) I have found that in my dry, but somewhat dusty basement lab,
mirror cleaning isn't needed for months with only some plastic bubble wrap
for covers - dust doesn't tend to collect on the vertical mirror surfaces.
If you must clean the mirror, use the "drop and drag" method as described
in the section: Cleaning of Laser Optics.
- Initial alignment: Once the laser head is mounted securely with
mirror mounts and powered, the fun can begin.
The easiest way to perform mirror alignment on this sort of
setup is to *never* lose the alignment of *both* mirrors at the same time!
Otherwise, an alignment laser will probably be needed, though I have been
successful in restoring lasing on an intact 3184H laser head by careful
trial and error, simply using the mechanical alignment of the end-plate
with respect to the head cylinder as a guide. Though, maybe it was more
a matter of luck.
So, start with a 3184H that is lasing. Secure it in the mounts and adjust
the external mirror beyond the OC so that all the reflected spots converge.
Then remove the 3184H's OC. The alignment should be close enough so that
when the end-plate is removed, if it isn't already lasing, slight rocking
of the mirror in Y while very slowly adjusting the alignment in X will
restore a lasing condition. Unfortunately, the same procedure can't be used
with the HR because of its fine-ground outer surface. For that one
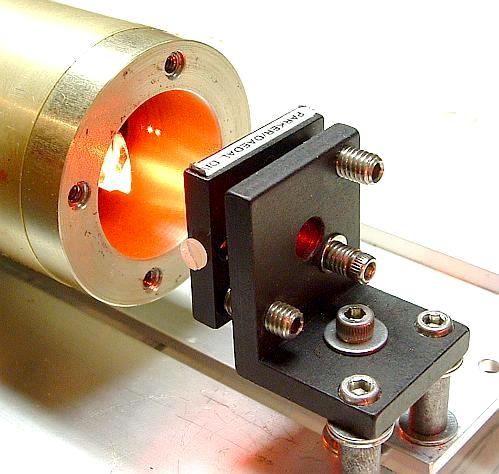
(as well as the OC should its alignment be lost later on), I use a 60 cm
RoC HR or OC mirror mounted in a mirror cell such as shown in
Simple Mounting Cell for Salvaged HeNe Laser Tube
Mirrors, or any other similar mounting scheme. This can simply be held
against the end of the 3184H cylinder and easily adjusted by hand until the
tube lases (assuming the other end is aligned). Then, the adjustable mirror
can be tweaked until the spots converge as above. Once the 2-B tube has been
tested, the Hughes end-plates can be reinstalled. The OC can use its outer
surface reflection as a guide but the HR will simply have to be carefully
adjusted until flashes occur. Buts as long as alignment of both ends is
not lost, all of these procedures are really quite quick and easy.
If the mirror is a half meter away, good luck. :)
- Maintenance: No routine maintenance is required. The laser head
does NOT need to be run periodically. Given the age of these lasers,
they must use optical contacting, and not simply an Epoxy seal and
it can sit on the shelf unpowered for as long as you like without any ill
effects. It should operate for several thousand hours with at most a slight
decrease in possible output power. I would recommend that the
laser be covered or stored in a dust proof box when not in use but that's
just to protect it and help to keep the Brewster window and external mirror
as clean as possible.
Unless fully enclosed and sealed, cleaning of the Brewster window
will be required more or less frequently depending on environmental
conditions. (The mirror generally remains quite clean even after long a
period.)
- Electrical troubleshooting: The HeNe tube inside the Hughe 3184
two-Brewster laser head is much like any other HeNe tube except that its
bore is tapered (which is sometimes used on modern tubes but mostly not).
Unless it is abused (e.g., run on a power supply putting out way too much
current or with reverse polarity), almost any amount of educational or
hobbyist running time shouldn't hurt it or use up a substantial
portion of its life expectancy. About the only other way to cause damage is
to drop the tube on a concrete floor!
I've seen only one sort of problem with a few samples of these tubes:
- Under certain conditions - perhaps high humidity, perhaps being ignored
for too long :), some of these tubes take awhile to start when cold, up to
a minute using the 05-LPM-379 power supply. However, they always do start
eventually and once they have started, restarts are virtually instantaneous.
I have not noticed any deterioration in this behavior with age or use, nor
does this correlate at all with performance.
- Lasing troubleshooting: Problems obtaining a beam are most likely
related to mirror reflectivity or radius of curvature, mirror alignment, or
the cleanliness of the mirrors or Brewster windows. A scratched mirror or one
that is damaged in some other way may lase erratically depending on its
X-Y position and/or behave strangely with alignment. Sometimes an almost
invisible speck of dust or fiber will land in a strategic location on the
Brewster window and totally inhibit lasing.