- Safety: This is potentially a Class IIIb laser
and the power supply is also capable of a painful (if
not lethal) shock. Once the wiring is complete, the electrical hazards are
minimal except at the anode-end of the tube. It is recommended that this
be enclosed for protection from shock. Where this is the Brewster
window-end, precautions should be taken to minimize the chance of
accidental contact.
Although the circulating photons inside the resonator can possibly exceed
1 watt with a super HR, the output beam is likely to be under 5 mW
even with an optimal OC - about the intensity of a decent laser pointer.
So, reasonable precautions should suffice - don't stare into the beam with
your remaining
good eye. :) For additional safety information, see the chapter:
Laser Safety.
- Mounting the tube: Keep in mind that a HeNe laser tube is basically
a fancy thin glass bottle. So, any mounting scheme should not apply excessive
stress to the glass. Clamping the glass portion is acceptable as long as
soft rubber or foam cushions are used and the clamps aren't tightened
too much. Some means of gently holding just the metal nearest the tube ends
will also work (but high voltage on at least one of them!).
If an aluminum cylinder and Nylon screws were included with your tube, you
may have to shorten the cylinder and drill and tap 3 new 10-32 holes to
mount the tube inside. The Nylon screws should only be tightened enough
to prevent the tube from sliding around (finger tight). I recommend adding
a layer of electrical tape surrounding the tube at the hole locations as
added protection.
- Wiring the tube connections: Since the Brewster window may be
at either the anode or cathode-end of the tube, this cannot be used as a
guide for wiring. The cathode of the tube is the end with the large aluminum
can electrode; this must be the negative or black wire to the power supply.
The anode of the tube is the end with the thick glass bore; this must go
to a 68K to 75K ohm, 5 watt or greater, ballast resistance no more than 2 or 3
inches from the tube. It's best to construct the ballast resistance from
several resistors in series (e.g., five 15K, 1 W resistors). The other end
of the ballast resistor goes to the positive or red wire of the power supply.
Clips may be used to make the connections to the tube or wrap bare
wire several times around the mirror or Brewster window mount and exhaust
tip-off, twist the ends together, and secure with tape.
DO NOT ATTEMPT TO SOLDER TO THE TUBE!!! The anode-end should
be insulated in some manner to prevent accidental contact with the high
voltage. However, if the Brewster window is at the anode end, it should
allow for access to clean the window with a cotton swab.
CAUTION: The tube may light up with the connections reversed but will be
destroyed within a few minutes operating on the wrong polarity
The prewired Alden cable (if supplied) has clips or a clip and bare wire for
attaching to the laser tube.
(The diagram doesn't show an Alden but the power supplies and laser tube
cable usually include one.) If the ballast resistance is inside the end-cap
from a cylindrical laser head, this can be installed in the aluminum
cylinder (if included). There will be a hole in the center of the end-cap
if your 1-B tube has an anode-end B-window.
- Powering the one-Brewster laser tube: This is a hard-seal wide
bore HeNe laser tube. A 05-LPM-379 power supply works
fine for up to near 6.5 mA. (It might only go to 6.25 mA but that's
close enough for Government work!) To set the current,
put a DC milliammeter in between the thin black
HV return wire (negative of the meter) and the HeNe tube exhaust tube
(positive of the meter);
adjust for 6.5 mA after warmup (or as close as the supply will go which may
be fully clockwise for the -379). Running at lower current is fine as
well as long as the discharge is stable but the output power will be
slightly reduced. The operating voltage is around 1,500 to 1,600 VDC
with the included ballast resistor.
- Wiring up the Melles Griot 05-LPM-379 power supply: If your unit
came with this power supply, you need to connect a 3 wire grounded line cord
for 115 VAC and a 1/2 to 1 amp fuse or circuit breaker.
THIS IS CRITICAL as I've heard of power supply bricks from various
manufacturers exploding if there is an internal fault and no current
limiting! A sticker on the power supply shows the wiring color code.
Usually it is yellow and white for 115 VAC. I usually connect yellow to
Hot but I don't think it matters. On the power cord, black or brown is
Hot; white or blue is Neutral; and green or green/yellow is Earth Ground.
(Most of these power supplies do not have a 230 VAC option. On those that
do (probably specifically ordered) and where it is desired to run on 230 VAC,
the connections are: white and white, yellow open.
Once the wiring is complete and power is applied, the tube should start.
If the tube doesn't light after a few seconds (there may be a 3 to 4 second
delay built into the power supply - cut the CDRH loop wire to disable this),
check the wiring and that your outlet is powered. If it still doesn't
start after 30 seconds, go to the troubleshooting section, below.
WARNING: DO NOT disconnect the Alden connectors while the unit is running!
If you disconnect it just after powering down, there may still be some
residual charge on the male Alden pins attached to the laser head due to
stray capacitance. Don't jump too high. :)
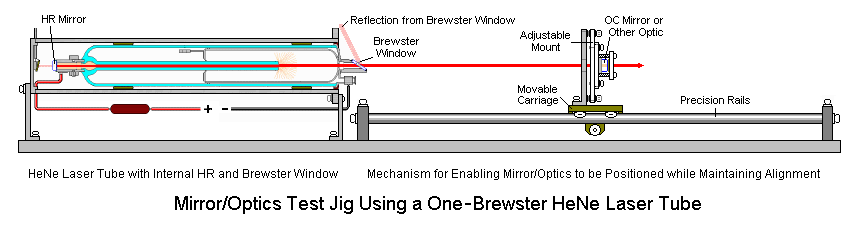
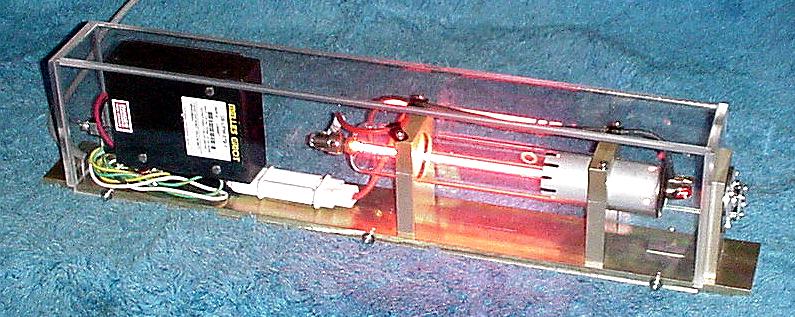
- Mounting: The tube must be mounted securely but since it is glass,
some care must be taken to prevent breakage. Since the stability of the
overall setup will be affected by the rigidity of the tube mount, this
is critical. A wooden platform can be used though 1/4" or thicker aluminum
would be better. An example of a suitable mounting arrangement is shown
in the photo below.
Although the diagrams show the B-window facing up and this
is the most convenient orientation for display and cleaning, it is also
the one that collects dust quickest. Facing it to the side or down
will result in a much longer running/storage time between cleanings.
- Mirrors: The mirrors provided in the one-Brewster kits are
from Melles Griot 05-LHR-150, 05-LHR-170 or similar 5 to 7 mW-class
HeNe laser tubes. They are still mounted on the original tube end-caps.
I recommend they be left this way as it protects the delicate mirror
coatings from grubby fingerprints! :) There will be a protective rubber
cap or piece of tape that must be removed before use.
- The HR (High Reflector, R approaches 100%) will result in maximum
circulating power (perhaps as much as a watt or more) but little or no
output beam. The HR is the one that has no AR coating.
- The OC (Output Coupler) with R of around 99% will result in modest
circulation power and a strong (1.5 to 5 mW depending on the particular
tube and the cleanliness of the Brewster window.) output beam. I don't know
quite where output power peaks. A 98% mirror results in a lower output
though. The OC provided is around 99%.
The RoC of the mirror will determine what range of locations are result in
a stable resonator (and thus lasing). These can be found from the
equations involving g1 and g2.
See the section: Resonator
Stability. Planar mirrors will work almost up
to a distance of 60 cm from the internal HR (which has its RoC equal to
60 cm). Mirrors with very small RoCs (e.g., from short barcode scanner HeNe
tubes) will have a very limited range of acceptable positions - a typical
RoC for these which is 26 cm won't work at all close to the Brewster window.
I recommend 60 cm if you have a choice. This arrangement will
lase anywhere from the mirror next to the Brewster window out to almost a
meter away with changing mode structure as this distance is varied! There
is at least one most interesting singularity along the way (you find it!).
Mounting the mirror assembly on an optical rail will allow you to easily
experiment with mirror placement. A confocal cavity will result using this
mirror at a distance of about 34 cm from the Brewster window.
The mirrors provided have an RoC of at least 60 cm. The inner surface
faces towards the Brewster window.
The mirrors that are part of Mirror Kit 1 (HENEMIR1) have a variety of
RoCs and reflectivities. It is the responsibility of the user to determine
the range of positions over which each one will work.
- Optics cleaning: Your output and circulating power will be a strong
function of the cleanliness of the Brewster window and external mirror.
The Brewster can be cleaned with alcohol. Spectroscopic grade isopropyl
or methanol alcohol is best but drugstore rubbing alcohol (70 percent
isopropyl) or medicinal alcohol (91 percent isopropyl) will work just fine
as long as it doesn't contain any ingredients other than alcohol and water.
Use a fresh Q-tip (cotton swab) or lens tissue. Once the window has been
cleaned, all you should have to do is dust it off from time-to-time with a
new (clean) Q-tip. Break a new Q-tip in half, use each part exactly once,
then discard it. With the laser lasing, dust and other debris will light
up like a beacon so it is easy to see what is there. It will never be
perfect - and will degrade in anything but a clean room environment. (And,
some tubes may have a speck inside which can't be
removed. If anyone has a suggestion on cleaning the inside surface of a
Brewster window, please contact me via the
Sci.Electronics.Repair FAQ
Email Links Page.)
Accept this as a fact of life! With the relatively high gain of this tube
(at least relative to a one-Brewster tube that does green!), the laser will
still work quite well after a week in a dusty basement environment though
its output power will be way down if measured on a power meter.
As for the mirror, if you start with a nice clean mirror, it will likely stay
fairly clean as long as (1) you don't put your grubby fingers on its surface
and (2) your environment doesn't have any tobacco smoke or cooking grease
vapors. :) I have found that in my dry, but somewhat dusty basement lab,
mirror cleaning isn't needed for months with only some plastic bubble wrap
for covers - dust doesn't tend to collect on the vertical mirror surfaces.
If you must clean the mirror, use the "drop and drag" method as described
in the section: Cleaning of Laser Optics.
The mirrors provided are safely tucked away in their original tube end-caps.
I suggest that they not be removed - fasten the entire assembly to your
adjustable mirror mount.
A piece of tape or a cap protects the inner mirror surface which must be
removed before any lasing can take place. Inspect for any dangling debris
inside the end-cap and carefully remove with a cotton swab but take care not
to go too far and touch the mirror itself.
- Initial alignment: Once you are ready with a real mirror and mount,
the easiest way to do the alignment if the mirror is located fairly close to
the Brewster window is to view the reflection of the bore light back
onto the Brewster window. When it is approximately centered, there
should be flashes. This works best if the mirror is behind an aperture
of about 6 mm. An alignment jig using a separate HeNe laser will also work
but is overkill for this wide bore multimode tube. Really. :) (However,
if you have never aligned any laser before, it may be best. And, although
the alignment is not nearly as critical as for normal TEM00 HeNe lasers,
it probably still has to be within less than 1 degree of perpendicular
to the laser's optical axis all around to lase.)
In fact, the first test I'd suggest is to hold the HR mirror about an inch
from the Brewster window and just carefully orient it by hand to reflect
the bore light back into the tube. With only a bit of care, this should
produce flashes when the cavity alignment is momentarily close enough.
But if the mirror is a half meter away, good luck. :)
- Maintenance: No routine maintenance is required. The laser tube
does NOT need to be run periodically. Since it is a hard-seal HeNe tube,
it can sit on the shelf unpowered for as long as you like without any ill
effects. It should operate for several thousand hours with at most a slight
decrease in possible output power. I would recommend that the
laser be covered or stored in a dust proof box when not in use but that's
just to protect it and help to keep the Brewster window and external mirror
as clean as possible. Constructing a see-through plastic box like the
one in the photo below would make your laser a nice conversation piece.
Unless fully enclosed and sealed, cleaning of the Brewster window
will be required more or less frequently depending on environmental
conditions. (The mirror generally remains quite clean even after long a
period.)
- Electrical troubleshooting: The HeNe tube
is much like any other modern hard-seal HeNe tube
except that its bore is quite wide (more along the lines of a multimode
tube) and thus the operating voltage is relatively low for its length (just
over 1 kV not including the ballast resistor). Unless it is abused (e.g., run
on a power supply putting out way too much current or with reverse polarity),
almost any amount of hobbyist running time shouldn't hurt it or use up a
substantial portion of its life expectancy. About the only other way to
cause damage is to drop the tube on a concrete floor!
I've seen only one problem with a few samples of these tubes:
Under certain conditions - perhaps high humidity, perhaps being ignored
for too long :), some of these tubes take awhile to start when cold, up to
a minute using the 05-LPM-379 power supply. However, they always do start
eventually and once they have started, restarts are virtually instantaneous.
I have not noticed any deterioration in this behavior with age or use, nor
does this correlate at all with performance. If the tube doesn't start
after a minute or so, there is probably something else wrong though.
- Lasing troubleshooting: Problems obtaining a beam are most likely
related to mirror reflectivity or radius of curvature, mirror alignment, or
the cleanliness of the mirror or Brewster window. A scratched mirror or one
that is damaged in some other way may lase erratically depending on its
X-Y position and/or behave strangely with alignment. Sometimes an almost
invisible speck of dust or fiber will land in a strategic location on the
Brewster window and totally inhibit lasing. However, this laser tube really
loves to lase given half a chance!
Both of the mirrors provided have been tested with the actual tube you
received. After removing the protective cover or tape from the mirror,
carefully inspect the inside of the metal tube to make sure there are
no "whiskers" or other debris. A Q-tip can be carefully used to clear
these out - just make sure not to touch the mirror itself as that will
put dirt on it and may even damage it permanently - mirror coatings are
very delicate.
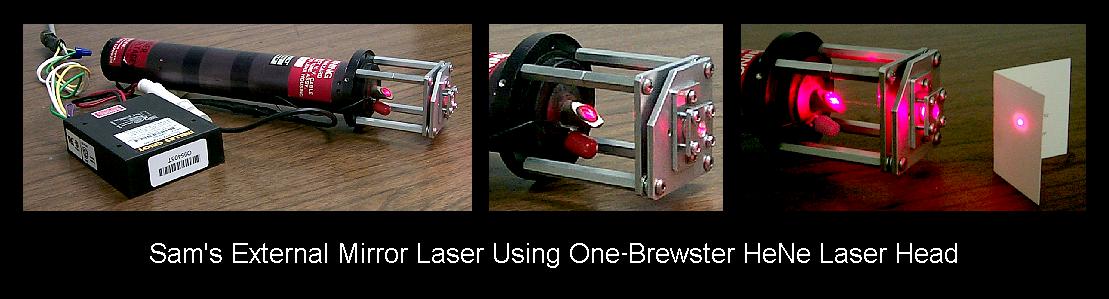
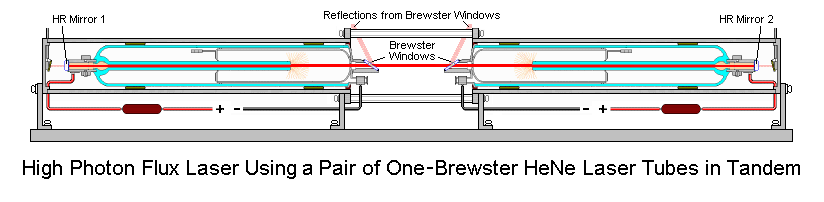
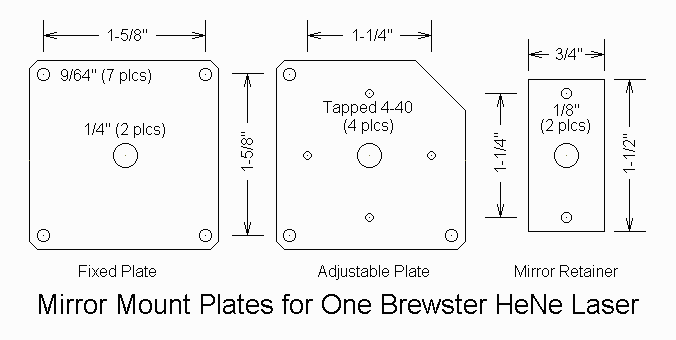
Here are some relevant diagrams and photos. Most show the one-Brewster
HeNe laser tube inside a laser head cylinder but other mounting schemes
will work just as well: