Instructions for High Power Stabilized HeNe Laser Kit with or without Arduino Compatible Controller
Version 1.40 (3-Mar-24)
Introduction
This document contains notes on the construction of a compact frequency or
intensity stabilized HeNe laser using a HeNe laser tube and
Arduino compatible microprocessor-based controller. The primary difference
with the high power (or deluxe) kit is the use of a 2.5-3 mW HeNe laser tube
similar to those in commercial stabilized HeNe lasers. This also requires
some changes to the HeNe laser power supply and heater.
IMPORTANT: Most of the information below applies to any of the types of
laser tubes that may be included in the kit. However, for the specific
case of the Research Electro-Optics (REO) tube, there are some
physical differences, which will be noted and the REO tube is available
safely enclosed in an aluminum cylinder with heater already attached.
(This may be the only REO version currently available.)
Laser/optical components in this kit
- Melles Griot, Uniphase, LASOS/Siemens, Zygo, or REO 9-10 inch HeNe laser
tube with an output power of 2.5-4 mW that has been tested to
assure that it is suitable for use in a stabilized laser. The output
on all these is from the cathode-end.
WARNING: Do not touch the anode-end of the tube when powered or for
several minutes after being turned off to avoid shocking experience!
But it should be OK to use a clip lead to short
the two ends of the tube AFTER shutting off power. Touch it to the
cathode-end FIRST!
For the option with an enclosed laser head instead of bare glass laser tube,
the laser power specifications are similar, but the hassle of wiring the
tube and attaching the heater is eliminated. And mounting is simplified.
Only the electrical connections to the female Alden connector need to be
dealt with.
- HeNe laser power supply brick that runs on low voltage DC (typically
between 12 and 18 VDC), or AC line voltage (110-125 VAC or 220-250 VAC).
- One or two regulated wall adapters: If there are two, one for the DC-input
HeNe laser power supply brick and the other for the controller. They are
probably either both 12 VDC or one is 15 VDC. If they differ, use the 15 VDC
power pack for the HeNe laser power supply brick and use the 12 VDC power pack
for the heater (via the Arduino). Otherwise, there will be one higher
current wall adapter to power both. Or if an AC-input brick, then only
one for the heater. The non-stabilized kit will have only a single
power supply, or none.
- Thin film Kapton heater which may already be attached to the tube. The
cold resistance will be anywhere from 5 to 20 ohms. To optimize power to the
heater, a DC-DC step-down converter is included if necessary to adjust the
voltage to it. For heaters with a resistance of greater than around
12 ohms, none is needed. The REO tubes have a 12 ohm heater.
- Small (4x4x4mm Polarizing Beam Splitter (PBS) Cube, a pair of silicon
photodiodes (PDs) and other components alone with a small PCB to mount
them on. A variable beam-splitter plate is also provided for
cathode-end sampling as well as a piece of linear polarizer film for
checking polarization. A second PBS cube may be used to optionally
block one of the output modes so the output is pure single mode (not
included, though the polarizer film can be used for this purpose with
a slight decrease in output power). More on this below.
Arduino controller components in this kit (Arduino version only)
- Atmega 328 Nano 3.0 microcomputer board with pins soldered
and controller firmware preloaded.
- USB A male to USB B Mini male cable for attaching to a computer to
use the µSLC1 GUI or upload updated firmware.
- Custom µSLC1 printed circuit board.
- All required electronic components to complete the µSLC1
assembly.
Much more on the µSLC1 controller at:
Micro Stablized Laser
Controller 1 (µSLC1) Installation and Operation Manual. It
includes specifications, assembly instructions, and information
on the µSLC1 firmware and Windows Graphical User Interface (GUI).
What you will need to provide
- Mounting scheme for the tube and beam sampler (PBS and PDs):
- The tube must be free to expand slightly so an entirely rigid mount is not
acceptable. In addition, it should not be totally insulated as heat
transfer to the air is needed to balance the heat provided by the
tube discharge current and thin film heater. However, a WOW enclosure
such as a clear Plexiglas box may be used. Even if somewhat sealed, its
large surface area will provide adequate thermal conductivity.
If enclosed in a laser head cylinder, this is all taken care of since it is
mounted using RTV Silicone. A similar scheme can be used to mount a bare
tube. But there is no WOW option with the enclosed cylinder, sorry.
- The feedback parts include a small PCB which makes assembly more
straightforward. See: Dual
Photodiode 1 (DP1). While the photodiodes can be soldered directly
into the PCB, the use of sockets is highly recommended as the PDs are
very easily damaged by heat. A pair of 2-pin sockets is included, though
the legs of the PDs may need to be shaved down a bit to fit. The PBS
will need to be mount on a spacer so the beam height matches the PDs.
R-Protect is simply there to protect the PDs if accidentally installed
backwards. The load resistors are the 1M trim-pots in µSLC1.
Alternatively, the
PBS can be glued to a post with the PDs glued to its back and side,
or to some simple plastic or metal enclosure of your choice. The PDs can
also be installed on a piece of Perf. board with the PBS glued between
them. A spacer (made from a piece of Perf. board or something similar)
may be required to lift the PBS to the optimum height. Take care
with the PD lead wires as they are easily broken. Very thin wire (e.g.,
AWG #30) is recommended. Do NOT apply any stress
while soldering as the heat can melt the plastic causing them to shift
and break internally. After soldering, confirm that the PDs still behave
like diodes with a DMM.
- Wire, cable, connectors, solder, brain (yours). ;-)
Power and wiring:
Power supplies are required for the laser tube, heater, and the Arduino
(when not connected to USB). These can all run off the pair of 12 VDC or
15 VDc power packs / wall adapters included:
- Tube power: This will be a HeNe laser power supply brick which
is powered from either low voltage DC or AC line voltage (110-125 VAC
in the USA or 220-250 VAC Worldwide). (these used to be a copper covered
Voltex brick but a different Voltex 10-14 VDC brick may be used now. For
the DC-input bricks, a suitable DC wall adapter will be included. For
the AC-input bricks line-fuse and power cord (USA only) will be included.
Wire colors vary so please contact me before if the cord and fuse is
not already attached.
- Voltage copper-covered brick:
CAUTION: For the Voltex copper-covered brick specifically,
DO NOT connect the negatives
of the DC adapters together or cheat and use a single higher current
power supply for both HeNe and heater power - that will result in smoke or
damaged adapters. But it should be possible to tie the positive of
the Voltex brick to system negative/common and Earth ground. Confirm that
the red and black
power wires of the Voltex brick are not shorted before powering.
Summary for Voltex copper-covered brick ONLY:
- Voltex power pack positive: +Input of Voltex (red and blue),
system negative/common, and earth ground. This also assures that
the HV return is grounded.
- Voltex power pack negative: -Input of Voltex (black/clear).
- Heater power pack positive: +Input of heater driver.
- Heater power pack negative: System negative/common, and earth ground.
See the wiring diagrams and notes below.
- AC-input bricks: These are powered from the AC line - 110-125 VAC
in the USA and up to 250 VAC elsewhere. Since the wiring color code varies
and may be confusing, the AC-input bricks will probably already be mostly
wired including a fuse in one of the input leads. Contact me if this is
NOT the case for specific instructions.
NONE OF THESE BRICKS ARE AUTOSWITCHING! POWERING THE BRICK WITH THE WRONG
WIRING CAN DESTROY IT ISNTANTLY.
But here are the guidelines:
- Green or green/yellow is Earth Ground.
- If there are two other wires, they are for 110-125 VAC.
- If there are three other wires where two are the same color, 110-125 VAC
is between the pair that are the same (tied together) and the other one.
- If there are three other wires that all differ, contact me as there
are several schemes that may not agree with each-other. ;-)
In most cases, I will have labeled the wires and/or tied together wires
as appropriate. But if at all in doubt, contact me before doing something
you may regret.
- Heater power: Where the heater resistance is more than about
10 ohms, it can run connected to a 12 or 15 VDC adapter directly.
Where the heater resistance is less than 10 ohms,
a DC-DC step-down converter is included to drop
the 12 VDC of the power pack to the required voltage for the heater.
More on this below.
- Atmega power (Arduino version only):
When connected to PC, the required power comes
from USB. But if stand-alone, a source of power is required for the Atmega.
The heater supply may be used providing 12 V to VIN (via the jumper on the
PCB). While this is within spec, lowering this voltage will reduce the
heat dissipation in the Nano's on-board regulator. The simplest way to
do this is use a string of silicon diodes in series. Suitable diodes
like 1N4007s may be included. This can go to the PCB input labeled
"+5VExt" on the schematic. A three-terminal 6-8 V regulator can also
be used (e.g., 7806).
CAUTION: DO NOT power the Nano from both a line-powered computer's USB and
a power supply. This may include a laptop using its AC power pack.
In my experience, bad things happen, like the CPU or USB
chip on the Nano board dying. See the info in the µSLC1 manual.
Hooking up power to the tube correctly is
critical to its survival and life. This is extermely important since
the laser tube is the most expensive part of the kit by far.
- Connections for Bare Laser Tubes


This shows tubes with the output from the cathode-end. Most of the kits
will be this way but double check to be sure. The output comes
from the end of the tube with a blue-ish AR-coating on the mirror.
HOWEVER, THE CONNECTIONS MUST BE AS SHOWN: The positive (red) wire
and ballast goes to the glass-end of the tube (usually the mirror mount
stem or a pin fused into the side of the glass tube). The negative (black)
wire goes to the cathode which may be an aluminum can (all but REO and Zygo),
shiny coating on the glass (Zygo), or all metal (REO). Otherwise, the tube
may be destroyed quickly even if the laser appears to work.
Make sure the anode-end of the tube and the connection to it are well
insulated and cannot arc to anything. Keeping anything conductive
(including stupid humans) at least an inch away should be adequate.
Or it can be protected inside an insulated housing.
During starting, there may be up to 10 kV there and any leakage or arcing
will prevent starting and may destroy the power supply. And accidentally
touching it, while not dangerous, will be unpleasent and may cause you
to toss the entire thing across the room, which is bad form at the
very least. ;-(
For the REO tube ONLY, the anode connection is to the pin sticking out of
the side of the glass, NOT the HR mirror stem. There may be a
1M ohm resistor between it and the mirror stem to aid in starting.
The mirror stem itself can be Used instead of the pin and will actually
result in slighlty more output power but may reduce tube life slightly.
How much is not known.
The power supply should have a ballast resistor already attached to
it along with a suitable connector for the tube anode. If not, contact
me before proceeding. The exception for the REO tube enclosed in an
aluminum cylinder where the ballast is inside.
It is essential that the wiring to the HeNe laser tube have the
correct polarity as noted above. Reverse polarity may ruin the tube in a
few minutes even though it may appear to light up and lase normally.
The tube is the most expensive part of this kit by far.
For all but the REO tubes, the end that has the thick
glass capillary is the anode, positive,
fat red wire, and ballast resistors. The end of the tube with the
aluminum can or shiny coating is the cathode, negative, fat black
wire or blue wire of the power supply brick. (Where the brick has
multiple black wires, they are probably connected internally.)
WARNING: There may be over 2,000 V present while running and over 10,000 V
at startup on the anode mirror mount of the tube! Stay clear! There will
be a significant charge remaining for a while after shutting off power.
Touching the anode probably won't kill you but throwing the tube across
the room as a result of a reflex reaction is bad form and may upset your
thesis advisor.
- Connections for REO Laser Head ONLY
The laser head has the tube wired internally with a ballast resistor
and a cable with a white "Alden" high voltage male connector. For kits
shipped with the head, a mating female Alden connector and short cable
will be provided. The required heater is also pre-installed inside the
cylinder with a pair of thin white wires exiting from the front
of the head cylinder. A loose-fitting end-cap is included to cover the
front of the head while permitting the white wires to exit. It can be
taped in place or some tape can be wrapped around the perimeter so it
fits snugly.
The wiring may be connected with "Wire Nuts" for testing as shown
in the right-hand graphic, but proper permanent
wiring - preferably soldered - should be done at least for the connection
between the fat red wires on the power supply and Alden, along with
high voltage insulation consisting of several layers of electrical
tape or similar.


- The fat red wire from the power supply brick should be soldered to the
fat red wire of the Alden connector and well insulated with several layers
of electrical tape or something similar.
- The thin blue wire from the power supply should be soldered to the
fat black wire of the Alden connector ONLY.
CAUTION: For the Voltex brick specifically, DO NOT connect the negatives
of the DC adapters together or cheat and use a single higher current
power supply for both HeNe and heater power - that will result in smoke or
damage to the adapter(s). But it should be possible to tie the positive of
the Voltex brick to system negative and Earth ground. Confirm that the red
and black power wires of the Voltex brick are not shorted before powering.
Please contact me if this isn't crystal clear.
Make sure all connections are secure before applying power. Solder is
recommended as noted above, but ues of "wire nuts" is acceptable, in which
case the one for the high voltage should be further insulated with
electrical tape.
The tube should light within a few seconds of applying DC power to the
brick. The output power from the laser tube may start relatively low (llke
2.0 mW) and climb to between 2.5 mW and 3 mW or more. (This modest
increase probably won't even be obvious using only Mark I eyeballs.)
The beam should be on continuously with no pulsing, flickering, or sputtering.
If not, double check connections and DC power. If it continues to misbehave,
contact me. Once the operation of the tube has been confirmed, power down and
discharge the power supply and tube capacitance by shorting between
the two ends of a tube with a pair of clip leads, touching the negative
FIRST to avoid a shocking experience.
Some lasers are slow to start taking up to a minute or more. This can generally
be speeded up by shining a light in to the tube from the output-end.
Install the heater:
(This step is not required for the REO tube in a laser head cylinder as the
heater is already there, with a pair of white wires sticking out for the
connections.)
The thin film heater may already be attached to the tube. If not, wrap
it tightly around the tube centered between the ends but so there is at least
1/2 inch between it and the anode-end of the tube. Orient it such that its
wires come out at the cathode-end. If there is no adhesive,
secure it with Kapton tape but don't smoother it. Just a single layer.
Plastic packing tape (e.g., clear or brown) will work in a pinch.
Determining the polarization axes of the tube:
The lasing characterstics (output power, beam diameter, and divergence)
are similar for all of these model tubes. However, the REO tube is the
only one to actually force the polarization axes to have a specific
orientation relative to the physical structure of the tube. This involves
using a pair of HR mirrors to provide a small amount of polarization
preference, and an axial magnet field spoil that just enough so that
the modes behave properly. That accounts for the funky and unique
appearance of the REO tube. So, there is no real need to "determine"
the polarization axes for the REO tube but the exercise below is still
worthwhile to familarize yourself with polarization behavior of any of
the tubes. The other manufacturers depend on the
natural birefringence of mirror coatings to create the polarization
preference so the step is essential, but the mirrors are not installed
with any particular orientation.
Note that HeNe laser tubes actually produces 2 beams: A strong one
through the "Output Coupler" mirror (OC) called the
"main beam" and a much weaker one from the "High Reflector" mirror (HR)
called the "waste beam" (though in some cases it is painted over).
For all but the REO tube, the beam sampler
for stabilization can be constructed behind the
rear of the tube and use the waste beam since there is adequate beam
power present there. But take care since the high voltage will be
present near there as well.
Using the waste beam is NOT an option for the REO laser head since it is
blocked by the rear end-cap with the Alden cable.
The waste beam from the REO
tube is probably too weak to be usable anyhow, so the feedback must
be done by sampling the output beam.
To use the main beam, a portion must be split off using a
glass plate. If a variable attenuator is included, it is intended for this
purpose. Use the end with the least attenuation and place it at an small angle
to the beam line 20 degrees (not at 45 degrees). This is to minimize
polarization effects
in the reflection if it is anywhere close to the Brewster angle.
The only disadvantage if this scheme is that there
will be a small loss in usable beam power.
But in principle, using a portion of the main beam for feedback will
have slightly better stability, especially for intensity stabilization
with some tubes. This is because the rear mirror is not AR-coated and may not
have "wedge", which results in interference inside the mirror and a varying
amount of transmission as its thickness changes due to thermal expansion.
Some of these tubes have a layer of optical glue with a mottled appearance
applied to the rear mirror in an attempt to remedy this.
If in doubt, contact me for more details. And again, if you use
output beam sampling, this is mostly a non-issue.
For this purpose, a variable attenuator plate has been included in the kit
to use as a beam sampler. It should be oriented at as near-normal an angle
as is convenient to minimize the effects on polarization. E.g., if near the
Brewster angle, one polarization orientation will be highly reflected
while the other almost not at all. And using the end with the highest
transmission should be satisfactory to provide adequate sampled beam power.
As noted, there is no need to determine the polarization axes of a REO tube
because they are fixed by the construction, are oriented lined up with the
anode pin, and orthogonal to it. For the REO head, one should be lined
up with the arrow on the head. But even if you are using a REO
laser, you can still do the following exercise as a learning experience.
And labels are not always accurate. With the tube powered, place a continuous
reading laser power meter
in the output beam. This can be one of the photodiodes connected to a
VOM or DMM set to its µA range, or wired up for input to the P-Mode
or S-Mode signals of µSLC1 Atmega board with the µSLC1 GUI
running in the "Hangout" state. They should vary by anywhere from 30
percent to 100 percent, and will be opposte phase. Use a piece of linear
polarizer sheet or the PBS cube to identify
the orientations of the polarized modes of the tube.
The angles of the polarization axes will be
where the variation in power due to mode sweep is maximized, though
for a 9 or 10 inch tube the power won't go close to zero power.
There will be two such angles orthogonal to each-other.
Label the axes and adjust the orientation of the tube so they are
vertical and horizontal.
The power varies because the longitudinal modes of the laser cavity are
moving through the neon gain curve as the tube expands due to heating.
The roughly bell-shaped gain curve results in gain variation depending on
its height. If a few V is applied to the heater (between the two heater
wires), the rate of the mode sweep will greatly increase since the tube
is expanding faster making it easier to determine the axes.
As the tube/heater combination approaches thermal equilibrium where the
power input from the electrical discharge in the bore of the laser tube
and heater power are balanced by heat loss to the environment, the
mode sweep will slow down and eventually stop. If power is removed from
the heater at that time, the discharge heat alone will no longer be
able to sustain the same temperature, the tube will start to cool,
and the mode sweep will reverse.
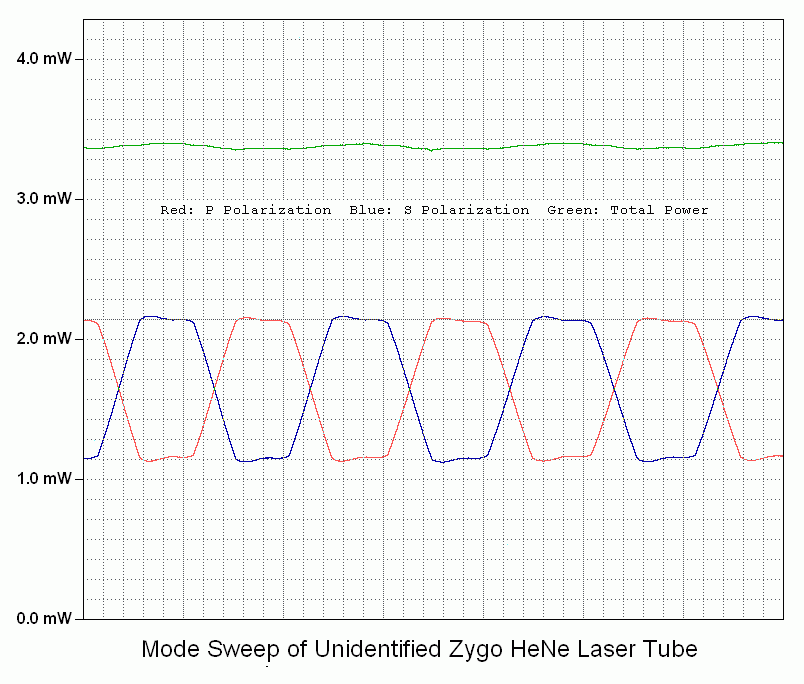
This shows the mode sweep from a cold start of a tube similar to one type
that may be included in the kit. However, the actual shape of the S and P-mode
plots may be quite different for your actual tube.
If both the P-Mode and S-Mode photodiodes are
wired to the Atmega with the sensitivity adjusted so the peaks are
near 5 V, then the µSLC1 plot will be very similar in appearance.
If the heater is also connected, with µSLC1 in the "Hangout" state,
it can be turned on or off or set anywhere in between to change the
speed and direction of mode sweep. Or the heater can be powered with
a few V from a separate DC power supply or battery for these tests.
And while it would be possible to manually stabilize the modes by visually
monitoring them, the Atmega can do it much more precisely and won't get
tired and bored doing it all day long. ;-)
For thermal stabilization to be effective, what is desired is where a
modest amount of heater power is needed to be at thermal equilibrium.
Perhaps 20-30 percent of the power in the bore discharge with the driver
running at 50 percent power. For the 9-10
inch tube running at at 5 mA, 1600-1900 V, the bore discharge power is
under 9.5 W. So, 3 W of heater power should be sufficient to allow the
laser to stabilize with reasonable immunity to ambient temperature changes.
A purist might object (due to noise considerations), but this means that a
single power supply can be used for both the HeNe laser power and
the stabilizer, though this kit probably has two power supplies.
However, the 12 VDC power supply
may be too high if the heater resistance is under 10 ohms. For that case,
a compact 3A DC-DC step-down converter is included so the 12 VDC can be
dropped to a more optimum value. Setting the DC-DC converter for the
voltages below based on the heater resistance should be satisfactory:
      Heater Ohms    ~Voltage
  -------------------------------
           5            5.5
           8             7
Using a slightly higher voltage to improve the response time would be
acceptable but don't let it exceed 1.5 A.
The DC-DC converter is labeled with IN and OUT, + and -. The minus
should be common. (There will be no DC-DC converter for the REO
tube or head since the heater resistance is around 12 ohms
and 12 V direct is fine.)
Checking the beam sampler:
Either the weak "waste" beam from the back of the tube (if usable),
or a sampled
portion of the main beam may be used for feedback. However, depending
on the specific tube, it may take a bit more work to use the waste
beam. This is because they may not have "wedge" to eliminate the etalon
effects of the parallel surfaces of the HR (rear) mirror glass.
If there is a black opaque or clear mottled coating on the rear
mirror, there is probably no wedge. If there is nothing
or an opaque sticker with
a center hole, project the beam onto a white
card a couple feet away. If there is only one spot, there is no wedge.
But if there is at least one weaker beam off to the side, then wedge is
present and the waste beam can be used without further fuss.
Cut a piece of a sticky black label or other similar opaque material to
be about the same size as the mirror glass at the rear of the tube (order
of 6-8 mm or 1/4 inch). (Use a Magic Marker to turn a white label black
if needed so it's more or less opaque.) Use a tiny drill bit or similar
tool to make a clean 0.7 to 1 mm hole in it. With the laser powered, stick
this aperture over the rear end mirror so the weak waste beam
passes through it. (Don't worry about blocking the ghost beam.)
The purpose of the aperture is to block "bore light"
from affecting the photodiodes in the beam sampler. (The tube
provided may already have something like this in place
but you might want to improve upon it.)
Place the PBS on a support behind the tube so the waste beam passes
through its center and a deflected beam shoots off to one side.
If using the main beam, install the beam sampler plate at around
45 degrees. Eventually it will need to be mounted securely, but
for now, anything that works will suffice.
Now use a white card as a screen to observe the beam coming straight
through the PBS and the beam being reflected to the side. They will
vary in intensity along with the polarized modes coming out the front.
One of the photodiodes will be placed behind the PBS cube and the other
on the side. Monitor the current from one of the photodiodes or use the
µSLC1 to display the power. Adjust the orientation so that the
variation in amplit1ude is maximized. Doing this by eye may not be
reliable since for these higher power tubes, the variation won't
large enough for the optimum orientation to be determined reliably.
Testing the photodiodes response to laser light:
To test the response of the silicon PhotoDiodes (PDs) included in these kits,
a simple test circuit using a few resistors, a 5 VDC power supply
(or USB charger cube), and DMM can be constructed before connecting
the Arduino board. To determine the polarity of the PDs, use the DMM
on the "Diode Test" range across the pins: The voltage drop will be between
0.5 and 0.6 V if the red probe is connected to the anode. The polarity is
usually opposite for a VOM but they are only found in museums these days. ;-)
Wire up a test circuit as follows:
                                  V1
                                   o
             R Protect       PD1   |  R Load 1
   +5 VDC o----/\/\----+-----|<|---+---/\/\-----+
                       |                        |
                       |          V2            |
                       |           o            |
                       |     PD2   |  R Load 2  |
                       +-----|<|---o---/\/\-----+
                                                |
                                                |
  GND/RET o-------------------------------------+
- +5 VDC through a 200 ohm to 1K ohm resistor to the cathodes of both
photodiodes. This resistor simply provides protection to limit current
through the PDs should they be backwards or something unfortunate occurs.
But if too large, they will limit the response to light so don't go
above 1K ohms.
- One end each of a pair of load resistors to the anodes of both PDs.
Their value will depend on the laser power. The response of a silicon PD
is typically between 0.3 and 0.4 mA/mW. So select load resistors (or
trim-pots) of appropriate value so that there will be a detectable response:
- Main beam of 0.5-5 mW: 5K ohms.
- Sampled main beam of 0.1-0.5 mW: 50K ohms.
- Waste beam of 0.01 to 0.05 mW: 500K ohms.
The trim-pots in the µSLC1 kit are 1M so they will be satisfactory
for all options.
CAUTION: If the PDs are at the anode-end of the tube, take care to keep the
setup at a safe distance as they won't like being zapped by the high voltage.
Nor will you. :( :)
- The other end of the load resistors goes to the GND/RET of the
5 VDC supply.
- Monitor the voltage across each load resistor with the DMM on the
DCV range (0 to 5 V typical). Adjust the value of the load resistors
if needed.
- With the beam blocked to each PD, the voltage across its load resistor
should be close to 0 V.
- With the beam incident on the PD, there should be a detectable response
whose value will depend on the actual laser power and load resistor. With
a 5 VDC supply, the available range is from 0 to slightly below 5 V.
- If the PBS cube (or a linear polarizer) in inserted in the beam AND
the tube is rotated so the polarization axes line up with the polarizer, the
voltage will vary during mode sweep.
Closing the loop:
To stabilize the laser so that the position of the modes is under automatic
control requires some electronics to first run the tube in "Preheat Mode"
so that the temperature of the tube/heater combination levels off somewhat
above ambient, and then to "Lock Mode" to allow the output of one or both
photodiodes to take control. This is the purpose of the Arduino
compatible µSLC1 controller. Complete installation and assembly
instructions may be found at
Micro Stablized Laser
Controller 1 (µSLC1) Installation and Operation Manual.
The output of the laser when locked will be the two orthogonal
linearly polarized modes whose the amplitudes can be adjusted over a
fairly wide range via the trim-pots and µSLC1 firmware settings,
while retaining mode purity. To use this
rig as a single frequency laser for something like holography or
homodyne interferometry, one of the modes should be blocked with
a Linear Polarizer (LP) such as another PBS cube (for best efficiency
but not included) or a sheet polarizer (included).
Enhancements/experiments:
- Determine if the laser tube HR mirror is ground with no wedge (where
applicable).
Project the waste beam onto a white surface a few feet away from the tube.
If there IS wedge, at least one weaker ghost spot will be present in addition
to the waste beam spot.
Lack of wedge means that there will be reflections from its outer surface
back into the laser tube. But more significantly,
there will be etalon effects between the outer uncoated glass
surface and the mirror which
will result in a slight ripple in output power (in addition to mode sweep)
as the tube warms up and may reduce the overall stability. The intensity
of the waste beam will vary in lock-step, but much more dramatically.
And the two polarizations may not change by the same amount, so if using
the waste beam for feedback, it may not correlate with what's coming
out the front. A simple fix is to
add a glass plate at a small angle (a few degrees) using clear 5
minute Epoxy, UV cure optical adhesive, or clear RTV Silicone. Even
just a drop of the adhesive without the glass plate will probably
be effective. Index
matching adhesive is best but almost any type will be close enough to
greatly reduce the retroreflections. DON'T use Crazy glue (cyanacrylic)
or hard Epoxy!!! as these may damage the optics and/or stick you finger(s)
to them. ;(
- Deliberately introduce retroreflections and determine how they
effect both the gross locking behavior and short and long term stability.
- Some outer covering over the heater may improve stability. The tube
will stabilize with just the heater as it is, but by providing just a bit
of thermal insulation, the effects of the environment can be reduced
substantially. Adding a temperature controlled enclosure could help
also.
- Look into how the performance is affected by the sophistication of
the controller, and with respect to 1 mode or 2 mode feedback schems.
Feel free to experiment with modifications to the firmware. The
"factory" defaults can always be restored. ;-)
Sam's Laser FAQ, Copyright © 1994-2024,
Samuel M. Goldwasser, All Rights Reserved.
I may be contacted via the
Sci.Electronics.Repair FAQ
Email Links Page.