For contact info, please see the Sci.Electronics.Repair FAQ Email Links Page.
Copyright © 1994-2025
Reproduction of this document in whole or in part is permitted if both of the
following conditions are satisfied:
1.This notice is included in its entirety at the beginning.
All Rights Reserved
2.There is no charge except to cover the costs of copying.
DISCLAIMER
Although working on small appliances is generally less risky than dealing
with equipment like microwave ovens, TVs, and computer monitors, those that
plug into the wall can still produce a very lethal electric shock as well
cause a fire from incorrect or careless repairs both during servicing or
later on. It is essential that you read, understand, and follow all safety
guidelines contained in this document and in the document:
Safety Guidelines for High Voltage and/or Line Powered
Equipment.
Improper repair of battery operated devices can also result in bad consequences for you, the device, and any equipment attached to it.
We will not be responsible for damage to equipment, your ego, county wide power outages, spontaneously generated mini (or larger) black holes, planetary disruptions, or personal injury or worse that may result from the use of this material.
However, if you can do the repair yourself, the equation changes dramatically as your parts costs will be 1/2 to 1/4 of what a professional will charge and of course your time is free. The educational aspects may also be appealing. You will learn a lot in the process. Many problems can be solved quickly and inexpensively. Fixing an old vacuum cleaner to keep in the rec room may just make sense after all.
This document provides maintenance and repair information for a large number of small household appliances and portable power tools. The repair of consumer electronic equipment is dealt with by other documents in the "Notes on the Troubleshooting and Repair of..." series. Suggestions for additions (and, of course, correction) are always welcome.
You will be able to diagnose problems and in most cases, correct them as well. Most problems with household appliances are either mechanical (e.g., dirt, lack of or gummed up lubrication, deteriorated rubber parts, broken doohickies) or obvious electrical (e.g., broken or corroded connections, short circuits, faulty heating elements) in nature. With minor exceptions, specific manufacturers and models will not be covered as there are so many variations that such a treatment would require a huge and very detailed text. Rather, the most common problems will be addressed and enough basic principles of operation will be provided to enable you to narrow the problem down and likely determine a course of action for repair. In many cases, you will be able to do what is required for a fraction of the cost that would be charged by a repair center - or - be able to revive something that would otherwise have gone into the dumpster - or remained in that closet until you moved out of your house (or longer)!
Since so many appliances are variations on a theme - heating, blowing, sucking, rotating, etc. - it is likely that even if your exact device does not have a section here, a very similar one does. Furthermore, with your understanding of the basic principles of operation, you should be able to identify what is common and utilize info in other sections to complete a repair.
Should you still not be able to find a solution, you will have learned a great deal and be able to ask appropriate questions and supply relevant information if you decide to post to sci.electronics.repair (recommended), alt.home.repair, or misc.consumers.house. It will also be easier to do further research using a repair textbook. In any case, you will have the satisfaction of knowing you did as much as you could before finally giving up or (if it is worthwhile cost-wise) taking it in for professional repair. With your newly gathered knowledge, you will have the upper hand and will not easily be snowed by a dishonest or incompetent technician.
Thus, in the end, these device increase costs if you need to use more or larger bulbs to make up for the reduced light output. The major life cycle expense for incandescent lighting is not the cost of the bulbs but the cost of the electricity - by a factor of 25 to 50! For example, it costs about $10 in electricity to run a 100 W bulb costing 25 cents over the course of its 1000 hour life. However, these devices (or the use of 130 V bulbs) may make sense for use in hard-to-reach locations. Better yet, consider compact or normal fluorescent bulbs or fixtures which last much longer and are much more efficient than incandescents (including halogen).
The Green Plug is supposed to reduce reactive power (V and I out of phase due to inductive or capacitive loads) but residential users don't pay for reactive power anyway, only the real power they use. In addition, this is a minor concern for modern appliances.
The demo you see in the store that shows a utility meter slowing down substantially when the Green Plug is put in the circuit is bogus for two reasons: (1) The motor being powered is totally unloaded resulting in a high ratio of reactive to real power. Under normal use with a motor driving a load, the reduction in electricity use would be negligible. (2) The meter is wired to include reactive power in its measurement which, as noted above, is not the case with residential customers.
Mention the word 'magnetism' and somehow, people will pay $300 for $2 worth of magnets that do nothing - and then be utterly convinced of their effectiveness. They forget that perhaps the instruction manual suggested changes in their water use habits - which was the true reason for any improvement. Perhaps the magnets can be used to stick papers on the refrigerator once you discover they don't do anything for the water.
BTW, the same goes for magnetic wine flavor enhancers. :-)
I will be happy to revise these comments if someone can provide the results of evaluations of any of these devices conducted by a recognized independent testing laboratory. However, I won't hold my breath waiting.
The easiest way to explain basic electrical theory without serious math is with a hydraulic analogy. This is of the plumbing system in your house:
Water is supplied by a pipe in the street from the municipal water company or by a ground water pump. The water has a certain pressure trying to push it through your pipes. With electric circuits, voltage is the analog to pressure. Current is analogous to flow rate. Resistance is analogous the difficulty in overcoming narrow or obstructed pipes or partially open valves.
Intuitively, then, the higher the voltage (pressure), the higher the current (flow rate). Increase the resistance (partially close a valve or use a narrower pipe) and for a fixed voltage (constant pressure), the current (flow rate) will decrease.
With electricity, this relationship is what is known as linear: double the voltage and all other factors remaining unchanged, the current will double as well. Increase it by a factor of 3 and the current will triple. Halve the resistance and for a constant voltage source, the current will double. (For you who are hydraulic engineers, this is not quite true with plumbing as turbulent flow sets in, but this is just an analogy, so bear with me.)
Note: for the following 4 items whether the source is Direct Current (DC) such as a battery or Alternating Current (AC) from a wall outlet does not matter. The differences between DC and AC will be explained later.
The simplest electrical circuit will consist of several electrical components in series - the current must flow through all of them to flow through any of them. Think of a string of Christmas lights - if one burns out, they all go out because the electricity cannot pass through the broken filament in the burned out bulb.
Note the term 'circuit'. A circuit is a complete loop. In order for electricity to flow, a complete circuit is needed.
                          Switch (3)
               _____________/ ______________
              |                             |
              | (1)                         | (4)
      +-------+--------+                +---+----+
      |  Power Source  |                |  Load  |
      +-------+--------+                +---+----+
              |            Wiring (2)       |
              |_____________________________|
With household water we usually don't think of the load. However, things like lawn sprinklers, dishwasher rotating arms, pool sweepers, and the like do convert water flow to mechanical work in the home (some homes, at least!). Hydraulic motors are used to aircraft and spacecraft, large industrial robots, and all sorts of other applications.
Here are 3 of the simplest appliances:
Now we can add one type of simple control device:
With the addition of a thermostat, many more appliances can be constructed including (this is a small subset):
Electric heaters and cooking appliances usually have adjustable thermostats.
Hair dryers may simply have several settings which adjust heater power and fan speed (we will get into how later). The thermostat may be fixed and to protect against excessive temperatures only.
That's it! You now understand the basic operating principle of nearly all small appliances. Most are simply variations (though some may be quite complex) on these basic themes. Everything else is just details.
For example, a blender with 38 speeds just has a set of buttons (switches) to select various combinations of motor windings and other parts to give you complete control (as if you need 38 speeds!). Toasters have a timer or thermostat activate a solenoid (electromagnet) to pop your bread at (hopefully) the right time.
A significant amount of the power the electric company produces is lost to heating of the transmission lines due to resistance and heating.
However, in an electric heater, this is put to good use. In a flashlight or table lamp, the resistance inside the light bulb gets so hot that it provides a useful amount of light.
A bad connection or overloaded extension cord, on the other hand, may become excessively hot and start a fire.
The following is more advanced - save for later if you like.
Capacitors are not that common in small appliances but may be used with some types of motors and in RFI - Radio Frequency Interference - filters as capacitors can buffer - bypass - interference to ground. The energy to power an electronic flash unit is stored in a capacitor, for example. Because they act like reservoirs - buffers - capacitors are found in the power supplies of most electronic equipment to smooth out the various DC voltages required for each device.
The windings of motors and transformers have significant inductance but the use of additional inductance devices is rare in home appliances except for RFI - since inductance tends to prevent current from changing, it can also be used to prevent interference from getting in or out.
The simplest of these are:
                    V = I * R (1)
                    I = V / R (2)
                    R = V / I (3)
Where:
                    P = V * I      (4)
                    P = V * V / R  (5)
                    P = I * I * R  (6)
For example:
A direct current source is at a constant voltage. Displaying the voltage versus time plot for such a source would show a flat line at a constant level. Some examples:
The nominal voltage from an AC outlet in the U.S. is around 115 VAC. This is the RMS (Root Mean Square) value, not the peak (0 to maximum). In simple terms, the RMS value of an AC voltage and the same value of a DC voltage will result in identical heating (power) to a resistive load. For example, 115 VAC RMS will result in the same heat output of a broiler as 115 VDC.
Direct current is used for many small motor driven appliances particularly when battery power is an option since changing DC into AC requires some additional circuitry. All electronic equipment require various DC voltages for their operation. Even when plugged into an AC outlet, the first thing that is done internally (or in the AC adapter in many cases) is to convert the AC to various DC voltages.
The beauty of AC is that a very simple device - a transformer - can convert one voltage into another. This is essential to long distance power distribution where a high voltage and low current is desirable to minimize power loss (since it depends on the current). You can see transformers atop the power poles in your neighborhood reducing the 2,000 VAC or so from a local distribution transformer to your 115 VAC (actually, 115-0-115 were the total will be used by large appliances like electric ranges and clothes dryers). That 2,000 VAC was stepped down by a larger transformer from around 12,000 VAC provided by the local substation. This, in turn, was stepped down from the 230,000 VAC or more used for long distance electricity transmission. Some long distance lines are over 1,000,000 volts (MV).
When converting between one voltage and another with a transformer, the amount of current (amps) changes in the inverse ratio. So, using 230 kV for long distance power transmission results in far fewer heating losses as the current flow is reduced by a factor of 2,000 over what it would be if the voltage was only 115 V, for example. Recall that power loss from P=I*I*R is proportional to the square of the current and thus in this example is reduced by a factor of 4,000,000!
Many small appliances include power transformers to reduce the 115 VAC to various lower voltages used by motors or or electrical components. Common AC adapters - often simply called transformers or wall warts - include a small transformer as well. Where their output is AC, this is the only internal component other than a fuse or thermal fuse for protection. Where their output is DC, additional components convert the low voltage AC from the transformer to DC and a capacitor smoothes it out.
The loads, say resistance heating elements, are now drawn with the schematic symbol (as best as can be done using ASCII) for a resistor.
                          Switch
               _____________/ __________________
              |                 I -->           |
              |                        ^    ^   |
              |                        |    |   / R1
              |                        |   V1   \ Load 1
      +-------+--------+               |    |   /
      |  Power Source  |                    v__ |
      +-------+--------+              V(S)  ^   |
              |                             |   / R2
              |                        |   V2   \ Load 2
              |                        |    |   /
              |                        v    v   |
              |_________________________________|
The total resistance, R(T), of the resistors in this series circuit is:
R(T) = R1 + R2 (7)
The voltage across each of the resistors would be given by:
                    V1 = V(S) * R1 / (R1 + R2)    (8)
                    V2 = V(S) * R2 / (R1 + R2)    (9)
The current is given by:
I = V(S) / (R1 + R2) (10)
However, another basic configuration, is also possible. With a parallel
circuit, components are connected not one after the other but next to
one another as shown below:
                          Switch
               _____________/ ___________________________
              |                      I -->  |            |
              |                 ^           |            |
      +-------+--------+        |           / R1         / R2
      |  Power Source  |       V(S)         \ Load 1     \ Load 2
      +-------+--------+        |           /            /
              |                 v           |v I(1)      |v I(2)
              |_____________________________|____________|
Now, the voltages across each of the loads is necessarily equal but the
individual currents divide according to the relative resistances of each
load.
The total resistance, R(T), of the parallel resistors in this circuit is:
R(T) = (R1 * R2) / (R1 + R2) (11)
The currents through each of the loads would be given by:
                    I1 = V(S)/R1                  (12)
                    I2 = V(S)/R2                  (13)
The total current is given by:
I = I1 + I2 (14)
Many variations on these basic arrangements are possible but nearly all can
be reduced systematically to a combination of series or parallel circuits.
Check out Sam's Neat, Nifty, and Handy Bookmarks in the "Education and Tutorials" area for links to introductory material on electronics and other related fields.
However, AC line power can be lethal. Proper safety procedures must be followed whenever working on live equipment (as well as devices which may have high energy storage capacitors like TVs, monitors, and microwave ovens). AC line power due to its potentially very high current is actually considerably more dangerous than the 30 kV found in a large screen color TV!
These guidelines are to protect you from potentially deadly electrical shock hazards as well as the equipment from accidental damage.
Note that the danger to you is not only in your body providing a conducting path, particularly through your heart. Any involuntary muscle contractions caused by a shock, while perhaps harmless in themselves, may cause collateral damage - there are many sharp edges inside this type of equipment as well as other electrically live parts you may contact accidentally.
You may have heard warnings about dangers from unplugged appliances. Perhaps, these were passed down from your great great grandparents or from local bar room conversation.
Except for devices with large high voltage capacitors connected to the line or elsewhere, there is nothing inside an appliance to store a painful or dangerous charge. Even these situations are only present in microwave ovens, fluorescent lamps and fixtures with electronic ballasts, universal power packs for camcorders or portable computers, or appliances with large motors. Other than these, once an appliance is unplugged all parts are safe to touch - electrically that is. There may still be elements or metal brackets that are burning hot as metal will tend to retain heat for quite a while in appliances like toasters or waffle irons. Just give them time to cool. There are often many sharp edges on sheetmetal as well. Take your time and look before you leap or grab anything.
Note that this list of dangerous appliances doesn't include CRT-type TVs, computer monitors, and other similar electronic equipment - which most certainly can store a dangerous charge on the CRT long after being unplugged - only because they aren't normally considered appliances. :)
The use of a GFCI (Ground Fault Circuit Interrupter) protected outlet is a good idea but will not protect you from shock from many points in a line connected TV or monitor, or the high voltage side of a microwave oven, for example. (Note however, that, a GFCI may nuisance trip at power-on or at other random times due to leakage paths (like your scope probe ground) or the highly capacitive or inductive input characteristics of line powered equipment.) A fuse or circuit breaker is too slow and insensitive to provide any protection for you or in many cases, your equipment. However, these devices may save your scope probe ground wire should you accidentally connect it to a live chassis.
BTW, electronic equipment should always be unplugged during lightning storms since it may be very susceptible to power surge and lightning damage. Don't forget the telephones and computer modems as well. This is not as much of a problem with small appliances that do not include electronic controllers as except for direct lightning strikes, the power switch will provide protection.
If you get stuck, sleep on it. Sometimes, just letting the problem bounce around in your head will lead to a different more successful approach or solution. Don't work when you are really tired - it is both dangerous and mostly non-productive (or possibly destructive - especially with AC line powered appliances).
Whenever working on precision equipment, make copious notes and diagrams. Yes, I know, a toaster may not exactly be precision equipment, but trust me. You will be eternally grateful when the time comes to reassemble the unit. Most connectors are keyed against incorrect insertion or interchange of cables, but not always. Apparently identical screws may be of differing lengths or have slightly different thread types. Little parts may fit in more than one place or orientation. Etc. Etc.
Pill bottles, film canisters, and plastic ice cube trays come in handy for sorting and storing screws and other small parts after disassembly.
Select a work area which is well lighted and where dropped parts can be located - not on a deep pile shag rug. Something like a large plastic tray with a slight lip may come in handy as it prevents small parts from rolling off of the work table. The best location will also be relatively dust free and allow you to suspend your troubleshooting to eat or sleep or think without having to pile everything into a cardboard box to eat dinner.
An electric drill or drill press with a set of small (1/16" to 1/4") high quality high speed drill bits is handy for some types of restoration where new holes need to be provided. A set of machine screw taps is also useful at times.
A medium power soldering iron and rosin core solder (never never use acid core solder or the stuff for sweating copper pipes on electrical or electronic repairs!) will be required if you need to make or replace any soldered connections. A soldering gun is desirable for any really beefy soldering. See the section: Soldering techniques.
A crimping tool and an assortment of solderless connectors often called 'lugs' will be needed to replace damaged or melted terminals in small appliances. See the section: Solderless connectors.
Old dead appliances can often be valuable sources of hardware and sometimes even components like switches and heating elements. While not advocating being a pack rat, this does have its advantages at times.
Use of the proper technique is critical to reliability and safety. A good solder connection is not just a bunch of wires and terminals with solder dribbled over them. When done correctly, the solder actually bonds to the surface of the metal (usually copper) parts.
CAUTION: You can easily turn a simple repair (e.g., bad solder connections) into an expensive mess if you use inappropriate soldering equipment and/or lack the soldering skills to go along with it. If in doubt, find someone else to do the soldering or at least practice, practice, practice, soldering and desoldering on a junk unit first!
Effective soldering is by no means difficult but some practice may be needed to perfect your technique.
The following guidelines will assure reliable solder joints:
See the document: Troubleshooting and Repair of Consumer Electronic Equipment for additional info on desoldering of electronic components.
One approach that works in some cases is to use the mating socket to stabilize the pins so they remain in position as you solder. The plastic will still melt - not as much if you use an adequately sized iron since the socket will act as a heat sink - but will not move.
An important consideration is using the proper soldering iron. In some cases, a larger iron is better - you get in and out more quickly without heating up everything in the neighborhood.
WireNuts allow multiple wires to be joined by stripping the ends and then 'screwing' an insulated thimble shaped plastic nut onto the grouped ends of the wires. A coiled spring (usually) inside tightly grips the bare wires and results in a mechanically and electrically secure joint. For appliance repair, the required WireNuts will almost always already be present since they can usually be reused. If you need to purchase any, they come in various sizes depending on the number and size of the wires that can be handled. It is best to twist the individual conductor strands of each wire together and then twist the wires together slightly before applying the WireNut.
Crimped connectors, called lugs, are very common in small appliances. One reason is that it is easier, faster, and more reliable, to make connections using these lugs with the proper crimping equipment than with solder.
A lug consists of a metal sleeve which gets crimped over one or more wires, an insulating sleeve (usually, not all lugs have these), and a terminal connection: ring, spade, or push-on are typical.
Lugs connect one or more wires to the fixed terminals found on switches, motors, thermostats, and so forth.
There are several varieties:
In the factory, the lugs are installed on the wires with fancy expensive equipment. For replacements, an inexpensive crimping tool and an assortment of lugs will suffice. The crimping tool looks like a pair of long pliers and usually combines a wire stripper and bolt cutter with the crimping function. It should cost about $6-10.
The crimping tool 'squashes' the metal sleeve around the stripped ends of the wires to be joined. A proper crimp will not come apart if an attempt is made to pull the wires free - the wires will break somewhere else first. It is gas-tight - corrosion (within reason) will not affect the connection.
Crimping guidelines:
A pen knife or Xacto knife can be used in a pinch but a wire stripper is really much much easier.
First, start with some analytical thinking. Many problems associated with household appliances do not require a schematic. Since the internal wiring of many appliances is so simple, you will be able to create your own by tracing the circuits in any case. However, for more complex appliances, a schematic may be useful as wires may run behind and under other parts and the operation of some custom switches may not obvious. The causes for the majority of problems will be self evident once you gain access to the interior - loose connections or broken wires, bad switches, open heating element, worn motor brushes, dry bearings. All you will need are some basic hand tools, a circuit and continuity tester, light oil and grease, and your powers of observation (and a little experience). Your built in senses and that stuff between your ears represents the most important test equipment you have.
The following will be highly desirable for all but the most obvious problems:
These are just a set of 3 neon bulbs+resistors across each pair of wires. If the correct bulbs light at full brightness - H-N, H-G - then the circuit is likely wired correctly. If the H-G light is dim or out or if both the H-G and G-N are dim, then you have no ground. If the N-G light is on and the H-G light is off, you have reversed H and N, etc.
What it won't catch: Reversed N and G (unlikely unless someone really screwed up) and marginal connections since the neon bulbs doesn't use much current. For this (particularly important for the G since it won't do any good if its resistance back to the service panel is too high) you need a real load like a 100 W light bulb. Or, build a tester consisting of 100 W light bulbs (instead of neon lamps) wired between each of the prongs.
It also won't distinguish between 110 VAC and 220 VAC circuits except that the neon bulbs will glow much brighter on 220 VAC but without a direct comparison, this could be missed.
For something that appears to test for everything but next week's weather:
(From: Bill Harnell (bharne@adss.on.ca).)
Get an ECOS 7105 tester! (ECOS Electronics Corporation, Oak Park, Illinois, 708-383-2505). Not cheap, however. It sold for $59.95 in 1985 when I purchased somewhere around 600 of them for use by our Customer Engineers for safety purposes!
It tests for:
Correct wiring, reversed polarity, open Ground, open Neutral, open Hot, Hot & Ground reversed, Hot on neutral, Hot unwired, other errors, over voltage (130 VAC+), under voltage (105 VAC-), Neutral to Ground short, Neutral to Ground reversal, Ground impedance test (2 Ohms or less ground impedance - in the equipment ground conductor).
Their less expensive 7106 tester performs almost all of the above tests.
FWIW, I have no interest in the ECOS Corporation of any kind. Am just a very happy customer.
A continuity tester can be constructed very easily from an Alkaline battery, light bulb or buzzer, some wire, and a set of test leads with probes. All of these parts are available at Radio Shack.
                     AA, C, or D cell    1.5 V flashlight bulb or buzzer
                            +|  -             +------------------+
   Test probe 1  o-----------| |--------------|  Bulb or buzzer  |-------+
                             |                +------------------+       |
                                                                         |
   Test probe 2  o-------------------------------------------------------+
CAUTION: Do not use this simple continuity tester on electronic equipment as there is a slight possibility that the current provided by the battery will be too high and cause damage. It is fine for most appliances.
Wire a 3 prong plug with a 15 K ohm 1 W resistor between H and G. Insulate and label it! This should trip a GFCI protected outlet as soon as it is plugged in since it will produce a fault current of about 7 mA.
Note that this device will only work if there is an actual Safety Ground connection to the outlet being tested. A GFCI retrofitted into a 2 wire installation without a Ground cannot be tested in this way since a GFCI does not create a Ground. However, jumpering this rig between the H and and a suitable earth ground (e.g., a cold water in an all copper plumbing system) should trip the GFCI. Therefore, first use an Outlet Tester (above) to confirm that there is a Safety Ground present.
The test button works because it passes an additional current through the sense coil between Hot and Neutral tapped off the wiring at the line side of the GFCI and therefore doesn't depend on having a Ground.
If you want to be fancier, you can build a combination outlet and GFCI tester. Wire up a neon indicator with current limiting resistor) across each pair of wires. Add a 15K ohm 1 W resistor in series with a pushbutton switch between H and G. If the H-G neon is lit (indicating a proper Ground connection), pressing the button should trip the GFCI.
Note: For testing of household electrical wiring, a VOM or DMM can indicate voltage between wires which is actually of no consequence. This is due to the very high input resistance/impedance of the instrument. The voltage would read zero with any sort of load. See the section: Phantom voltage measurements of electrical wiring.
Appliance manufacturers seem to take great pride in being very mysterious as to how to open their equipment. Not always, but this is too common to just be a coincidence.
A variety of techniques are used to secure the covers on consumer electronic equipment:
These are almost always of the Philips variety though more and more appliances are using Torx or security Torx type screws. Many of these are hybrid types - a slotted screwdriver may also work but the Philips or Torx is a whole lot more convenient.
A precision jeweler's screwdriver set including miniature Philips head drivers is a must for repair of miniature portable devices.
When reinstalling the screws, first turn them in a counter-clockwise direction with very slight pressure. You will feel them "click" as they fall into the already formed threads. Gently turn clockwise and see if they turn easily. If they do not, you haven't hit the previously formed threads - try again. Then just run them in as you normally would. You can always tell when you have them into the formed threads because they turn very easily for nearly the entire depth. Otherwise, you will create new threads which will quickly chew up the soft plastic. Note: these are often high pitch screws - one turn is more than one thread - and the threads are not all equal.
The most annoying (to be polite) situation is when after removing the 18 screws holding the case together (losing 3 of them entirely and mangling the heads on 2 others), removing three subassemblies, and two other circuit boards, you find that the adjustment you wanted was accessible through a hole in the case just by partially peeling back a rubber hand grip! (It has happened to me).
When reassembling the equipment make sure to route cables and other wiring such that they will not get pinched or snagged and possibly broken or have their insulation nicked or pierced and that they will not get caught in moving parts. This is particularly critical for AC line operated appliances and those with motors to minimize fire and shock hazard and future damage to the device itself. Replace any cable ties that were cut or removed during disassembly and add additional ones of your own if needed. Some electrical tape may sometimes come in handy to provide insulation insurance as well. As long as it does not get in the way, additional layers of tape will not hurt and can provide some added insurance against future problems. I often put a layer of electrical tape around connections joined with WireNuts(tm) as well just to be sure that they will not come off or that any exposed wire will not short to anything.
Appliances containing fans or blowers seem to be dust magnets - an incredible amount of disgusting fluffy stuff can build up in a short time - even with built-in filters.
Use a soft brush (like a new cheap paint brush) to remove as much dirt, dust, and crud, as possible without disturbing anything excessively. Some gentle blowing (but no high pressure air) may be helpful in dislodged hard to get at dirt - but wear a dust mask.
Don't use compressed air on intricate mechanisms, however, as it might dislodge dirt and dust which may then settle on lubricated parts and contaminating them. High pressure air could move oil or grease from where it is to where it should not be. If you are talking about a shop air line, the pressure may be much much too high and there may be contaminants as well.
A Q-tip (cotton swab) moistened with politically correct alcohol can be used to remove dust and dirt from various hard to get at surfaces.
NEVER, ever, use WD40! WD40 is not a good lubricant despite the claims on the label. Legend has it that the WD stands for Water Displacer - which is one of the functions of WD40 when used to coat tools for rust prevention. WD40 is much too thin to do any good as a general lubricant and will quickly collect dirt and dry up. It is also quite flammable and a pretty good solvent - there is no telling what will be affected by this.
A light machine oil like electric motor or sewing machine oil should be used for gear or wheel shafts. A plastic safe grease like silicone grease or Molylube is suitable for gears, cams, or mechanical (piano key) type mode selectors. Never use oil or grease on electrical contacts.
One should also NOT use a detergent oil. This includes most automotive engine oils which also have multiple additives which are not needed and are undesirable for non-internal combustion engine applications.
3-In-One(tm) isn't too bad if that is all you have on hand and the future of the universe depends on your fan running smoothly. However, for things that don't get a lot of use, it may gum up over time. I don't know whether it actually decomposes or just the lighter fractions (of the 3) evaporate.
Unless the unit was not properly lubricated at the factory (which is quite possible), don't add any unless your inspection reveals the specific need. Sometimes you will find a dry bearing, motor, lever, or gear shaft. If possible, disassemble and clean out the old lubricant before adding fresh oil or grease.
Note that in most cases, oil is for plain bearings (not ball or roller) and pivots while grease is used on sliding parts and gear teeth.
In general, do not lubricate anything unless you know there is a need. Never 'shotgun' a problem by lubricating everything in sight! You might as well literally use a shotgun on the equipment!
Testing: If the problem is intermittent, (or even if it is not), plug the appliance in and turn it on. Then try bending or pushing the wire toward the plug or appliance connector end to see if you can make the internal conductors touch at least momentarily. Ii the cordset is removable, test between ends with a continuity checker or multimeter on the low ohms scale. If it is not detachable, open the appliance to perform this test.
Testing: In many cases, a visual inspection with some careful flexing and prodding will reveal the location of the bad connection. If it is an intermittent, this may need to be done with a well insulated stick while the appliance is on and running (or attempting to run). When all else fails, the use of a continuity checker or multimeter on the low ohms scale can identify broken connections which are not obviously wires visibly broken in two. For testing heating elements, use the multimeter as a continuity checker may not be sensitive enough since the element normally has some resistance.
A short circuit may develop with no operational problems - but the case of the appliance will be electrically 'hot'. This is a dangerous situation. Large appliances with 3 wire plugs - plugged into a properly grounded 3 wire circuit - would then blow a fuse or trip a circuit breaker. However, small appliances like toaster, broilers, irons, etc., have two wire plugs and will just set there with a live cabinet.
Testing: Visually inspect for bare wires or wires with frayed or worn insulation touching metal parts, terminals they should not be connected to, or other wires. Use a multimeter on the high ohms scale to check between both prongs of the AC plug and any exposed metal parts. Try all positions of any power or selector switches. Any resistance measurement less than 100K ohms or so is cause for concern - and further checking. Also test between internal terminals and wires that should not be connected together.
Too many people like to blame everything from blown light bulbs to strange noises on short circuits. A 'slight', slow, or marginal short circuit is extremely rare. Most short circuits in electrical wiring between live and neutral or ground (as opposed to inside appliances where other paths are possible) will blow a fuse or trip a breaker. Bad connections (grounds, neutral, live), on the other hand, are much much more common.
Testing: Where there is a changed feel to the switch or thermostat with an associated operational problem, there is little doubt that the part is bad and must be replaced. Where this is not the case, label the connections to the switch or thermostat and then remove the wires. Use the continuity checker or ohmmeter across each set of contacts. They should be 0 ohms or open depending on the position of the switch or knob and nothing in between. In most cases, you should be able to obtain both readings. The exception is with respect to thermostats where room temperature is off one end of their range. Inability to make the contacts open or close (except as noted above) or erratic intermediate resistances which are affected by tapping or jiggling are a sure sign of a bad set of contacts.
Testing: If the appliance does not run but there is a hum (AC line operated appliances) or runs sluggishly or with less power than you recall when new, lubrication problems are likely. With the appliance unplugged, check for free rotation of the motor(s). In general, the shaft sticking out of the motor itself should turn freely with very little resistance. If it is difficult to turn, the motor bearings themselves may need attention or the mechanism attached to the motor may be filled with crud. In most cases, a thorough cleaning to remove all the old dried up and contaminated oil or grease followed by relubing with similar oil or grease as appropriate will return the appliance to good health. Don't skimp on the disassembly - total cleaning will be best. Even the motor should be carefully removed and broken down to its component parts - end plates, rotor, stator, brushes (if any) in order to properly clean and lubricate its bearings. See the appropriate section of the chapter: Motors 101 for the motor type in your appliance.
Testing: Except for the case of a vacuum cleaner where the belt is readily accessible, open the appliance (unplugged!). A good rubber belt will be perfectly elastic and will return to its relaxed length instantly when stretched by 25 percent and let go. It will not be cracked, shiny, hard, or brittle. A V-type belt should be dry (no oil coating), undamaged (not cracked, brittle, or frayed), and tight (it should deflect 1/4" to 1/2" when pressed firmly halfway between the pulleys).
Sometimes all that is needed is a thorough cleaning with soap and water to remove accumulated oil or grease. However, replacement will be required for most of these symptoms. Belts are readily available and an exact match is rarely essential.
Testing: In many cases, the problem will be obvious. Where it is not, some careful detective work - putting the various mechanisms through their paces - should reveal what is not functioning. Although replacement parts may be available, you can be sure that their cost will be excessive and improvisation may ultimately be the best approach to repair. See the section: Fil's tips on improvised parts repair.
The result may be any of the items listed in (1) to (7) above. Once the actual contamination has been removed and the area cleaned thoroughly, inspect for damage and repair as needed. If the appliance failed while powered, you may also have damage to wiring or electronic components due to any short circuits that were created by the intruders' activities.
The following types of parts are found in line powered appliances:
CAUTION: Some cordsets are more than what meets the eye. See the section: When a cordset is more than a cord and plug.
Most plug-in appliances in the U.S. will have one of 3 types of line cord/plug combinations:
Thus, if you are replacing a plug and don't know (or didn't label) how the old one was hooked up, the narrow prong should go to the fuse, switch, thermostat or other control, center of the socket, etc. Since you may have trouble finding non-polarized plugs these days, this applies to older appliances as well and there is really no problem in replacing a non-polarized plug with a polarized one on an appliance.
Light duty cordsets are acceptable for most appliances without high power heating elements or heavy duty electric motors. These include table lamps, TVs, VCRs, stereo components, computers, dot matrix and inkjet printers, thermal fax machines, monitors, fans, can openers, etc. Electric blankets, heating pads, electric brooms, and food mixers are also low power and light duty cordsets are acceptable. The internal wires used is #18 AWG which is the minimum acceptable wire size (highest AWG number) for any AC line powered device.
Medium or heavy duty cordsets are REQUIRED for heating appliances like electric heaters (both radiant and convection), toasters, broilers, steam and dry irons, coffee makers and electric kettles, microwave and convection ovens, laser printers, photocopiers, Xerographic based fax machines, canister and upright vacuum cleaners and shop vacs, floor polishers, many portable and most stationary power tools. The internal wires used will be #16 AWG (medium duty) or #14 AWG (heavy duty).
For replacement, always check the nameplate amps or wattage rating and use a cordset which has a capacity at least equal to this. The use of an inadequate cordset represents a serious fire hazard.
Three prong grounded cordsets are required for most computer equipment, heavy appliances, and anything which is not double insulated and has metal parts that may be touched in normal operation (i.e., without disassembly).
The individual wires in all cordsets except for unpolarized types (e.g., older lamp cord) will be identified in some way. For sheathed cables, color coding is used. Generally, in keeping with the NEC (Code), black will be Hot, white will be Neutral, and green will be Safety Ground. You may also find brown for Hot, blue for Neutral, and green with a yellow stripe for Safety Ground. This is used internationally and is quite common for the cordsets of appliances and electronic equipment.
For zip cord with a polarized plug, one of the wires will be tagged with with a colored thread or a ridge on the outer insulation to indicate that it is the Neutral wire. For unpolarized types, no identification is needed (though there still may be some) as the wires and prongs of the plug are identical. However, fewer and fewer devices use non-polarized cords/plugs now so you are more likely to see this with older ones.
In general, when replacement is needed, use the same configuration and length and a heavy duty type if the original was heavy duty.
If the input is completely symmetric (e.g., it goes into a power transformer and no where else), then the polarity doesn't matter.
Before disconnecting the old cord, label connections or make a diagram and then match the color code or other wire identifying information. In all cases, it is best to confirm your final wiring with a continuity tester or multimeter on the low ohms scale. Mistakes on your part or the manufacturer of the new cord are not unheard of!
Common problems: internal wiring conductors broken at flex points (appliance or plug). With yard tools, cutting the entire cord is common. The connections at the plug may corrode as well resulting in heating or a broken connection.
Testing: Appliance cordsets can always be tested with a continuity checker or multimeter on a the low ohms scale.
Squeeze, press, spindle, fold, mutilate the cord particularly at both ends as while testing to locate intermittent problems.
If you are too lazy to open the appliance (or this requires the removal of 29 screws), an induction type of tester such as used to locate breaks in Christmas tree light strings can be used to confirm continuity by plugging the cord in both ways and checked along its length to see if a point of discontinuity can be located. A permanent bench setup with a pair of outlets (one wired with reverse polarity and clearly marked: FOR TESTING ONLY) can be provided to facilitate connecting to either of the wires of the cordset when using an induction type tester.
Note: broken wires inside the cordset at either the plug or appliance end are among the most common causes of a dead vacuum cleaner due to abuse it gets - being tugged from the outlet, vacuum being dragged around by the cord, etc. Many other types of appliances suffer the same fate. Therefore, checking the cord and plug should be the first step in troubleshooting any dead appliance.
If the cord is broken at the plug end, the easiest thing to do is to replace just the plug. A wide variety of replacement plugs are available of three basic types: clamp-on/insulation piercing, screw terminals, and wire compression.
Of course, if the problem is with an *extension* cord, then either it is overloaded or defective. In either case, the solution should be obvious.
Some cords will run warm just by design (or cheapness in design using undersized conductors).
However, if it is gets hot during use, this is a potential fire hazard.
If it is hot mainly at the plug end - get a heavy duty replacement plug - one designed for high current appliances using screw terminals - at a hardware store, home center, or electrical supply house. Cut the cord back a couple of inches.
If the entire cord gets warm, this is not unusual with a heater. If it gets really hot, the entire cord should be replaced. Sometimes with really old appliance, the copper wires in the cord oxidize even through the rubber insulation reducing their cross section and increasing resistance. This leads to excessive power dissipation in the cord. Replacement *heavy duty* cordsets are readily available.
Note that just because the cord itself gets warm does NOT mean that the wiring in the walls is heating significantly. The smallest allowable wiring size inside the walls is #14 which has a resistance of about 2.5 ohms per thousand feet. An appliance drawing 10 A through 50 feet of cable (100 total feet of wire going both ways) would result in a 2.5 V drop and 25 W dissipation. But since this is distributed over 50 feet of cable, heating in any location is minimal.
Extension cord rules of use:
Common problems: internal wiring conductors broken at flex points (socket or plug). With yard tools, cutting the entire cord is common. The connections at the plug may corrode as well resulting in heating or a bad or intermittent connection.
Testing: Extension cords can always be tested with a continuity checker or multimeter on a the low ohms scale.
But, how do you locate the break?
This also works for appliance cords where you are too lazy to go inside to check continuity. You may need to try both wires in the cord to locate the broken one.
An AM or multiband radio may also be suitable as a detector.
Inside the appliance, individual wires (often multicolored to help identify function) or cables (groups of wires combined together in a single sheath or bundle) route power and control signals to the various components. Most are insulated with plastic or rubber coverings but occasionally you will find bare, tinned (solder coated), or plated copper wires. In high temperature appliances like space heaters and toasters, the insulation (if present) will be asbestos (older) or fiberglass. (Rigid uninsulated wires are also commonly found in such applications.) Particles flaking off from either of these materials are a health hazard if you come in contact, inhale, or ingest them. They are also quite fragile and susceptible to damage which may compromise their insulating properties so take care to avoid excessive flexing or repositioning of wires with this type of insulation. Fiberglass insulation is generally loose fitting and looks like woven fabric. Asbestos is light colored, soft, and powdery.
Note that it is unlikely there would be asbestos in any common consumer electronics like TVs, computer monitors, or microwave ovens since under normal conditions, nothing inside should get really hot. However, it might be found in very old large appliances including stoves, water heaters, and air conditioners. Nowadays, Fiberglas and rock wool (also known as mineral wool or slag wool) insulation are used. Older houses are another story and asbestos covered pipes are common.
Color coding will often be used to make keeping track of the wires easier and to indicate function. However, there is no standard except for the input AC line. Generally, black will be used for Hot, white will be used for Neutral, and green or uninsulated wire will be used for Safety Ground. While this is part of the NEC (Code) for electrical wiring (in the U.S.), it is not always followed inside appliances. You may also find brown for Hot, blue for Neutral, and green with a yellow stripe for Safety Ground. This is used internationally and is quite common for the cordsets of appliances and electronic equipment.
Where a non-polarized plug (cordset) is used, either AC wire can be Hot and both wires will typically (but not always) be the same color.
Other colors may be used for switched Hot (e.g., red), thermostat control, motor start, solenoid 1, etc. Various combinations of colored stripes may be used as well. Unfortunately, in some cases, you will find that all the wiring is the same color and tracing the circuit becomes a pain in the you-know-what.
Where multiple wires need to go from point A to point B along the same path, they will often be combined into a single cable which is bundled using nylon or cloth tie-wraps or run inside a single large flexible plastic sheath. For electronic interconnects and low voltage control and signal wiring, molded flat cables are common (like those for the cables to the diskette and hard drives of your PC). These are quite reliable and can be manufactured at low cost by fully automatic machines.
The thickness of the insulation of a wire or cable is not a reliable indication of its capacity or voltage rating. A fat wire may actually have a very skinny central conductor and vice-versa. In some cases, the wire conductor size and voltage rating will be printed on the insulation but this not that common. If replacement is needed, this information will be essential. However, the ampacity (maximum current) can be determined from the size of the metal conductor and for any of the line powered appliances discussed in this document, wire with a 600 V rating should be more than adequate.
The type of insulation is critical in appliances that generate heat - including table lamps and other lighting fixtures. There is special high temperature insulated wire (fixture wire) which should be used when replacement is needed. For heating appliances like toasters, hair dryers, and deep friers, fiberglass or high temperature silicone based rubber insulated wire or insulating sleeves must be used should the original wiring need replacement. An appliance repair motor rebuilding shop would be the most likely source - common electronics distributors may not carry this stuff (especially if you only need a couple feet)!
Connections between individual wires and between individual wires and other components are most often made by crimp or screw terminals, welding, or press-in contacts. For cables, actual multipin and socket connectors may be used.
Common problems: internal wiring conductors broken, corroded, or deteriorated due to heat or moisture. Dirty, corroded, weakened, or damaged connector contacts are common requiring cleaning and reseating or replacement. Damage to insulation from vibration, heat, movement, or even improper manufacture or design is also possible. Careless reassembly during a previous repair could result in pinched broken wires or insulation as well as short circuits between wires, or wiring and sharp sheet metal parts.
Testing: Inspect for obvious breaks or wires that have pulled out of their terminations. Integrity of wiring can be determined with a continuity checker or multimeter on a the low ohms scale. Flexing and wiggling wires especially at connections while observing the meter will identify intermittents.
Testing: Switches can always be tested with a continuity checker or a multimeter on a low ohms scale.
WARNING: Mercury is a heavy metal and is poisonous. I know it is fun to play with beads and globs of the stuff (and I have done it) but do not recommend it, at least not on a daily basis. Dispose of any from broken mercury switches or thermometers safely. If you insist on keeping it, use a piece of paper as a scoop and put the mercury in a bottle with a tightly sealed cap. See the section: Comments on mercury poisoning.
Problems are rare with these mercury switches. In fact, GE mercury switches used to carry a *50* year warranty! I don't know if they still do.
In principle, these are also the safest type of switch since any sparking or arcing takes place inside the sealed mercury capsule. However, the contact between the screw terminals and the capsule are via sliding contacts (the capsule is press fit between the metal strips to which the screws are attached) and with time, these can become dirty, worn, or loose. For this reason, some electricians do not like mercury switches, particularly for high current loads.
The danger isn't so much from occasional contact with metallic mercury as from mercury vapor which may build up in an enclosed spaces and from soluble mercury compounds. You get significant contact with metallic mercury from amalgam ("silver") tooth fillings and while there is controversy about their safety and some people have had their old fillings ripped out at great expense (and disconfort!), there is as far as I know, no conclusive scientific evidence linking mercury poisoning to amalgam fillings.
Having said that, I agree that it's probably a bad idea to be playing with mercury on a daily basis but pushing a few drops of it around or losing one drop to the floorboards isn't going to make everyone sick. If this were the case, half the houses in the World would be HAZMAT zones from broken fluorescent lamps - which have significant metallic mercury in them.
If anyone has evidence to the contrary, please cite refereed scientific publications and I will read them, not hyped popular press reports.
The most common types are:
A ______/ _______ B
This is the normal light or power switch. For electrical (house) wiring, it may be called a '2-way' switch.
        A ______/ _______ B
                :
        C ______/ _______ D
This is often used as a power switch where both wires of the AC line are switched instead of just the Hot wire.
                 _______ NC
       C ______/
                 _______ NO
This is the same configuration as what is known as a '3-way' switch for electrical (house) wiring. Two of these are used to control a fixture from separate locations.
                 _______ NC1
      C1 ______/
               : _______ NO1
               :
               : _______ NC2
      C2 ______/
                 _______ NO2
               _________ 1
                 _______ 2
       C ______/  ______ 3
                 _______ 4
               _________ 5
Fuses use a fine wire or strip (called the element) made from a metal which has enough resistance (more than for copper usually) to be heated by current flow and which melts at a relatively low well defined temperature. When the rated current is exceeded, this element heats up enough to melt (or vaporize). How quickly this happens depends on the extent of the overload and the type of fuse.
Fuses found in consumer electronic equipment are usually cartridge type - 1-1/4" mm x 1/4" or 20 mm x 5 mm, pico(tm) fuses that look like green 1/4 W resistors, or other miniature varieties. Typical circuit board markings are F or PR.
More than you could ever want to know about fuses can be found at the Littlefuse Web site. Go to Resouces->Reference Materials->Fusology to start.
Circuit breakers may be thermal, magnetic, or a combination of the two. Small (push button) circuit breakers for appliances are nearly always thermal - metal heats up due to current flow and breaks the circuit when its temperature exceeds a set value. The mechanism is often the bending action of a bimetal strip or disc - similar to the operation of a thermostat. Flip type circuit breakers are normally magnetic. An electromagnet pulls on a lever held from tripping by a calibrated spring. These are not usually common in consumer equipment (but are used at the electrical service panel).
At just over the rated current, it may take minutes to break the circuit. At 10 times rated current, the fuse may blow or circuit breaker may open in milliseconds.
The response time of a 'normal' or 'rapid action' fuse or circuit breaker depends on the instantaneous value of the overcurrent.
A 'slow blow' or 'delayed action' fuse or circuit breaker allows instantaneous overload (such as normal motor starting) but will interrupt the circuit quickly for significant extended overloads or short circuits. A large thermal mass delays the temperature rise so that momentary overloads are ignored. The magnetic type breaker adds a viscous damping fluid to slow down the movement of the tripping mechanism.
Common problems: fuses and circuit breakers occasionally fail for no reason or simply blow or trip due to a temporary condition such as a power surge. However, most of the time, there is some other fault with the appliance which will require attention like a bad motor or shorted wire. Dirty, corroded, or weak contacts (holding the fuse or circuit breaker) may get hot and contribute to nuisance tripping. Circuit breakers can also go bad just due to age (this particularly applies to those in the electrical service panel - one that buzzes and/or trips occasionally for no apparent reason may need replacement).
Testing: Fuses and circuit breakers can be tested for failure with a continuity checker or multimeter on the low ohms scale. A fuse that tests open is blown and must be replaced (generally, once the circuit problem is found and repaired.) Of course, if the fuse element is visible, a blown fuse is usually easy to identify without any test equipment. A circuit breaker that tests open or erratic after the reset button is pressed, will need replacement as well.
Note that in general, circuit breakers should NOT be used for repeated switching nor should they be reset on a circuit with any substantial load (or overload or short circuit). Their contacts are not designed for this type of operation. Here are some additional comments:
(From: Tom Hardy (th7675@istate.net).)
Many people use circuit breakers as switches (including my father-in-law!). The problem is that the contacts become burned, creating resistance and thus abnormal heating causing the breaker to be unable to carry its rated load. The other thing this does (especially with Square-D QO style breakers) through heating is causes the buss bar contact to loose it's spring tension (in reference to circuit breakers installed in an electrical service panel). This will (as happened to my father-in-law) burn up part of the buss bar and ruin the electric panel. Most people will just reset a breaker if it trips, without first removing the load. This also causes burned contacts as mentioned above. I have found many defective breakers before they go bad, usually feeding higher current appliances. Just turn on the appliance for 15 to 20 minutes and then feel the front of the breaker with your hand. If its warm or hot, there is usually reason to suspect future trouble if it's not replaced.
This information can be of use in directly further troubleshooting.
Even with circuit breakers, a short circuit may so damage the contacts or totally melt the device that replacement will be needed.
Five major parameters characterizes a fuse or circuit breaker:
Some equipment may use fuses with strange current ratings like 1.65 A instead of 1.5 A. In such cases, it won't hurt to try a common lower current value like 1.5 A. The worst that will happen is that it will blow, probably not immediately but some time in the future even if there is no problem. Using the next higher common value like 1.75 A isn't recommended except for testing. The irony is that these strange values are often used in the primaries of switchmode power supplies where their function is to blow due to catastrophic failure, not a slight overload, and it really doesn't matter if they are slightly larger (but only slightly larger!). However, for reasons of liability, this is still not recommended. Don't do it!
And, it's quite likely that there will be no difference between 125 V and 250 V fuses except the labeling. It really doesn't cost more to make higher voltage fuses in the same package size of the type found in consumer electronic equipment so any labeling like this would be more of a regulatory issue.
For high voltage, current limited equipment (up to 500 V or more, up to 10 times the fuse current rating), it may still be acceptable to use a 250 V fuse.
However, any soldering of wires directly to a fuse should be done with care and it may weaken the fuse element or its connection if the fuse doesn't just fall apart. Thus, where soldered-in fuses are used, obtain replacements with wire leads that preattached or solder in a fuse holder.
There are three typical types:
CAUTION: When replacing a thermal fuse, DO NOT SOLDER it if at all possible. If the device gets too hot, it may fail immediately or be weakened. Crimp or screw connections are preferred. It is normally possible to obtain "crimp rings" when you order - they may be included. Then, just cut off the old fuse but leave some wire, slip the old and new wires into a crimp ring (twist them for added mechanical stability) and compress the ring tightly with a pair of pliers. Note the direction: If the appliance uses a polarized plug, it is recommended that the isolated lead of the thermal fuse be attached to the Hot AC wiring and the bare metal body of the thermal fuse which is connected to one lead be attached to the wiring of the appliance. This is a minor point but it doesn't cost anything!
                       *                     *
      To AC Hot -------||--     ______     --||-------- To appliance wiring
                     --||------<______|------||--
                           New Thermal Fuse

  * Twisted and crimped connection for maximum mechanical strength.
If you must solder, use a good heat sink (e.g., wet paper towels, little
C-clamps) on the leads between the thermal fuse and the soldering iron, and
work quickly!
In some applications, device types (2) and (3) may be used as the primary temperature regulating controls where adjustment is not needed with (1) as the protection of last resort. For example, a hair dryer may depend on air-flow to maintain the desired temperature. But it will have a bimetal strip-type thermostat to shut off power if the air-flow is blocked for some reason and a thermal fuse to permanently disable the device should the thermostat fail to open.
For testing, it is perfectly acceptable to temporarily short out the device to see if the equipment then operates normally without overheating. This will confirm that a one-time thermal fuse has blown, or that a resettable type is malfunctioning. However, while these devices do sometimes just fail on their own, most likely, there was another cause. If you know what it was - you were trying to charge a shorted battery pack, using your window fan to mix cement, or something was shorted externally, then the fuse served its protective function and the equipment is fine. IT SHOULD BE REPLACED WITH THE SAME TYPE or the entire transformer, motor, or whatever it was in should be replaced! This is especially critical for unattended devices. Otherwise, especially with unattended devices, you have a situation where if the overload occurred again or something else failed, the equipment could overheat to the point of causing a fire - and your insurance company may refuse to cover the claim if they find that a change was made to the circuit. And even for portable devices like blow dryers and portable power tools, aside from personal safety should the device malfunction, the thermal protector is there to prevent damage to the equipment itself - don't leave it out!
The following is From Microtemps' literature (`95 EEM Vol.B p1388):
"The active trigger mechanism of the thermal cutoff (TCO) is an electrically non-conductive pellet. Under normal operating temperatures, the solid pellet holds spring loaded contacts closed. When a pre-determined temperature is reached, the pellet melts, allowing the barrel spring to relax. The trip spring then slides the contact away from the lead and the circuit is opened. Once TCO opens a circuit, the circuit will remain open until the TCO is replaced....."
Be very careful in soldering these. If the leads are allowed to get too hot, it may "weaken" the TCO, causing it to fail prematurely. Use a pair of needle-nose pliers as heat sinks as you solder it.
I have replaced a few of these in halogen desk lamp transformers. The transformers showed no signs of overheat or overload. But once I got it apart, the TCO's leads had large solder blobs on them, which indicated that the ladies that assembled the transformers must have overheated the cutouts leads when they soldered them.
The NTE replacement package also comes with little crimp-rings, for high-temp environments where solder could melt or weaken (or to avoid the possibility of soldering causing damage as described above --- sam).
Four types are typically found in appliances. The first three of these are totally mechanically controlled:
In a thermostat, the bimetal strip operates a set of contacts which make or break a circuit depending on temperature. In some cases the strip's shape or an additional mechanism adds 'hysteresis' to the thermostat's characteristics (see the section: What is hysteresis?).
Testing of mechanical thermostats: Examine for visible damage to the contacts. Use a continuity checker or ohmmeter to confirm reliable operation as the knob or slider is moved from end to end if it will switch at room temperature. Gently press on the mechanism to get the contacts to switch if this is not possible. Use an oven on low or a refrigerator or freezer if needed to confirm proper switching based on temperature.
Humidistats, as their name implies, are used to sense relative humidity in humidifiers and dehumidifiers. Their sensing material is something that looks kind of like cellophane or the stuff that is used for sausage casings. It contracts and expands based on the moisture content of the air around it. These are somewhat fragile so if rotating the control knob on a humidifier or dehumidifier does not result in the normal 'click', this material may have been damaged or broken.
Testing of mechanical humidistats: examine for visible damage to the contacts. Use a continuity checker or ohmmeter to confirm reliable operation as the knob or slider is moved from end to end. Gently press on the mechanism to get the contacts to switch if this is not possible. Gently exhale across the sensing strip to confirm that the switching point changes.
Examples of systems with hysteresis:
                 B o-------------+
                                 |
                                 V
                 A o--------/\/\/\/\/\-----
                         250 ohm rheostat
In the diagram above, the resistance changes smoothly from 0 to 250 ohms as the wiper moves from left to right.
Very often, you will see the following wiring arrangement:
                 B o-------------+------+
                                 |      |
                                 V      |
                 A o--------/\/\/\/\/\--+
                        250 ohm rheostat
Electrically, this is identical. However, should the most common failure occur with the wiper breaking or becoming disconnected, the result will be maximum resistance rather than an open circuit. Depending on the circuit, this may be preferred - or essential for safety reasons.
Testing: Disconnect at least one of the terminals from the rest of the circuit and then measure with an ohmmeter on the appropriate scale. The resistance should change smoothly and consistently with no dead spots or dips.
                 B o-------------+
                                 |
                                 V
                 A o--------/\/\/\/\/\--------o C
                       1K ohm potentiometer
In the diagram above, the resistance between A and B varies smoothly from 0 to 1K ohms as the wiper moves from left to right. At the same time, the resistance between B and C varies smoothly from 1K to 0 ohms. For some applications, the change is non-linear - audio devices in particular so that the perceived effect is more uniform across the entire range.
Testing: Disconnect at least two of the terminals from the rest of the circuit and then measure with an ohmmeter on the appropriate scale. The resistance should change smoothly and consistently with no dead spots or dips. Try between each end and the wiper. Check the resistance across the end terminals as well - it should be close to the stamped rating (if known).
Testing: Use an ohmmeter or continuity checker on the switches. The reading should either be 0 ohms or infinite ohms. Anything in between or erratic behavior is indication of a bad switch or cord.
Testing: Use an ohmmeter or continuity check to confirm that both wires of the cord are connected to both AC plug and appliance connector. Wiggle the cord where it connects to the appliance and at the plug end as well to see if there might be broken wires inside.
Testing: visual inspection will often reveal a burnt out incandescent light bulb simply because the filament will be broken. If this is not obvious, use an ohmmeter - an infinite resistance means that the bulb is bad.
See the chapter: Incandescent Light Bulbs, Lamps, and Lighting Fixtures for more info.
Small fluorescent lamps are often found in makeup mirrors, plant lights, and battery powered lanterns.
Testing: The best test for a bad fluorescent lamp (tube) is to substitute a known good one. Unfortunately, there is no easy go-no go test for a these as with an incandescent lamp. Other parts of the fixture (like the ballast or starter) could also be bad. Testing with a multimeter between the pair of pins at each end should show low resistance if the lamp is good. However, depending on the type of ballast, a lamp with an open filament may still work just fine even though strictly speaking, it is defective. Again, try a replacement to be sure. CAUTION: A defective ballast or starter can cause a fluorescent lamp to go bad in short order - if it still doesn't work, don't just let it continue to try to start!
See the document: Fluorescent Lamps, Ballasts, and Fixtures for additional information.
There are three common types of electrical indicator lights:
Incandescent indicator lamps are often removable using a miniature screw, bayonet, or sliding type base. Some are soldered in via wire leads. Others look like cartridge fuses.
Testing: Visual inspection will often reveal a burnt out incandescent light bulb simply because the filament will be broken. If this is not obvious, use an ohmmeter - an infinite resistance is means that the bulb is bad.
They are nearly all the characteristic orange neon color although other colors are possible and there is a nice bright green variety with an internal phosphor coating that can actually provide some illumination as well. While neon bulbs do not often burn out in the same sense as incandescent lamps, they do darken with age and may eventually cease to light reliably so flickering of old Neon bulbs is quite common. This is almost always just due to the natural aging process of the indicator and does not mean the outlet or appliance itself is bad.
Some Neon bulbs come in a miniature bayonet base. Most are soldered directly into the circuit via wire leads.
Testing: Inspect for a blackened glass envelope. Connect to AC line (careful - dangerous voltage) through a series 100K resistor. If glow is weak or absent, Neon bulb is bad.
LEDs are almost always soldered directly into the circuit board since they rarely need replacement.
As an item of interest which has nothing to do with appliance repair, many automotive tail lights are now red LEDs, particularly the middle brake light. In fact, the red (stop) lights in many traffic signals are now LED clusters that screw directly into a normal 115 VAC socket. This is done because one of these will outlast 50 normal incandescent lamps and the cost of replacement far exceeds the cost of the lamp itself. How can you tell which type is used? Easy, move your eyes (or head) from side-to-side while looking at the red light; since the LED actually pulses 120 times per second (for 60 Hz power), you will see a series of spots - an incandescent lamp will appear continuous. Yellow and green will probably follow shortly but all I've seen so far are the red ones using LEDs.
Testing: Use a multimeter on the diode test scale. An LED will have a forward voltage drop of between 1.7 and 3 V. If 0 or open, the LED is bad. However, note: some DMMs may not produce enough voltage on the diode test scale so the following is recommended: Alternative: Use a 6 to 9 V DC supply in series with a 470 ohm resistor. LED should light if the supply's positive output is on the LED's anode. If in doubt, try both ways, If the LED does not light in either direction, it is bad.
Testing: Check for bad connections and bad components with a multimeter. An open series resistor, shorted EL device, or faulty (partially shorted) MOV is possible. However, sometimes these failures won't show up except when normal voltage is applied. Measure on the AC volts range across the EL device - there should be a high AC reading, probably over 100 VAC.
There are 3 basic types of heating elements. Nearly every appliance on the face of the planet will use one of these:
NiChrome coils are used in many appliances including toasters, convection heaters, blow-dryers, waffle irons and clothes dryers.
The main disadvantage for our purposes is that it is usually not possible to solder this material due to the heating nature of its application. Therefore, mechanical - crimp or screw must be used to join NiChrome wire or ribbon to another wire or terminal. The technique used in the original construction is may be spot welding which is quick and reliable but generally beyond our capabilities.
Testing: Visual inspection should reveal any broken coil or ribbon. If inspection is difficult, use a multimeter on the low ohms scale. Check for both shorts to the metal chassis as well as an open element (infinite ohms).
These are found in toaster oven/broilers, hot plates, coffee makers, crock pots and slow cookers, electric range surface elements, conventional and convection ovens and broilers.
Testing: When these fail, it is often spectacular as there is a good chance that the internal NiChrome element will short to the outer casing, short out, and melt. If there is no visible damage but the element does not work, a quick check with an ohmmeter should reveal an open element or one that is shorted to the outer casing.
These are found in various kinds of radiant heaters. By running a less than maximum power - more orange heat - the peak radiation is in the infra-red rather than visible range.
Testing: Look for a broken filament. Test with an ohmmeter just like an incandescent light bulb.
I have used nuts and bolts, say 6-32, bolt, wire, washer, wire, washer, lockwasher, nut. Depending on how close to the actual really hot element it is, this may work. If you are connecting to the coiled element, leave a straight section near the joint - it won't get as hot.
The use of high temperature solder or brazing might also work.
The best approach is probably to use high temperature crimp connectors:
(The following from: sad@garcia.efn.org (Stephen Dunbar))
You can connect heating element wires with high-temperature solderless connectors that are crimped onto the wires. Be sure to get the special high-temp connectors; the ordinary kind will rapidly oxidize and fall apart at high temperatures. If you want to join two wires to each other, you'll need either a butt splice connector (joins the wires end-to-end) or a parallel splice connector (the wires go into the connector side-by-side). To fasten a wire to a screw terminal you can use a ring or spade connector (though as noted above, a screw, nut, and washer(s) should work fine --- sam). If your waffle iron has quick disconnect terminals you'll need the opposite gender disconnect (AkA Faston). These come in both .187" and .250" widths.
Your best bet for getting these connectors in small quantity is probably a local appliance parts outlet that caters to do-it-yourselfers. If you can't find what you need there, try Newark Electronics (branches all over the place). I have an old copy of their catalog which lists SPC Technology Voltrex Brand High Temperature Barrel Terminals in several styles: ring, spade, disconnect, and butt splice. The prices were around $10 to $12 per 100 (this catalog is a couple of years old) for wires in the 22-18 or 16 to 14AWG size ranges, almost twice that for the heftier wire gauges. (Be sure to determine the wire gauge of your heating elements so you can get the right size terminal.)
You can spend a *lot* of money on crimp tools, but for occasional light use you can probably get by with one of those $10 gadgets that crimp, strip & cut wires, and cut bolts--the sort of thing you'd find in your local home center or Radio Shack.
(From: Nigel Cook (diverse@tcp.co.uk).)
The thin stainless steel strip found spot welded to multicell NiCd batteries make good crimps for joining breaks in heater resistance wire. Form a small length of this strip around a needle or something similar to make a tight spiral with enough clearance to go over doubled-up heater wire. Abraid or file the cut ends of the broken wire. Crimp into place with a double lever action crimper. If there is an area of brittle heating element around the break then cut out and splice in a replacement section with two such crimps. Such a repair to my hot-air paint stripper (indispensable tool in my electronics tool-kit) has survived at least 50 hours.
(From: Dan Sternberg (steberg@erols.com).)
Another old trick for nichrome repair is to make a paste of Borax, twist the two broken end together, and energize the circuit. A form of bond welding takes place. I've have used this on electric clothes dryer heater elements with good luck.
(From: DaveC.)
Here's a "quick fix" that sometimes works for a long time and sometimes fails quickly (depending, I think, on just how old and brittle the nichrome wire is).
Mix some ordinary "Boraxo" powdered hand soap with a little water to make a thick paste -- and you don't need much.
Take the broken ends of wire, bend a small loop into each, and interlock the loops so the wires stay together.
Pack the Boraxo paste around the joint, and turn on the heater.
Keep your eyes on that joint. As the coil heats up, the hook joint will be the worst connection, so it'll naturally get the hottest.
When it gets hot enough, the nichrome wires will melt, and, being fluxed by the borate, will fuse together into a blob. The blob, now being *larger* than the rest of the wires, will immediately cool down, and will never again get as "red hot" as the rest of the heater.
Allow the coils to cool down and, using pliers, carefully crush any glassy flux deposit that remains on the joint.
If the joint doesn't behave as I describe, or if the wires are too brittle to be formed into hooks, the wires are likely too old to produce a long-lasting joint. If the joint behaves as I described, it may last for a good long time.
Solenoids are usually two position devices - they are not used to provide intermediate amounts of force or travel like motors.
Sizes ranges from small 1/2" long units providing a fraction of an ounce of force and 1/8" travel to large 3" long units providing many pounds of force with travels of 2" or more.
Testing: Inspect for free movement. Use an ohmmeter to confirm that the coil is intact. There could be other problems like shorted turns in the coil but these would be less common than lack of lubrication or an open coil. Check voltage on operating solenoid to determine whether drive power is present.
Transformers are used in nearly every type of electronic equipment both for power and signals, and throughout the electrical distribution network to optimize the voltage/current used on each leg of the journey from the power plant to the user.
The types we are interested in with respect to household appliances and power tools are most often use to convert the AC line voltage to some other value, lower or higher:
Motors come in all shapes and sizes but most found in small appliances can be classified into 5 groups:
There are two primary types of configurations:
The direction of the air movement with respect to blade rotation is determined by the pitch - the tilt - of the blades. Although reversing air direction is possible by reversing the motor, one direction is usually more effective than the other due to the curve of the blades.
Direction of rotation of the blower motor does not change the direction of airflow. However, one direction will be more effective than the other (where the blower is rotating in the same direction as the way exit port on the air plenum points. Because of this, it is not possible for a vacuum cleaner to blow out the suction hose due to a reversed motor (which in itself is for all intents and purposes, impossible as well). This is usually caused by back flow due to a blockage.
Under normal conditions, a plain bearing wears only during start and stop cycles. While the shaft is rotating at any reasonable speed, there is no metal to metal contact and thus no wear. With a properly designed and maintained bearing of this type, a very thin oil film entirely supports the shaft - thus the importance of clean oil. Your automobile engine's crankshaft is entirely supported by these types of bearings.
Eventually, even 'lubricated for life' bearings of this type may need to be disassembled, cleaned, and lubricated. The plain bearings in small appliances must be lubricated using a proper light oil like electric motor or machine oil - not automotive engine oil and NEVER NEVER WD40.
NEVER, ever, use WD40 as a lubricant (unless specifically recommended by the manufacturer of the equipment, that is)! WD40 is not a good lubricant despite the claims on the label. Legend has it that the WD actually is an abbreviation for Water Displacer - which is one of the functions of WD40 when used to coat tools. WD40 is much too thin to do any good as a general lubricant and will quickly collect dirt and dry up. It is also quite flammable and a pretty good solvent - there is no telling what will be affected by this.
WD40 has its uses but lubrication unless specifically recommended by the manufacturer (of the equipment, that is) is not one of them. Results initially may be good with that instant gratification that comes from something returning to life. However, the lighter fractions of WD40 evaporate in a few days
For very small metal-in-plastic types, the following might be useful:
(From: Frank MacLachlan (fpm@bach.n2.net).)
"I've had good luck with a spray lubricant called SuperLube. It contains a solvent which evaporates and leaves a Teflon film which doesn't migrate or retain dust. I spray some into a spray paint cap and then apply the solution with a toothpick, allowing the lubricant to wick into the bearing areas. Worked great for some balky Logitech mice I purchased at a local swap meet."
Sometimes, reworking an appliance to use a ball bearing instead of a plain bearing is a worthwhile effort - I have done this with electric drills and shop vacs. They run smoother and quieter with ball bearings. Not surprisingly, higher-end models of these devices (which use ball bearings) share parts with the cheaper versions and finding standard ball bearings that would fit was not difficult.
Most of these are just small timing motors (synchronous motors running off of the AC line) which rotate one or more cams (disks with bumps) which activated one or more switches at appropriate times during the rotation cycle. Typical cycle times range from a minute or less to several hours (refrigerator defrost timer). Most like washing machine timers are in the 1 hour range. Sometimes, the motor is stopped during certain portions of the cycle awaiting completion of some other operation (i.e., fill).
These controllers therefore consist of several parts:
If some of the circuits do not work, check the switches for dirty or worn contacts or broken parts.
While generally quite reliable, bad solder connections are always a possibility as well as failed parts due to operation in an environment prone to temperature extremes.
Testing: Check for bad solder connections and connectors that need to be cleaned and reseated. Inspect for obviously broken or burned parts. Test components for proper value.
For digital clock/programmers or microprocessor based controllers, not much else can be done without a schematic - which not likely to be easily available.
The common table lamp is just a light duty cordset, switch, and sockets for one or more incandescent light bulbs. In many cases, the switch and socket are combined into one assembly. In other designs, particularly where more than one bulb can be lit independently (for example, a large bulb up top and a night light in the base), a separate switch (rotary or push-push) selects the light bulb(s) to be turned on.
For the most common combined switch and socket, there are several varieties and these are all generally interchangeable. Therefore, if you want to take advantage of the added convenience of a 3-way bulb allowing low, medium, and high illumination, it is a simple matter to replace the simple on-off switch in your lamp with a 3-way switch (not to be confused with the 3-way switches used in house wiring to control a single light fixture from 2 places).
Virtually the same switch/socket combo is used where there is a bulb in the top and the base. But instead of switching the extra contact inside a 3-way socket, that terminal goes to the bottom lamp holder.
Push-push, pull chain, and rotary switches are common for simple on-off control. The 3-way switches are usually of the rotary variety with off-low-medium-high selected as the knob is rotated. The 3-way bulb has two filaments which can be switched on individually or in combination to provide the 3 levels of illumination.
Dimmer sockets can often be substituted for the normal kind as long as conventional incandescent bulbs (and not compact fluorescents) are to be used.
Touch and even sound activated switch-sockets are also available though my personal recommendation is to stay away from them.
Most common problems: burned out bulb, worn switch, bad plug or cord. Where the light flickers, particularly if jiggling or tapping on the switch has an effect, a bad switch is almost always the problem. Switch failure is more common when using high wattage bulbs but can occur just due to normal wear and tear.
Replacements for most common switches and sockets are readily available at large hardware stores, home centers, and electrical supply houses. It is best to take along the old switch so that an exact match (if desired) can be obtained. While the thread sizes for the screw on socket shells are quite standard, some older lamps may have an unusual size. For more complicated switches with multiple sockets, label or otherwise record the wiring. If color coded, cut the wires so that the colors are retained at both the lamp and switch ends.
This is assumed to be the type of lamp which has a combination socket and switch with a metal (brass-colored usually) outer shell. It is your decision as to whether a simple on-off switch or a 3-way type is to be used - they are usually interchangeable and a normal light bulb can be put into a 3-way socket (two clicks of the knob will be needed to switch a normal light bulb on or off, however). You can also put a 3-way bulb into a normal socket but you will, of course, only get one level of illumination (medium). For lamps with lighted bases, also see the section: Lamps with night-light bulbs in their base.
You will need: (1) a new socket/switch of the appropriate type and (2) a new cordset (if you want to replace this as well). A polarized type plug is desirable to minimize the possibility of shock when changing bulbs. A medium size straight blade screwdriver and wire strippers are the only required tools.
This is a standard, if somewhat unusual socket. It is basically the same as a 3-way type but with the extra connection going to the bulb in the base of the lamp. In the old days when sockets were assembled with screws instead of rivets, it might have been possible to modify a new 3-way socket to provide the extra connection.
An electrical supply parts distributor or lamp store should have what you need or be able to order it for you.
Take note of the connections as you remove the old socket to avoid mistakes. When routing the wires to the bulb in the base, avoid allowing the hot bulb from contacting the insulation - the plastic stuff might melt (for a 7 W or less wattage bulb and high temperature insulation is probably not an issue, however).
Then, DON'T tighten the bulbs down all the way - just so they are a snug fit in the socket.
If a dimmer control is present, keep in mind that these are somewhat more sensitive to slight voltage fluctuations especially when set at low levels. You may simply not have noticed any flickering with a normal on/off switch.
Tensor(tm) (and their clones) high intensity lamps have been around for over 30 years and are essentially unchanged today. They use a low voltage transformer producing 12-24 VAC along with a special high output light bulb that looks similar to an automotive tail light. However, it uses substantially more current for the same voltage and puts out a much more intense, whiter light. These are not halogen lamps though their spectral characteristics are similar since the filaments run hotter than normal incandescents - and have shorter lives.
Some will have multiple levels of illumination based on selecting taps on the transformer. Normal dimmers may not work (and should not be used) with these due to their transformer design - damage to the dimmer or lamp may result and this may be a fire hazard.
Problems with Tensor lamps tend to center around the socket and switch. These may fail due to overheating as a result of the high temperature and high current operation. Replacements are available but they may take some effort to locate. A replacement lamp may be cheaper. (I often find complete Tensor lamps in perfect operating condition at garage sales for around $2.
Should the dimmer portion of such a fixture fail or become unreliable, it may a blessing in disguise since the lamp will either run at full intensity or can be easily rewired to do so by bypassing the electronics and just using the on/off switch!
WARNING: halogen bulbs run extremely hot and are a serious fire hazard and burn hazard if not properly enclosed. When changing a halogen bulb, wait ample time for the old one to cool or use an insulated non-flammable glove or pad to remove it. When installing the new bulb, make sure power is off, and do not touch it with your fingers - use a clean cloth or fresh paper towel. If you do accidentally touch it, clean with alcohol. Otherwise, finger oils may etch the quartz and result in early - possibly explosive failure - due to weakening of the quartz envelope.
(Source: The Associate Press except as noted).
Safety groups recommend the following precautions for owners of halogen torchere lamps with tubular bulbs:
Do not touch the new bulb with your fingers as the oils and acids may make them more prone to exploding. Clean the bulb thoroughly with isopropyl alcohol after any accidental contact (--- sam).
Note that this may not result in maximum life but will be safer due to the lower temperature of the bulb (--- sam).
If the lamp is stuck on, the thyristor is probably shorted. The specific part can be replaced but to be sure it is bad, some testing will be needed and it is probably soldered in place. However, if you have repaired an ordinary lamp, you will be able to replace the entire module fairly easily.
If the lamp is stuck off, there could be a bad connection or bad bulb, or the electronics module is defective. Again, replacement is straightforward.
Erratic problems could be due to bad connections, dried up electrolytic capacitors (especially if the electronics module is near the hot bulb), E/M interference (e.g., a dimmer or vacuum cleaner on the same circuit), or power spikes (thunderstorms or EMP from nuclear detonations). An inexpensive surge suppressor/AC line filter may reduce or eliminate the random switching from external causes.
Some problems are of the following type:
"I have 2 touch lamps in the bed room and they are both plugged in to the same receptacle. Every once in a while the lamps come on by themselves for no apparent reason. Even more strange is that every so often just one lamp turns on by itself."
(From: Tim Moore (tmoore@interserf.net).)
These use a MOSFET type circuit to switch the lamps on and off. The circuit is attached to the metal in the lamp base. When you touch it the impedance changes ever so minutely but enough to change the MOSFET from off to on and visa versa. My wife could never get our lamps to switch, she often had to blow on her hand first to get it moist so it would make better contact. Here is part of the problem. It takes a certain amount of signal from the lamp base to switch the circuit. Electronic parts all have acceptable ranges of operation and when put into identical circuits they sometimes perform differently. One circuit might need a good hard touch while the other might need only a slight touch. Power surges would often switch one of my lamps, although it didn't happen often. A strong radio signal could do it too. The bottom line is that these lamps are not rocket science and can't be counted on as 100% reliable. Sorry, that's the truth. You give up a little to get the convenience of just having to touch them. I ended up removing mine - an electrical storm wiped one out and wiped the other out a few years later.
(Portions from: John Evans - N0HJ (jaevans@codenet.net).)
Here is a fix my buddy, Ed, a fellow ham radio operator, has come up with to solve this problem.
As usual it took 8 months and 10 minutes to fix.
Two parts: 1/4 watt, 1k Ohm resistor and 2.5 mH 1/2 watt size molded coil. Connect in-line with the touch wire.
I send 2 or more watts from my rig. My son works the CB.
You'll find it on when you get home.
So the darn thing is an oscillator which changes frequency when you touch it. The circuit does the rest. By adding the resistor/inductor pair, its sensitivity is reduced and the problem disappears.
One more thing: (Most important!), you won't hear interference FROM the oscillator in the lamp anymore on your radio.
And don't open up the module inside the lamp base, you are wasting your time there, and adding more work to glue the module back together.
Just Choke off the sense wire with the resistor and 2.5 mH choke. You'll be fine.
There will be one or more sockets for light bulbs - often all wired in parallel so that all the bulbs come on at the same time. For wall fixtures, there may be a switch on the fixture though most often the switch is mounted on the wall elsewhere.
Unlike table lamps where most of the heat rises from the bulb away from the socket, mounting the sockets horizontally or inverted (base up) can result in substantial heating and eventual deterioration of the socket and wiring. Common problems relate to this type of problem - bad connections or brittle wire insulation. Replacement parts are generally available at home centers and electrical supply houses. Just make sure to kill power before working on any fixture wired into your house's electrical system!
Then use a pair of needlenose pliers or any other tool that will grip what is left of the base to twist it free. A piece of a raw potato may even work!
                          Bulbs
    Male o------O----O----O----O----O----O----O----O---+
    Plug                                               |
         o---------------------------------------------+
Or the following which permits several strings to be connected end-to-end:
            +---------------------------------------------+
            |             Bulbs                           |
    Male o--+---O----O----O----O----O----O----O----O---+  +--o Female
    Plug                                               |       Socket
         o---------------------------------------------+-----o
Many variations on these are possible including multiple interleaved series strings. One of the bulbs in each circuit may be a flasher. All newer light sets must include a fuse as well.
In a series connected circuit, if one bulb burns out, all lights go out. The newer types include a device in each bulb which is supposed to mechanically short out that bulb if it burns out. However, these don't always work or you may have a set that doesn't have this feature.
The following assumes a single series circuit - large light sets (e.g., perhaps 50 or more) will have multiple series strings so you will have to identify the particular circuit that is bad. If more than one bulb is burnt out, this may further complicate matters.
To locate a burnt out bulb in a series string, you can use the binary search approach: pull a bulb in the middle of the string. Test the bulb and between the power cord end and the middle for low resistance. If these are ok, you know the bad bulb is in the other half. Then divide the 'bad' portion in half and test one half of it and so forth. For example, using this technique, you will need to make at most 6 sets of measurements to locate a bad bulb in a 50 light set.
Sears, K-Mart, Radio Shack, among others sell inexpensive testers (e.g., Lite-Tester Plus, about $4). These detect the electric field generated by the (now floating) wire on the Hot side of the gap of the burnt out filament. These will also locate open wires and blown fuses in the same manner.
I have also heard of bulb sets in which the individual bulbs are gas filled in such a way that if the filament breaks, current flows across the gap through the gas resulting in a faint glow in the burnt out bulb. I don't know if these things still exist.
WARNING: Do not be tempted to bypass a bad bulb with a wire. This will reduce the total resistance and increase the current to the remaining lamps shortening their life. Replace a few bulbs and the entire string will pop. This is a serious safety hazard especially on older light sets that may not have internal fuses. Also, some fuses look like lamps - replace only with an identical fuse - not with a lamp!
(From: Ken Bouchard (bouchard@ime.net).)
My advice, is trash them and go out and buy new ones. After all, you can get them typically around 5-10 bucks a set.
Then you have the old set to raid bulbs from, for the ones that blow out.
Quality control is not an issue when they build xmas lights. One slight tug of a wire, can break it, and the entire set goes dead.
First I assume you wiggled all the bulbs, often just a loose bulb causes this. In the smaller type bulb sets the string is wired in sections, so one bulb goes out, and every 4th or 5th one is dead.
The little bulbs were also designed, that if the filament breaks in the bulb a piece of foil inside it shorts out that bulb so that the remaining lights keep on working. This works up to a point, until more than 4-5 bulbs blow out at once, then the remaining ones get too much voltage and blow out too.
Often the cheesy sockets get water in them and corrode, and/or the wires on the bulb get twisted or broken.
They also use a cheap method of crimping the wiring together in these lights. Most times you can find the broken wire, by inspecting, seeing where it goes into the socket it pulls out easily.
Well avoid doing this when the set is live (heh...) unless you like the idea of getting zapped.
However, for the common type of tiny bulbs that are in series, you cannot really do this easily. Removing and bypassing 1 or 2 bulbs in a 50 light string won't have much effect on the remaining bulbs but cutting it in half will double the voltage on each bulb - you will get a very bright string of lights for a very short time.
The only way to shorten a string by more than a few percent of lights and have it survive is for the current to be limited by a bulb or resistor or to run it off of reduced voltage. A light dimmer might work except for the fact that they typically require a minimum load of 60 to 100 W - your light string is a small fraction of this.
However, for the special case of 1/2 (give or take) the original number of bulbs, there is a simple solution: A rectifier diode (1A, 200 V PRV min.) in series with the string will cut the effective voltage approximately in half. Typical part numbers are 1N4003 though 1N4007. Even Radio Shack will carry them.
Whatever you do, make sure your connections are secure (with wire nuts or properly soldered) and well insulated. For fire safety, the built-in fuse (usually at the plug-end) must be retained.
Should you care, these implement the multiple input XOR (exclusive OR) logic function for controlling electrical devices.
Note: See the section: Dimmer switches and light dimmers if you would like to have control of brightness of a lamp or fixture from multiple locations.
The descriptions below are for using traditional mechanical switches at more than one location. There are also electronic solutions, some even are wireless, where a control module is placed between the load (e.g., lamp or fixture) and the power line and the 'switches' or user controls are mounted remotely. The X10 system is a more general way of doing this providing fully programmable timed (automatic) switching and dimming (where appropriate) from one or more locations.
These are actually SPDT (Single Pole Double Throw) switches which look like ordinary wall switches but have 3 screws instead of 2. Two of these screws will be the same color (usually brass) while the third will be different (darker copper or brown). They may be marked as well.
Note that a socket for a 3-way bulb for a lamp is not related to this - only the name is similar.
Typical wiring for controlling a fixture or outlet from exactly two locations is as follows:
            Location 1         Location 2
             3-way SW     A     3-way SW          +---------+
                /o----------------o\              | Fixture |
    Hot o-----/                      \o-----------|   or    |--------o Neutral
                 o----------------o        Center | Outlet  | Shell
                          B               (brass) +---------+ (silver)

                                           /o---o                   o---o
  A 3-way switch connects either up  o---/         or down  o---o\        .
                                            o---o                  \o---o
As usual, the brass screw on the fixture or outlet should be connected to the Hot side of the wiring and the silver screw to the Neutral side.
Another common variation is shown below:
                                          Location 1           Location 2
                                           3-way SW    Rd :     3-way SW
                                    : Bk      /o------------------o\
        Hot o-------------------------------/          Wh :          \o---+
                                    :          o------------------o       |
                    +---------+     :                     :               |
                    | Fixture |     : Wh   Splice      Bk :               |
    Neutral o-------|   or    |---------------X---------------------------+
                    | Outlet  |     :     (Wirenut)       :
                    +---------+   14-2                  14-3
Details may differ for your particular installation (like to which sides the Hot and Neutral are connected and/or particular wire colors used).
You may also see something along the lines of the following which works but may not be allowed by NEC Code for obvious safety reasons (the load can be electrically live even if off and someone wiring it this way may be tempted to pull the Hots and Neutrals from separate circuits) but has that ever stopped anyone from doing something stupid?):
                                 +---------+
         Hot o------------o\     | Fixture |     /o------------o Hot
                             \---|   or    |---/
     Neutral o------------o      | Outlet  |      o------------o Neutral
                                 +---------+
(And, if you accidentally get the Hots from opposite phases - watch out!)
4-way switches have 4 terminals arranged as two pairs. In one position pair 1 is connected to pair 2 straight through. In the other position, the connections are interchanged.
Typical wiring for controlling a fixture or outlet from 3 or more locations is as follows:
        Location 1     Location 2     Location 3
         3-way SW   A   4-way SW   A   3-way SW        +---------+
            /o------------o\ /o-----------o\           | Fixture |
  Hot o---/                 /               \o---------|   or    |---o Neutral
             o------------o/ \o-----------o    Center  | Outlet  | Shell
                    B              B           (brass) +---------+ (silver)

                                           o---o              o\ /o
  A 4-way switch connects either straight         or exchange   /   .
                                           o---o              o/ \o
This can be extended to an arbitrary number of positions.
As usual, the brass screw on the fixture or outlet should be connected to the Hot side of the wiring and the silver screw to the Neutral side.
Note that a 4-way switch can be constructed from a DPDT (Double Pole Double Throw) type (e.g., toggle switch) as follows:
                    +--------------+
                    |              |
      A(in) o---------------+      |
                    |       |      |
                    +----o  o/ o-------+------o A(out)
                             :     |   |
                    +----o  o/ o---+----------o B(out)
                    |       |  DPDT    |
      B(in) o---------------+  toggle  |
                    |          switch  |
                    +------------------+
For low voltage (non-house wiring) or panel mount applications, this may be easier than using actual 4-way switches (which are probably not available in small sizes).
The wires marked A and B (sometimes called 'travelers') may be in a single (Romex) cable and should be on the screws that are both the same color.
If you do use Romex with a black and white wire, put black tape on the insulation at the ends of the white wire (or paint the ends black) to indicate that this is a Hot wire and not a Neutral. This is required by Code but allows the use of this type of wire.
These diagrams represent one wiring arrangement. Sometimes, there are other slight variations. For example, you might find the switches in the Neutral instead of Hot portion of the wiring - however, this is not recommended.
Perhaps they got it right in the UK :-).
(From: Dion L Heap (Dion@homesix.globalnet.co.uk).)
I had to translate the American into the English. If anyone UK is reading this then for what we (UK) call 2 way lighting is the normal stairs light with 2 switches controlling it, (one up & one down). Both these switches are "2 way switches", to add another switch you would be creating 3 way lighting, for this you use both the existing 2 way switches and in-between the L1 & L2 you use an "intermediate switch" I asked at my supplier for a 4 way switch & they thought I was talking Japanese. A phone call to MK technical support revealed that the UK equivalent is the aforementioned intermediate switch. this has 4 points, the L1 & L2s from the 2 existing 2 way switches are taken through the intermediate.
So you forgot to label the wires before you removed the old switch, huh? :-).
Or, you moved the wires from the old switches to the new switches but guess what? The new switches may not have the corresponding screws in the same locations and your symptoms are that one switch has to be up for the other switch to do anything - and that is if you are lucky!
You have several options:
I won't even consider the case of more than 2 switches!
Or a slight variation on the theme:
(From: Greg Fretwell (JRFC31A@prodigy.com).)
"Pull out one of the switches (the first one you "fixed" to create this problem) mark all 3 wires. Rotate them all one terminal to the right. Try it. If no luck shift one more time. One of those should work."
Here is one way to identify the proper wires more quickly than trial and error but requires testing the live wiring:
Now, turn off the power and confirm that it is off by retesting the hot wire you identified above.
(From: CodeElectric@Worldnet.att.net).
Check both boxes. There will be a single Hot - that goes on the common of the 3-way switch. Put the other two wires on the other two screws.
Now, at the other switch, you will find one hot. Put that on a screw, not the common. Switch the other switch, and you'll find another hot. That is the other traveler. You've got one wire left,,, that's the other common.
In more detail:
Dimmers are available to replace standard wall switches and even for use in place of the light bulb socket/switch in most table lamps. However, nearly all of these are designed only for normal incandescent light bulbs - not fluorescents, compact fluorescents, or high intensity or halogen lamps (or any other type of lamp with a transformer).
(There are special dimmers for use with fluorescent lamps but these must be specifically matched to the lamp type and wattage and their dimming range is usually not very wide. See: the fluorescent lamp information at Don Klipstein's Lighting Web Site for a discussion of dimming techniques and details on several relatively simple approaches that may work for your needs.)
Installation is generally very straightforward as there are only two wires and polarity does not matter. They simply replace the existing switch.
To assure long life, it is best to select a dimmer with a higher power rating than your maximum load. For example, if you are using four 100 W bulbs, a 600 W dimmer should be the minimum choice and one rated at 1000 W would be better. This is particularly true if halogen bulbs are used since these may be harder on dimmers than normal types. Further derating should be applied where multiple dimmers are installed in the same outlet box resulting in greater combined heating. Higher wattage dimmer switches will have better heat sinking as well which should result in the active components - the thyristors - running cooler. Dimmers are under the most stress and generate the most heat when operating at about 50% output.
Dimmers may fail due to power surges, excess load, momentary fault (short) at the instant of light bulb failure, or just plain old age. A failed dimmer will generally be stuck at full brightness since the thyristor will have shorted out. The mechanical on-off switch which is part of the dimmer will probably still work.
To more fully test it, you can make up a simple circuit with a wall plug and cord, and the dimmer in series with a 60-100 W light bulb (less wattage may not be enough to provide enough load and the dimming range may be restricted). Make sure everything is well insulatded!
For a 3-way type dimmer, test/connect between the common (different color wire ors crew) and each of the travelers (same color wires or screws) for all switch positions.
It is not generally worth worrying about repair of a dimmer as they are so inexpensive. However, before replacement confirm that there is no actual problem with the wiring (like a short circuit in the fixture) and that you are not overloading the dimmer.
While designed for incandescent or heating loads only, these will generally work to some extent with universal motors as well as fluorescent lamps down to about 30 to 50 percent brightness. Long term reliability is unknown for these non-supported applications.
CAUTION: Note that a dimmer should not be wired to control an outlet since it would be possible to plug a device into the outlet which might be incompatible with the dimmer resulting in a safety or fire hazard.
S1 is part of the control assembly which includes R1.
The rheostat, R1, varies the amount of resistance in the RC trigger circuit. The enables the firing angle of the triac to be adjusted throughout nearly the entire length of each half cycle of the power line AC waveform. When fired early in the cycle, the light is bright; when fired late in the cycle, the light is dimmed. Due to some unavoidable (at least for these cheap dimmers) interaction between the load and the line, there is some hysteresis with respect to the dimmest setting: It will be necessary to turn up the control a little beyond the point where it turns fully off to get the light to come back on again.
          Black o--------------------------------+--------+
                                                 |        |
                                              |  |        |
                                           R1 \  |        |
                                        185 K /<-+        |
                                              \  v CW     |
                                              |         __|__ TH1
                                              |         _\/\_ Q2008LT
                                              +---|>|   / |   600 V
                                              |   |<|--'  |
                                          C1 _|_  Diac    |
                                       .1 uF --- (part of |
                       S1                     |    TH1)   |
          Black o------/ ---------------------+-----------+
The parts that fail most often are the triac, TH1, or the combination
switch/control (S1/R1).
None of the simple 3-way dimmer controls permit totally independent dimming from multiple locations. With some, a dimmer can be installed at only one switch location. Fully electronic approaches (e.g., 'X10') using master programmers and addressable slave modules can be used to control the intensity of light fixtures or switch appliances on or off from anywhere in the house. See the section: True (electronic) 3-way (or more) dimmers.
However, for one simple, if inelegant, approach to independent dimming, see the section: Independent dimming from two locations - kludge #3251.
Note that the primary difference between this 3-way dimmer schematic and the normal dimmer schematic shown above is the addition of an SPDT switch - which is exactly what is in a regular 3-way wall switch. However, this dimmer also includes a choke (L1) and capacitor (C2) to suppress Radio Frequency Interference (RFI). Operation is otherwise identical to that of the simpler circuit.
This type of 3-way dimmer can be used at only one end of a multiple switch circuit. All the other switches should be conventional 3-way or 4-way types. Thus, control of brightness is possible only from one location. See the section: True (electronic) 3-way (or more) dimmers for reasons for this restriction and for more flexible approaches.
   Red 1 o--------o
                    \
                 S1   o----+------------+-----------+
                           |            |           |
   Red 2 o--------o        |         R1 \  ^ CW     |
                           |      220 K /<-+        |
                           |            \  |        |
                           |            |  |        |
                           |            +--+        |
                           |            |           |
                           |         R2 /           |
                       C2 _|_      47 K \           |
                  .047 uF ---           /         __|__ TH1
                           |            |         _\/\_ SC141B
                           |            +---|>|   / |   200 V
                           |            |   |<|--'  |
                           |        C1 _|_   D1     |
                           |   .062 uF ---  Diac    |
                           |            |           |
                           |   ::::::   |           |
   Black o-----------------+---^^^^^^---+-----------+
                                 L1
                         40 T #18, 2 layers
                       1/4" x 1" ferrite core
The parts that fail most often are the triac, TH1, or the combination
switch/control (S1/R1).
Whether this is really useful or not is another story. The wiring would be as follows:
              Location 1             Location 2
             3-way Dimmer      A    3-way Dimmer     +---------+
                  /o----------------------o\         |  Lamp   |
    Hot o------o/    Silver 1     Silver 2   \o------|   or    |-----o Neutral
           Brass   o----------------------o   Brass  | Fixture |
                     Silver 2  B  Silver 1           +---------+
(If dimming interacts, interchange the A and B wires to the silver screws at
one dimmer).
This one uses a toggle style potentiometer where the up and down positions operate the switches. Therefore, it has 3 states: Brass to Silver 1 (fully up), dim between Brass and Silver 1 (intermediate positions), and Brass to Silver 2 (fully down).
                        Br  /o---o            Br   o---o          Br/\/o---o
  3-way dimmer is up o---o/   S1   or down o---o\  S1    or Dim o---o  S1
                             o---o                \o---o               o---o
                              S2                   S2                  S2
However, it is still not possible to have totally independent control - local
behavior differs based on the setting of the remote dimmer (details left as
an exercise for the reader).
Like the previous circuit, this dimmer also includes a choke (L1) and capacitor (C3) to suppress Radio Frequency Interference (RFI). It is just a coincidence (or a matter of cost) that the 3-way dimmers have RFI filters and the 2-way type shown above does not.
  Silver 1 o---+----------------+--------------------+-----------+
               |                |                    |           |
               |                |                 R1 \  ^ Up     |
               |                |              150 K /<-+        |
               |                |                    \  |        |
               |                |                    |  |        |
               |                |          +---------+--+        |
               |                |          |         |           |
               |            C3 _|_         |      R2 /           |
               |               ---         |    22 K \           |
               |                |          |         /         __|__ TH1
               |                |      C2 _|_        |         _\/\_
               |                | .047 uF ---        +---|>|   / |   200 V
           Up \                 |          |         |   |<|--'  |
               |                |          |     C1 _|_   D1     |
               |                |          |.047 uF ---  Diac    |
               |                |   ::::   |         |           |
               |  Dim  o--------+---^^^^---+---------+-----------+
               |     /               L1
     Brass o---+---o               12T #18
                           1/4" x 1/2" ferrite core
                 Down  o
                       |
  Silver 2 o-----------+
The parts that fail most often are the triac, TH1, or the combination
switch/control (S1/S2/R1).
The simple type of 3-way dimmers are just a normal dimmer with a 3-way instead of normal switch. This allows dimming control from only one location. The other switches in the circuit must be conventional 3-way or 4-way type.
Connecting conventional dimmers in series - which is what such a hookup would require - will not really work properly. Only if one of the dimmers is set for full brightness, will the other provide full range control. Anywhere in between will result in strange behavior. The other dimmer may have a very limited range or it may even result in oscillations - periodic or chaotic variations in brightness. The safety and reliability of such an arrangement is also questionable.
True 3 way dimmers do exist but use a more sophisticated implementation than just a normal dimmer and 3-way switch since this will not work with electronic control of lamp brightness. One approach is to have encoder knobs (similar to those in a PC mouse) or up/down buttons at each location which send pulses and direction info back to a central controller. All actions are then relative to the current brightness. A low cost microcontroller or custom IC could easily interface to a number, say up to 8 (a nice round number) - of control positions. The manufacturing costs of such a system are quite low but due to its specialty nature, expect that your cost will be substantially higher than for an equivalent non-dimmable installation.
If control of intensity at only one of the locations is acceptable, a regular dimmer can be put in series with the common of one of the normal 3-way switches. However, your brightness will be set by that dimmer alone. See the section: Typical dimmer schematics.
An alternative is to use X-10 technology to implement this sort of capability. This would likely be more expensive than a dedicated multi-way switch control but is more flexible as well. X-10 transmits control information over the AC lines to select and adjust multiple addressable devices like lamps and appliances.
However, for the adventurous, see the section: Independent dimming from two locations - kludge #3251.
                 Location 1       Location 2
           +--------+  4-way SW    3-way SW
Hot o--+---| Dimmer |----o\ /o--------o\            +---------+
       |   +--------+      /            \o----------| Fixture |------o Neutral
       |              +--o/ \o--------o      Center +---------+ Shell
       |              |                      (brass)           (silver)
       |              |            +--------+
       |              +------------| Dimmer |--+
       |                           +--------+  |
       +---------------------------------------+
As usual, the brass screw on the fixture or outlet should be connected to the
Hot side of the wiring and the silver screw to the Neutral side.
The dimmers can be any normal knob or slide type with an off position.
Note that as drawn, you need 4 wires between switch/dimmer locations. 4-way switches are basically interchange devices - the connections are either an X as shown or straight across. While not as common as 3-way switches, they are available in your favorite decorator colors.
If using Romex type cable in between the two locations, make sure to tape or paint the ends of the white wires black to indicate that they may be Hot as required by Code.
And, yes, such a scheme will meet Code if constructed using proper wiring techniques.
No, I will not extend this to more than 2 locations!
Also see the section: Controlling a fixture or outlet from multiple locations.
CAUTION: However, note that a dimmer should not be wired to control an outlet since it would be possible to plug a device into the outlet which might be incompatible with the dimmer resulting in a safety or fire hazard.
The severity of the problem is due to a variety of causes with the two most likely being related to the bulb's filament construction/supports and what, if any filtering, is provided by the dimmer itself - some are just worse than others and cost may not be a reliable indication of which-is-which.
There is nothing really wrong with your installation - incorrect wiring would result in it not working at all, blowing a fuse or tripping a breaker, or or not working in certain positions of switches in a 3-way or 4-way (multiple switch locations) setup. If it bothers you try a different brand of bulbs or a different brand of dimmer.
Touch dimmers work in a couple of different ways, depending on the IC used. Simple ones, such as those in the cheap 'touch lamps' that you find for sale on market stalls, etc. normally have three or four preset brightness levels and an OFF setting, which are operated sequentially: touch once for full brightness, again to dim slightly, again to dim a bit more, etc, until the OFF setting is reached. The next touch will then bring the lamp to full brightness.
The better (and more expensive) units, such as the touch dimmer switches that are sold as direct replacements for conventional light switches, are similar, but have many more steps. A single touch will usually bring the lamp to full brightness, while keeping your finger in contact with the touch plate will slowly dim the lamp. You just remove your finger when the lamp is at the required brightness level.
Both kinds of touch dimmer have three basic parts;
There are a number of specially designed IC's available for touch dimmers, notably the HT7704B ,a four-step device for touch lamps as described above, and the SLB0586A, which is the other kind, with facilities for remote control.
(From: Jack Schidt (jack@wintel.net).)
Body detection usually follows one of three forms:
(Zero crossing switching, a technique used with electrical heaters and heating appliances to minimize RFI cannot be used for lighting as it would result in way too much flicker or a very limited number of brightness levels.)
Better light dimmers will include a bypass capacitor (e.g., .01 uF, 1kV) and a series inductor to suppress RFI but these components were often left off in basic models. The FCC has tightened up on their regulations around 1992 so replacing older dimmer switches with newer ones may be the easiest solution.
I can't really recommend a particular model that it better in this regard. However, the package may list 'low RFI' as a feature so checking out Home Depot or wherever won't hurt.
Installing in-line power line filters may work but other options like replacing all your house wiring with metal conduit, or only listening to FM radio are probably not realistic!
BTW, I have used dimmers and AM radios to trace wiring inside the wall! :)
My recommendation would be to get a dimmer rated for 30 to 50 percent more power than you are using. It will still get warm but will have a better (probably finned) heat sink and will be running way below it maximum rating and should be more reliable. In general, any device should be derated to boost longevity!
It is very tempting to try using a common light dimmer to control devices using power transformers. Will this work?
It will usually work fine, but it can lead to a fire hazard and is not recommended. Most major dimmer manufacturers have special dimmers designed for this application, that prevent the hazard inherent in using a standard dimmer. It is worth your while to use one of those.
The problem results from the inductive nature of the impedance the transformer presents to the dimmer. The load is most inductive when the transformer is lightly loaded. Even if you set up your system with a fully loaded transformer, it can become lightly loaded when bulbs burn out. If there is any small asymmetry in the firing angle of the triac on the two half cycles, there will a be small DC voltage across the transformer winding. This is no big deal - you'll get a bit of DC current, and the core will run with some DC flux, and may saturate a bit, but neither will cause significant heating or a real hazard. However, the point at which the triac turns *off* will also then be different on the two half cycles. Because ordinary dimmer circuits time the triac turn on from the turn off point, not from the line voltage zero crossing, the asymmetry in turn-off times leads to a even greater turn-on time asymmetry. If the load is sufficiently inductive, this process can "run away" until the dimmer is acting as a diode, applying nearly full line voltage across the transformer winding. Ordinarily, this would result in enough current to trip a circuit breaker or a fuse, but smaller transformers can have enough DC resistance to keep the current low enough that the breaker does not trip. When I've experimented with this, the transformer winding soon started to smoke. I didn't continue the experiments to see what would happen next, but there have been reports of fires starting this way. A suitably rated small fuse installed in series with the transformer would probably work but I wouldn't want to depend on it.
Dimmers designed for this application can use several methods to get around the problem. Some use a DC detection circuit and shut off if DC is detected. Others use a three-wire connection scheme, such that the line- neutral voltage is available to the dimmer, and can be used for the timing reference, so that the triac is always fired at the same time relative to the line-voltage zero crossing, not relative to when the triac turns off. Thus, although there may still be a small amount of DC present due to asymmetry in the firing circuit, the system can never run away to the point of applying a much high DC voltage. (In good dimmers designed for this application, the asymmetry will also be small to begin with.)
References for further information:
But there is one type of failure to which virtually all dimmers may succumb caused not by a problem in the dimmer but by a transient event when an incandescent lamp burns out. When such a lamp reaches end-of-life, the filament opens and an arc forms which can expand to essentially result in close to a short circuit across the lamp. This happens within a very short time, perhaps one cycle of the AC. At that instant, a very high current flows likely blowing the triac in the dimmer. The result is that the dimmer now is stuck at full brightness (or off, if the switch is still functional).
Why isn't there a fuse? Actually, larger incandescent lamps do have fuses in their base, and these fuses may blow when the lamp burns out. But not fast enough to save the triac. Since dimmer switches are not designed to be repairable - they are considered disposable devices - the cost of including a fuse cannot be justified even if a fuse would work.
The triac may also fail if the dimmer is used in an attempt to control something other than an incandescent lamp, or least, something other than a resistive load. Using a normal light dimmer to control the speed of a motor is a hit or miss affair, and may result in damage to both the dimmer and motor depending on type.
The most common problem after dead batteries is very often damage due to leaky batteries. Even supposedly leak-proof batteries can leak. Batteries also tend to be prone to leaking if they are weak or dead. Therefore, it is always a good idea to remove batteries from any device if it is not to be used for a while. How to assure the batteries will be with the flashlight? Put them in separate plastic bags closed and fastened with a twist tie.
Test the batteries with a multimeter - fresh Alkalines should measure 1.5 V. Any cell that measures less than about 1.2 V or so should be replaced as they will let you down in the end. On a battery tester, they should read well into the green region.
Check the bulb with a multimeter on the ohms scale - a bad bulb will test open. Bulbs may fail from use just like any other incandescent lamp or from a mechanical shock - particularly when lit and hot. Replacement bulbs must be exactly matched to the number and type of batteries (cells). A type number is usually stamped on the bulb itself. There are special halogen flashlight bulbs as well - I do not really know how much benefit they provide.
The switches on cheap flashlights are, well, cheaply made and prone to unreliable operation or total failure. Sometimes, bending the moving metal strip a bit so it makes better contact will help.
Clean the various contacts with fine sandpaper or a nail file.
If a flashlight has been damaged as a result of battery leakage, repair may be virtually impossible.
High quality flashlights are another matter. Maglights(tm) and similar units with machined casings and proper switches should last a long time but the same comments apply to batteries - store them separately to avoid the possibility of damage from leakage. Keep a spare bulb with each of these - the specialty bulbs may be harder to find than those for common garbage - sorry - flashlights.
Rechargeable flashlights include a NiCd or lead-acid battery (one or more cells in series) and the recharging circuitry either as part of the unit itself or as a plug-in wall adapter or charging stand. See the sections: "Battery chargers" and "Typical rechargeable flashlight schematics" for more information.
It is a really simple, basic charger. However, after first tracing out the circuit, I figured only the engineers at First Alert knew what all the diodes were for - or maybe not :-). But after some reflection and rearrangement of diodes, it all makes much more sense: C1 limits the current from the AC line to the bridge rectifier formed by D1 to D4. The diode string, D5 to D8 (in conjunction with D9) form a poor-man's zener to limit voltage across BT1 to just over 2 V.
The Series 50 uses a sealed lead-acid battery that looks like a multi-cell pack but probably is just a funny shaped single cell since its terminal voltage is only 2 V.
Another model from First Alert, the Series 15 uses a very similar charging circuit with a Gates Cyclon sealed lead-acid single cell battery, 2 V, 2.5 A-h, about the size of a normal Alkaline D-cell.
WARNING: Like many of these inexpensive rechargeable devices with built-in charging circuitry, there is NO line isolation. Therefore, all current carrying parts of the circuit must be insulated from the user - don't go opening up the case while it is plugged in!
                                             2V LB1  Light
                                           1.2A +--+ Bulb    S1
                                       +--------|/\|----------o/ o----+
            _ F1   R3         D3       |        +--+                  |
   AC o----- _----/\/\---+----|>|--+---|----------------------+       |
          Thermal  15    |    D2   |   |                 4A-h |       |
           Fuse          | +--|>|--+   |         BT1 - |+ 2V  |       |
                         | |  D4       +--------------||------|-------+
                         +----|<|--+   |               |      |       |
                           |  D1   |   |  D8   D7   D6   D5   |  D9   |
          +--------+-------+--|<|--+---+--|<|--|<|--|<|--|<|--+--|>|--+
          |        |                                                  |
          |        /                                                  |
         _|_ C1    \ R1                                               |
         --- 2.2uf / 100K                                             |
          |  250V  \                                                  |
          |        |               R2          L1  LED                |
   AC o---+--------+--------------/\/\-----------|<|------------------+
                                 39K 1W       Charging
                                                                 S1
         11.2 VRMS                                +---------------o/ o----+
  AC o-----+ T1       R1      LED1         D1     |  +| | | -             |
            )|| +----/\/\-----|>|---->>----|>|----+---||||||---+          |
            )||(      33    Charging     1N4002       | | |    |  KPR139  |
            )||(      2W                           BT1         |    LB1   |
            )||(                                   3.6V, 1 A-h |    +--+  |
            )|| +-------------------->>------------------------+----|/\|--+
  AC o-----+                                             Light Bulb +--+

        |<------- Charger ---------->|<---------- Flashlight ----------->|
I could not open the transformer without dynamite but I made measurements of
open circuit voltage and short circuit current to determine the value of R1.
I assume that R1 is actually at least in part the effective series resistance
of the transformer itself.
Similar circuits are found in all sorts of inexpensive rechargeable devices. These have no brains so they trickle charge continuously. Aside from wasting energy, this may not be good for the longevity of some types of batteries (but that is another can of worms).
There is an added wrinkle which provides a blinking light option in addition to the usual steady beam. This will also activate automatically should there be a power failure while the unit is charging if the switch is in the 'blink' position.
With S1 in the blink position, a simple transistor oscillator pulses the light with the blink rate of about 1 Hz determined by C2 and R5. Current through R6 keeps the light off if the unit is plugged into a live outlet. (Q1 and Q2 are equivalent to ECG159 and ECG123AP respectively.)
            R1          D1                 R3   LED1
    AC o---/\/\----+----|>|-------+---+---/\/\--|>|--+    D1-D5: 1N4002
            33    ~|    D2        |+  |   150        |
           1/2W    +----|<|----+  |   |       R4     |  D5
                        D3     |  |   +------/\/\----+--|>|--+
              C1   +----|>|----|--+   |    33, 1/2W          |   LB1 2.4V
            1.6uF ~|    D4     |      |   | |                |   +--+ .5A
    AC o--+---||---+----|<|----+--+---|--||||--------------+-+---|/\|----+
          |  250V  |              |-  | - | |+             |     +--+    |
          +--/\/\--+              |   |   BT1      + C2 -  |      R5     |
              R2                  |   |  2.4V    +---|(----|-----/\/\----+
             330K                 |   |          |  22uF   |     10K     |
                                  |   |    R6    |       |/ E            |
                                  |   +---/\/\---+-+-----| Q1            |
                                  |       15K      |     |\ C  +---------+
                                  |                /  C327 |   |         |
                                  |             R7 \   PNP |   |   1702N |
                                  |           100K /       |   |   NPN |/ C
                                  |                \       +---|-------| Q2
                                  |      On        |           |       |\ E
                                  |   S1 o---------|-----------+         |
                                  +----o->o Off    |                     |
                                         o---------+---------------------+
                                    Blink/Power Fail
       +------+---|>|---+------------+----------+
       |      |   D1    |            |          |
       |      | 1N4004  |            /          |
       |      |         |            \ R3     __|__
      +| SC1  |       +_|_ BT1       / 2.2K   _\_/_ LED
    +--+--+   |         _  2xAA NiCd \          |
    |Solar|   |        ___ 550mA-hr  |        |/ C
    |Cell |   |       - _            +---+----| Q2 SS8050
    +--+--+   |         |    R2      |   |    |\ E (ECG216)
      -|      |         |   20K    |/ C  /      |
       |      +---------|---/\/\---| Q1  \ R1   |
       |                |   SS9013 |\ E  / 100K |
       |                | (ECG123A)  |   |      |
       +----------------+------------+---+------+
When there is enough voltage from the solar cell, Q1 is turned on and Q2
(the LED driver) is turned off. As far as I can tell, there is nothing to
actually limit current to the LED except for the combination of battery,
transistors, LED, and wiring resistance. Both transistors could probably
be replaced with 2N3904s. So, if you were duplicating this thing, I'd
recommend adding something to control the current to the LED or at least
checking it first!
Actual failure of this complex device would most likely be due to worn out NiCd cells or corrosion to due exposure to the weather.
Operational problems like weak output or inadequate lighting time could be due to insufficient Sunlight (the thing is installed under a bush!) or extended cloudy conditions. Of course, these don't produce a huge amount of light in any case!
Replacing incandescent light bulbs can usually be done without disassembly. The bulbs may be of the specialty variety and expensive, however.
When a unit using fluorescent bulbs will no longer come on, the most likely cause is a bad bulb. However, replacement may involve disassembly to fain access. Where two bulbs are used, either one or both might be bad. Sometimes it will be obvious which is bad - one or both ends might be blackened. If this is not the case, replacement or substitution is the only sure test. These **will** be expensive $7-10 is not uncommon for an 8 inch fluorescent bulb!
Other possible problems: plug, cord, switch, light bulb sockets.
If none of the lights come on, check for a blown fuse or circuit breaker, bad wall switch or dimmer, a bad connection in the ceiling box or elsewhere in the house wiring, or a bad connection where the cord is joined to the individual socket wires.
Where only one bulb does not light - and it is not a burned out bulb - a bad socket, loose wire connection at the socket, or bad connection at the point where the wires are joined (Wire Nuts(tm) or crimps) is likely.
A basic projector consists of a really bright lamp - usually halogen but some fancy ones use a High Intensity Discharge (HID) lamp (see the document: Gas Discharge Lamps, Ballasts, and Fixtures), a cooling fan, electrical and thermal protection devices, and possibly an interlock switch to prevent operation with the cover removed. The main switch may include reduced brightness settings which adds some resistance or a diode in series with the lamp.
(Repair of those with HID lamps unless it is a simple bad connection or failure in the protection devices is well beyond the scope of this document unless replacing the lamp is all that is needed. WARNING: The types of power supplies used for these may have capacitors that can retain a dangerous charge for a long time even after the plug is pulled.)
A reflector and condensing lens concentrates the light more or less uniformly onto the material to be projected {transparency or whatever) and a projection lens relays and enlarges that to the screen. Note that the large Fresnel lens (which should also be cleaned) that usually serves as the transparency platform of an overhead projector is not the primary condenser but serves a similar function directing most of the light which passes through the transparency to the projection lens. There may also be one or more pieces of heat absorbing glass between the lamp and condenser. While you're in there, a careful cleaning of the optics could be useful! After making sure the unit is unplugged, use a cloth moistened with isopropyl alcohol to clean all accessible optical surfaces. Rubbing (70%) or medicinal (91%) alcohol is fine as long as it doesn't contain any additives. Be gentle - optical glass is not that hard! WARNING: Avoid contact with the glass envelope of the lamp itself. If you do touch it by accident, use a fresh cloth or paper towel and alcohol to remove all traces of skin oils since this contamination can lead to failure at the elevated temperatures at which these run.
Like all incandescent lamps, those in projectors burn out - and since they are run at higher than normal wattage to get the most and whitest light, they usually are only rated for a small number of hours (e.g., 100). When burnout occurs, other components may be blown as well.
Since everything runs hot, deteriorated connections, contacts, sockets, etc., are quite common. Any major damage will require repair or replacement of the offending components. The fan may be on a thermostat which can also fail. If the fan doesn't start (usually immediately or after a minute or so at most), overheating WILL occur. Check the thermostat (bypass it to test) and the fan for dry bearings, bad connections, or a bad motor.
If replacing the bulb doesn't help, check the fuses and thermal protectors for opens. Check the outlet as the burnout may have blown the fuse or tripped the circuit breaker for that branch circuit.
If the new bulb runs excessively bright, TURN IT OFF IMMEDIATELY! Some of these projectors use 82 V bulbs (it will say on the bulb and/or its package), and a series diode (or diodes) may be used to reduce power to the bulb to run it at an effective voltage of 82 VRMS. (The RMS value of half wave rectified 115 VAC is close to 82 V). When the old bulb blew (or even if it didn't), these diodes can fail - often shorted. The new bulb won't last long on the full line voltage. The replacement diodes need to have a PIV rating of at least 200 V (for 115 VAC power) and a current rating adequate to handle the operating current and the initial surge (which can be 10X of that). Depending on the bulb's wattage, a 25 A or higher diode may be needed. An proper replacement will be available from the projector manufacturer but will be more expensive than one purchased from an electronics distributor.
There are two kinds of problems: totally dead or stuck/sluggish.
A totally dead fan can be the result of several possible causes:
Sluggish operation can be due to gummed up lubrication in the motor or any gears associated with an automatic oscillating mechanism. Disassemble, thoroughly clean, and then lubricate the motor bearings with electric motor oil. Use light grease for the gearbox but this is rarely a problem.
A noisy fan may be due to dry motor or other bearings or loose hardware or sheetmetal. Disassemble, clean, and lubricate the motor or gearbox as above. Inspect for loose covers or other vibrating parts - tighten screws and/or wedge bits of wood or plastic into strategic locations to quiet them down.
Damaged fan blades will result in excessive vibration and noise. These may be easily replaceable. They will be attached to the motor shaft with either a large plastic 'nut' or a setscrew. However, locating a suitable set of blades may be difficult as many cheap fans are not made by well known companies.
Ball bearing fans rarely fail for mechanical reasons but if the bearings become hard to turn or seize up, replacement will usually be needed. (Yes, I have disassembled ball bearings to clean and relube THEM but this used only as a last resort.)
WARNING: For power supply fans, be aware that high voltages exist inside the power supply case for some time (perhaps hours) after the unit is unplugged. Take care around the BIG capacitors. If in doubt about your abilities, leave it to a professional or replace the entire power supply!
The only type of repair that makes sense is cleaning and lubrication. Else, just replace the fan or power supply. It isn't worth troubleshooting electronic problems in a fan!
If you want to try to clean and lubricate the bearings, the blade assembly needs to be removed from the shaft. There should be a little clip or split washer holding it on. This is located under a sticker or plastic plug on the center of the rotating blade hub. Once this fastener has been removed, the blades will slide off (don't lose the various tiny spacers and washers!)
Thoroughly clean the shaft and inside the bushings and then add just a couple drops of light oil. Also, add a few drops of oil to any felt washers that may be present as an oil reservoir.
Reassemble in reverse order making sure the tiny washers and spacer go back in the proper positions.
How long this lasts is a crap shoot. It could be minutes or years.
Replacement fans are readily available - even Radio Shack may have one that is suitable. Nearly all run on 12 VDC but some small CPU fans may use 5 VDC. While current ratings may vary, this is rarely an issue as the power supply has excess capacity. Air flow rates may also vary depending on model but are usually adequate for use in PCs.
Advantages include virtually infinite life, very low power consumption, to nearly total silence when operating. However, they aren't going to cool very much :-).
(If you care, something that is said to be piezo electric changes shape (e.g., bends or compresses/expands) when a voltage is applied (and vice-versa). Many materials exhibit the piezo electric effect include crystals like quartz, various ceramics and plastics, and even some organic compounds. The most common example of a piezo electric device in modern technology is the beeper in a common digital watch, pocket alarm clock, or pager - in which case an electrical signal at a most annoying frequency causes the change in thickness of a ceramic disk and results in the audible tone.)
The piezo fan I have is just a pair of thin plastic flaps or vanes, each about 1/2" x 3", separated by perhaps 1" and slightly diverging. A pair of piezo elements at one end vibrate the vanes when driven through a dropping resistor from the 60 Hz AC line. Interestingly, the resonance is actually at 50 Hz but I do not think this unit was designed for European power. A plastic housing helps to guide the air flow - what of it there is. The result is a just detectable breeze so I wouldn't recommend using one of these to cool your Pentium II!
Except for mechanical damage, there isn't much to go wrong as long as the piezo elements themselves are getting power. However, a buildup of dirt on the vanes could change the resonant frequency to the point of greatly reducing effectiveness (to the extent that there is any to begin with!).
Don't worry, you may never see one of these things in several lifetimes :-).
Usually, the answer is a qualified 'yes'. Except for some that are internally regulated or thermostatically controlled, the speed is affected by input voltage. It is likely that the fan will run on anywhere from .5 to 1.25 times the nominal input voltage though starting when it is near the low end of this range may need some assistance.
A universal DC wall adapter, adjustable voltage regulator, or (variable) series power resistor can provide this control. For example:
                     25, 2 W        + +--------+ -
    +12 VDC o-----+---/\/\---+--------| DC FAN |----o Gnd
                  |   +      |        +--------+
                  +----|(----+      12 VDC, .25 A
                    10,000 uF
                      25 V
The 25 ohms power resistor should reduce the speed of this fan by about 25 to
30 percent. The capacitor provides full voltage for a fraction of a second to
assure reliable starting.
These small shaded pole fans will work just fine on a Variac. Any speed you want, no overheating, etc. I had done this with all sorts of little computer cooling fans as well as larger ones (remember those old DEC PDP-11 rack fans?). My bedroom window fan is one of these on a Variac. :)
A true rheostat (variable power resistor) will also work. However, significant power will be dissipated in the rheostat which must be sized so that the maximum power density of any portion of its element does not exceed its power handling capability - this can end up resulting in a massive device even for a small fan. For example, to vary a 120 VAC fan rated at 24 VA from between 1/2 to full power would require a 600 ohm, 25W rheostat; down to 1/4 power would require an 1,800 ohm 75 W rheostat!
Small triac based speed controls like those used for ceiling fans may also work. Even light dimmers will *probably* work for medium size fans or banks of fans though I cannot guarantee the reliability or safety of these. The problem is that small induction motors represent a highly inductive loads for the light dimmer circuitry which is designed for a resistive load. I have achieved a full range of speeds but over only about 1/4 to 1/2 of the rotation of the control knob. There is some buzz or hum due to the chopped waveform.
However, from my experiments, light dimmers may have problems driving a single small fan. If the load is too small, the result may be a peak in speed (but still way less than normal) at an intermediate position and the speed actually much lower when on full, or reduced speed even on full. In this case, adding a resistive load in parallel with the motor - a light bulb for example - may improve its range. It adds a sort of quaint look as well! :-)
If you do opt for a solid state speed control, make sure you include a fuse in the circuit. A partial failure of the triac can put DC through the motor which would result in a melt-down, lots of smoke, or worse. (This isn't a problem with a light bulb load since its resistance is the same for AC and DC; a motor's DC resistance is quite low.)
The reason these simple approaches will work for these AC motors is that they are high slip to begin with and will therefore have a high range of speed vs. input voltage. The only concern is overheating at some range of lower speeds due to reduced air flow. However, since these fans are normally protected even against stall conditions, I wouldn't expect overheating to be a problem - but confirm this before putting such fans into continuous service.
If all you need to do is provide a fixed, reduced speed for a bank of similar AC fans, try rewiring them as two sets of parallel connected fans in series. The result will be 1/2 the normal line voltage on each fan motor which may provide exactly the speed you want! The extension to more than 2 sets of fans is left as an exercise for the student :-).
And the shaded pole motors in fans and other appliances with multiple (fixed) speeds have several sets of windings that can be switched in or out in various combinations to vary the effective field strength.
A ceiling fan is just an induction motor driving a set of blades. Multiple taps on the motor windings in conjuac dansnction with a selector switch provides speed control for most inexpensive fans. Better units include a solid state motor speed control.
The light often included with the fan unit is usually just an incandescent fixture with 1-5 bulbs and a switch. This may be a simple on-off type, a selector to turn on various combinations of bulbs, or a dimmer with continuous or discrete control of illumination.
WARNING: Always check mechanical integrity of fan mounting when installing or servicing a ceiling fan. Original design and construction is not always as fail-safe as one might assume. Double check for loose nuts or other hardware, adequate number of threads holding fan to mounting, etc. These have fallen without warning. Only mount in ceiling boxes firmly anchored to joists - not just hanging from the ceiling drywall! Check that the fan is tight periodically. The constant vibration when running, slight as it is, can gradually loosen the mounting hardware. Furthermore, if pull chain type switches are used for the fan or light, constant tugging can also tend to loosen the entire fan.
Failures of ceiling fans can be divided into electrical and mechanical:
Electrical:
For an existing installation that suddenly stopped working, a bad cap is a likely possibility. An induction motor that will not start but will run once started by hand usually indicates a loss of power to the starting (phase) winding which could be an open or reduced value capacitor.
This is probably a capacitor-run type of motor where the capacitor provides additional torque while running as well. Therefore, even starting it by hand with the blades attached might not work. With the blades removed, it would probably continue to run. Of course, this isn't terribly useful!
I use synthetic transmission lube, 80-130 (manual gearbox, not automatic transmission fluid which is very thin --- sam). I imagine that any similar lubricant, synthetic or not, would work as well, but the synthetic flows down in better and works well.
Do not use WD-40, 3-in-1 oil or any other lightweight oil. Motor oil is good as well, but it does not stick to the bearings as well. DO NOT use automatic transmission fluid - extremely thin.
Grease would be perfect, white lithium, divine! But, getting the grease down into the bearings would be very difficult.
Just about three or four drops should be all it takes. Getting it on the lower bearings of the ceiling fan will be tough. I have an oil can that I pump a drop to the tip of, then hold it against the bearings until they wick the oil inside. This is very slow. It takes about 15 minutes per fan to oil, clean the top of the blades, oil a little around the hanging ball, pull the globe off and clean the globe inside, and make sure everything is OK.
Doing this will likely result in a nasty hum or buzz at anything other than full brightness (speed) or off. This is both annoying and probably not good for the fan motor as well. A dimmer works by reducing the power to the light by controlling when the voltage is applied on each cycle of the AC. If it is turned on half way through the cycle half the power is provided, for example. However, with cheap lamp dimmers, this results in sharp edges on the waveform rather as peak voltage is applied suddenly rather than with the nice smooth sinusoid. It is these sharp edges causing the coils or other parts of the fan to vibrate at 120 Hz that you are hearing.
Special speed controls designed for ceiling fans are available - check your local home center or ceiling fan supplier.
Here is another alternative:
(From: Rick & Andrea Lang (rglang@radix.net).)
Here's a potential solution if you don't mind spending a little more for a ceiling fan (If you already have one in that location, perhaps you can put it in another room). Ceiling fans with remote control are now available. They only require power to the ceiling fan (2 wire) and a remote control. With the remote you can dim the lights, slow the fan or both. You can then use the existing new wall switch as a power ON/OFF switch also. If you choose this route, be careful of interference with garage door openers. Usually, the remotes have at least 4 frequency selections to help avoid interference with other remote systems. I put one in that three of the four frequencies opened the garage door. I lucked out on the 4th one!
(From: David Buxton (David.Buxton@tek.com).)
A quickie test. Get the fan turning at a speed that demonstrates the throbbing noise. Come up with a way to instantly remove power to the fan. If the noise continues for a little bit until the fan has slowed down enough, then you know the noise is in the mechanical dynamics, perhaps blades out of balance. If the noise quits instantly with power removal, then you need a better speed control better designed for fan motor control.
Ceiling fans are normally multipole, capacitor-run types. They normally run fairly close to stalled, the blades being big enough that the motor never gets anywhere near synchronous speed.
Speed control in three speed types is by switching the value of the cap in series with the quadrature windings. The caps normally have two sections of 3 and 6 uF, with a common connection between the two sections allowing connections of 3, 6, or 9 (3 in parallel with 6) uF total.
I have seen some caps of slightly different value, but they should be close, just translate my 3 and 6 to what you actually have in what follows.
The higher the capacitance the higher the stall torque, so the faster the fan runs against the non-linear (square-law) torque vs. speed characteristic of the blades. (remember I said it is always pretty much stalled)
If you miswired the cap, then you may be getting 3 or 6 and 2 (3 in *series* with 6 uF which would result in low speeds. This *is* the case if any 2 out of 3 speeds seem to be the same. The replacement caps are usually marked with what terminal is which, but originals often are not. I don't know if there is a standard color code, but manufacturers are under no obligation to adhere to it even if there was. If you are totally lost, there are only 6 possible ways to connect the capacitor. 2 of these will give you all 3 speeds (but one in wrong order). So if you keep good notes (essential here) then you could try all possibilities in 20 minutes or so...yes, you're probably working with hands over head, what you wanted easy too?
OK, here is how to get it in 3 tries max:
Identify the "common" capacitor lead (connects to both 3, and 6 uF sections, hopefully your replacement is marked). It is currently connected to the wrong place, so swap it with one of the other cap wires. If you now have three speeds in the correct order, then your done. If you have three speeds in the wrong order, then leave common wire alone, but swap other two. (correct order is: off-hi-med-lo usually)
If you *didn't* have three different speeds following the first wire swap, then swap that common wire with the one wire you haven't moved yet. Now you should have three speeds, now correct the order as described, if needed.
If you currently have three speeds, but all are too slow, then it is likely that your fan needed a higher value capacitor. another explanation might be that the old cap was getting leaky when it warmed up after start, and letting the fan have extra current, thus giving extra speed.
In my experience, the three speed types should run from just slow enough to follow with the eye, to fast, fairly noisy, and making a fair amount of wobble on the mounting.
Continuously variable speed types put a fixed 9 or 10 uF cap in series with the quadrature winding, and regulate voltage to both windings via lamp-dimmer style triac circuit.
Depending on what wiring you have and what new wiring needs to be installed, I would install 14/3 cables for all ceiling lights. That way, you will be able to control ceiling fan and light from two separate switches.
Each time a new light has to be installed in our house, I make sure a 14/3 wire is installed. For three-way switches, I make it two 14/3 wires, even if I don't install a ceiling fan now. A 14/3 wire is not that much more expensive, and 10 years down the road, it might be useful.
The local high-end lights-and-fans shops have a handout that recommends that wherever a ceiling fan is to go have the following wiring:
The handout sheet also point out that adding a extra brace to the ceiling during any remodeling or new construction sized for a 100 pound dead weight is a good idea - it can be as simple as a couple of feet of 2x6" lumber and a couple of sheet metal fasteners. A wobbling fan can cause fatigue in a light duty metal brace rapidly. The extra cost is minimal, and it can prevent a fan from landing in the middle of the bed!
(From: George Eccles (geccles@ibm.net).)
I just took ceiling fan motor apart. The (center) stator has 16 coils, in 2 concentric groups of 8, arranged around the circumference of a flat disk. The groups are offset from each other by (maybe) 20 or 30 degrees. Based on resistance readings, I think one group is all wired in series. (I think) the other group is arranged in different combinations, based on the speed setting. For highest speed, I think all are in series, though I don't know what the phasing is. For the lower speeds, 1 or 2 coil pairs have their phasing reversed.
The rotor (aka the housing) has no visible windings, and no permanent magnets. AFAIK, it's just a thin ring (maybe 1/2" thick vertically, 3/4" radially) of laminated (maybe 10 or 12) strips of ferrous metal, embedded in a slightly larger aluminum casing. The laminations are not insulated from each other. Along the innner cicumference, the laminations are interrupted with weird pattern of what might be just interlocking to the aluminum casing.
Electronic air cleaners include a high voltage low current power supply and oppositely charged grids in the air flow. A failure of the solid state high voltage generator can result in the unit blowing air but not removing dust and particulate matter as it should. A typical unit might have 7.5 to 10 kV at 100 uA maximum (short circuit current, probably less at full voltage). Actual current used is negligible under normal conditions. This voltage is significant but the current would be just barely detectable, if at all.
The power supplies for smaller table top devices like the AirEase(tm) Personal Space Ionization Air Cleaner from Ion Systems, Inc. would probably generate similar voltages (possibly slightly lower) but at much lower current - perhaps only, 5 to 10 uA.
The modules are usually quite simple: a transistor or other type of switching circuit driving a step-up transformer and possibly a diode-capacitor voltage multiplier. See the sections: "Electronic air cleaner high voltage module schematic" and "Auto air purifier schematic" for an example of a typical circuit.
Where there is no high voltage from such a device, check the following:
On the topic of high voltage power supplies/transformers:
(From: Marvin Moss (mmoss@mindspring.com).)
These transformers have a very large air gap in the core and are designed to be able to operate for an extended period of time when the output is short circuited. If you get a piece of dirt or aluminum foil or something conductive in the filter, it has to bear the short until you clean the filter. I found several sources of surplus high voltage power supplies in the range of 5,000 volts at 2 mA. or so for $14.95 and bought several of them. I did in fact replace one of my two supplies in my A/Cs with this unit and it has been working perfectly for about 10 years now. The voltage is not critical but too high a voltage will create excessive ozone. Too low a voltage will not filter well. I think that 3,500 to 6,000 volts is the range but I can give you more info if you want it.
This module produces both positive and negative outputs when connected to 115 VAC, 60 Hz line voltage. Each is about 5 kV at up to around 5 uA.
The AC line powered driver and HV multiplier are shown in the two diagrams, below:
                   D1                                           T1  o
  H o--------------|>|----+---+--------------------+               +-----o A
                 1N4007   |   |        Sidac     __|__ SCR1     ::(
                          |   |   R3  D2 100 V   _\_/_ T106B2   ::(
  AC                  C1  |   +--/\/\---|>|      / |   200 V    ::(
 Line      Power  .15 uF _|_     1.5K   |<|--+--'  |   4 A    o ::( 350 ohms
          IL1 LED   250V ---                _|_    |  +-------+ ::(
        +--|<|---+        |              C2 ---    |  |        )::(
        |   R1   |   R2   |        .0047 uF  |     |  | .1 ohm )::(
  N o---+--/\/\--+--/\/\--+                  +-----+--+        )::(
           470      3.9K  |                                +--+    +--+--o B
           1 W      2 W   |                                |    R4    |
                          +--------------------------------+---/\/\---+
                                                               2.2M
The AC input is rectified by D1 and as it builds up past the threshold of the
sidac (D2, 100 V), SCR1 is triggered dumping a small energy storage capacitor
(C1) through the primary of the HV transformer, T1. This generates a HV pulse
in the secondary. In about .5 ms, the current drops low enough such that the
SCR turns off. As long as the instantaneous input voltage remains above about
100 V, this sequence of events repeats producing a burst of 5 or 6 discharges
per cycle of the 60 Hz AC input separated by approximately 13 ms of dead time.
The LED (IL1) is a power-on indicator. :-)
The transformer was totally potted so I could not easily determine anything about its construction other than its winding resistances and turns ratio (about 1:100).
                                            A o
                                     C3       |
                              +------||-------+
          R5     R6      D3   |   D4     D5   |  D6     R7       R8
  HV- o--/\/\---/\/\--+--|>|--+--|>|--+--|>|--+--|>|---/\/\--+--/\/\--o HV+
         10M    10M   |      C4       |                220K  |  10M
                      +------||-------+                      |
       D3-D6: 10 kV, 5 mA            _|_                    _|_
       C3,C4: 200 pF, 10 kV          --- C5                 --- C6
       C5,C6: 200 pF, 5 kV            |                      |
                                 B o--+----------------------+
The secondary side consists of a voltage tripler for the negative output
(HV-) and a simple rectifier for the positive output (HV+). This asymmetry is
due to the nature of the unidirectional drive to the transformer primary.
From my measurements, this circuit produces a total of around 10 kV between HV+ and HV-, at up to 5 uA. The output voltages are roughly equal plus and minus when referenced to point B.
I assume the module would also operate on DC (say, 110 to 150 V) with the discharges repeating continuously at about 2 kHz. Output current capability would be about 5 times greater but at the same maximum (no load) voltage. (However, with DC, if the SCR ever got stuck in an 'on' state, it would be stuck there since there would be no AC zero crossings to force it off. This wouldn't be good!)
This module is probably for a device similar to the AirEase(tm) Personal Space Ionization Air Cleaner from Ion Systems, Inc. This unit has the positive output of its HV module connected to a 3/16" diameter electrode on the side of the case. This is in contact with a piece of foam (a cylinder about 2" in diameter by 5" high) which surrounds the entire unit. While it appears that this foam should be conductive, I could not detect any evidence of this with a multimeter. The negative output is connected to a 1-1/4" conductive foam disk on the top of the unit. Unfortunately, the HV module in the AirEase was totally potted so I could not determine anything about its internal circuitry.
                                                                   DL1 +-+ |
                                                   o  T1 +-------+-----|o|
  +12 o---+--------+----------+---------------------+ ::(        |     +-+ |
          |        |          |                D 30T )::(        | DL2 +-+
          |        |        -_|_ 4.7uF           #30 )::(        +-----|o| |
          |        |         --- 50V         +------+ ::( 3000T  |     +-+
          |       _|_ C2    + |              |        ::( #44    | DL3 +-+ |
          |       --- 470pF   +--------------|------+ ::(        +-----|o|
          |        |          |              | F 30T )::(        |     +-+ |
        +_|_ C1    |          |       D1     |   #36 )::(        | DL4 +-+
         --- 33uF  +----------|---+---|<|----|------+ ::(        +-----|o| |
        - |  16V   |          |   | 1N4002   |     o     +--+          +-+
          |        /          /   |        |/ C           o |              |
          |     R1 \       R2 \   +--------|Q1  TIP41       +--------------+
          |     1K /     4.7K /            |\ E             |            Grid
          |        \          \              |              |
          |        |          |              |              |
  GND o---+--------+----------+--------------+--------------+
T1 is constructed on a 1/4" diameter ferrite core. The D (Drive) and F
(Feedback) windings are wound bifilar style (interleaved) directly on the
core. The O (Output) winding is wound on a nylon sleeve which slips over
the core and is split into 10 sections with an equal number of turns (100
each) with insulation in between them.
DL1 to DL4 look like neon light bulbs with a single electrode. They glow like neon light bulbs when the circuit is powered and seem to capacitively couple the HV pulses to the grounded grid in such a way to generate ozone. I don't know if they are filled with special gas or are just weird neon light bulbs.
The high-tech versions consist of a high voltage low current power supply and fluorescent (usually) lamp selected to attract undesirable flying creatures. (Boring low-tech devices may just use a fan to direct the insects to a tray of water from which they are too stupid to be able to excape!)
However, these devices are not selective and will obliterate friendly and useful bugs as well as unwanted pests.
Here is a typical circuit:
         S1        R1         C1            C2            C1-C4: .5 uF, 400 V
  H o----o/ o--+--/\/\--------||---+--------||---------+  D1-D5: 1N4007
               |  25K        D1    |   D2        D3    |   D4
               |         +---|>|---+---|>|---+---|>|---+---|>|---+
              +-+        |        C3         |        C4         |
 AC Line      |o| FL1    +---+----||----+----+---+----)|----+----+--o +
              +-+ Lamp   |   |    R3    |        |    R4    |        500 to
               |         |   +---/\/\---+        +---/\/\---+        600 V
               |   R2    |       10M                 10M             to grid
  N o----------+--/\/\---+------------------------------------------o -
                  25K
This is just a line powered voltage quadrupler. R1 and R2 provide current
limiting when the strike occurs (and should someone come in contact with the
grid). The lamp, FL1, includes the fluorescent bulb, ballast, and starter (if
required). Devices designed for jumbo size bugs (or small rodents) may use
slightly larger capacitors!
(From: Jan Panteltje (pante@pi.net).)
I have one, bought it very cheap: they are only $10 here :)
It comes with a 25 W blue lamp inside, with wires around it. The lamp did not last long, so I replaced that with a 7 W electronic fluorescent type, that now just keeps going and going and going. The bugs do not care, they just go for the light. Then they hit the wires.
Here, we have 230 V, in the lamp is a voltage doubler, with 2, 220 nF capacitors, 2 silicon diodes, and a 10 K Ohm series resistor in the mains. The whole thing cannot be touched by humans from outside. The voltage between the wires is something like 620 V. If an insect shorts the wires, the 10K limits the current until it is destroyed (the insect that is). The insect actually explodes, the 600 V cap discharges into it.
(From: (Abe Shultx) abe_shultz@hotmail.com).)
I grabbed a bug zapper from someone's garbage and opened it up. Instead of a voltage multiplier, there was a transformer. It had a capacitor across the output, and threw an approximately 3/4 inch loud blue arc. I don't know the cap values, because it was potted. :-(
(From: John Harvey (johnharvey@bigpond.com).)
Most DIY fence energizers use an automotive ignition coil and kits (generally minus coil) are available in Australia and probably elsewhere.
Commercial units operate on the capacitor discharge principle and are fired at a 1.2 second interval. Voltage O/P needs to be around 5 to 8 kV (which will drop under load). The energy O/P (pulse duration) is determined by the capacitor and 10 to 20 uF is about right for a small unit (up to 2km or so). They must use a pulse grade capacitor (which has a high dV/dt) to be reliable.
The most common problems relate to failure of the timing motor or gear train. With time, the oil and grease used inside the timing motor may gum up. Eventually, it gets so stiff that the motor stops - or more likely - doesn't start up after a power failure or the unit has been unplugged for a while.
The cheap plastic gears may also break, chip, or loose teeth.
Sometimes, disassembly, cleaning, and lubrication, will get the motor going - possibly for a long time. However, replacement parts are rarely worth the cost compared to a complete new timer.
These may fail in the same way as other electronic controls such as dimmers. Most likely problems are that they are either stuck off or stuck on. Aside from testing for bad connections or shorted or open components (with power OFF or disconnected!), repair is probably economical. Assuming it can be opened non-destructively at all, check the triac and other parts in its vicinity. The rest of the circuitry is probably in a proprietary chip - but these don't fail much.
Also see the section: Warnings about using compact fluorescent lamps on electronic timers.
There are two issues:
Where a solid state timer is used to replace a normal switch, there is usually no connection to the Neutral so it must derive all its operating power from current through the load (though at a very low current level).
The type of circuitry in a compact fluorescent with an electronic ballast (or other equipment with a switching power supply like a TV, some VCRs, computer, etc.) may result in this current being too low or erratic. The result will be that the timer doesn't work properly but damage isn't that likely (but no guarantees).
If it is installed with 3 wires (Hot, Neutral, Load), then this should not be a problem.
In addition, interference (e.g., spikes) from the CF ballast may feed back into the electronic timer and this may either confuse or actually result in failure.
The solid state switching device - usually a triac - in the timer unit may be blown by voltage spikes or current surges when the power goes on or off into an inductive or capacitive load like an electronic ballast (or normal magnetic ballast, for that matter.
Conventional thermostats usually use a bimetal strip or coil with a set of exposed contacts or a mercury switch. In general, these are quite reliable since the load (a relay) is small and wear due to electrical arcing is negligible. On those with exposed contacts, dirt or a sliver of something can prevent a proper connection so this is one thing to check if operation is erratic. The following description assumes a single use system - heating or cooling - using 24 VAC control which is not properly controlling the furnace or air conditioner.
(CAUTION: on an air conditioner, rapid cycling is bad and may result in tripped breakers or overload protectors so ideally, this should be done with the compressor breaker off).
Setback thermostats: These may be controlled electromechanically by a timer mechanism which alters the position of the contacts or selects an alternate set. Newer models are fully electronic and anything beyond obvious bad connections or wiring, or dead batteries is probably not easily repaired. However, eliminate external problems first - some of these may need an additional unswitched 24 VAC or 115 VAC to function and this might be missing.
Heat anticipators: In order to reduce the temperature swings of the heated space, there is usually a small heating element built into the thermostat which provides some more immediate feedback to the sensor than would be possible simply waiting for the furnace to heat the air or radiators. If this coil is defective or its setting is misadjusted, then erratic or much wider than normal temperature swings are possible. There will usually be instructions for properly setting the heat anticipator with the thermostat or furnace.
Fully open mechanisms (no enclosed switches) can be totally dunked in the water as long as they are dried thoroughly afterwards. This should be avoided where the bimetal activates an enclosed 'microswitch' since it is difficult to be sure of removing all the trapped water.
To test an air conditioner thermostat, for example, turn the knob to the highest (coldest) setting. The contacts should be closed. Then, cool the bimetal strip off with cold tap water. The contacts should open. The range can be determined with a thermometer and various combinations of hot and cold water.
Removing the thermostat (unplug AC line first!) and cleaning the contacts using contact cleaner NOT sandpaper or a file (except as a laser resor) - may help temporarily. Replacement is easy if the cold control is self contained using a bimetal strip. If it uses a liquid filled bulb, the tube may snake around inside the cabinet and may be more challenging. Still no big deal. An appliance part distributor or your appliance manufacturer should have a replacement.
Note that an exact replacement may not be needed as long as its electrical ratings (amps or HP) is at least as high, it is intended for the same application (e.g., freezer or space heater), the sensing element is similar, and it can be made to fit! This could come in handy if trying to repair a 30 year old air conditioner!
However, this does not mean that these are the most economical heating devices. Heat pumps based on refrigeration technology can be much less costly to run since they can have coefficients of performance - the ratio of heat output to energy input - of 3 or more to 1. Thus, they are in effect, 300% or more efficient. Note that this does not violate any conservation of energy principles as these simply move heat from one place to another - the outdoors is being cooled off at the same time.
Space heaters come in 3 common varieties:
Of course, first check that the outlet is live.
As with other heating appliances, the most likely problems are with burned out heating elements; defective on/off switches, thermostats, or safety interlock or tip-over switches, bad cord or plug, or bad wiring connections. Your continuity checker or ohmmeter will quickly be able to identify which of these are the problem.
Warning: do not be tempted to bypass any interlock or tip-over switches should they prove defective. They serve a very important fire and personal safety function. Never, ever cover the heater in any way as a serious fire hazard will result.
In addition to the problems covered in the section above: "Radiant space heaters", the fan can also become sluggish or seize up due to gummed up lubrication (as well as other fan-motor problems). Since it is running in a high temperature environment, disassembly, cleaning, and lubrication may be needed periodically despite what the manufacturer may say about permanently lubricated parts.
The typical unit consists of a pair of heating elements providing 600, 900, or 1500 Watts depending on which are switched on. A simple bimetal adjustable thermostat is used for temperature control. The heating elements are fully submerged and sealed inside an oil filled metal finned replica of an old style radiator. The whole affair is mounted on wheels as it is quite heavy.
Depending on design, there may be one or two thermostats (oil and air) in addition to thermal and electrical protection devices.
Common problems with these have been the pair of power switches which tend to fail resulting in no or erratic operation. Note: if your heater is a Delongi, there has been a free (well $5 S&H) upgrade to replace the failure prone power switches and air temperature thermostat on some common models.
The heating elements are replaceable (as a set). Since they are immersed in the oil, you MUST have the radiator on its end with the terminals straight up while changing them or else there will be a mess. Replacement will be worth the cost and effort only if you require the high settings as it is unlikely for both elements to fail. If testing reveals an open element, you will just not have the heat ranges that use it. If an element shorts to the case, it must be disconnected to prevent a shock hazard though the other one can still be safely used. Parts should be available.
It is a portable electric heater, using high-power thermisters as the heating elements. This technology was originally developed by TDK a few decades ago. The premise is that the power thermisters will automatically control the heating element temperature (the thermister), so that if the air flow is blocked, the heater won't cook. The manufacturers make efficiency claims, but these seem to be bogus. (All space heaters are nearly 100% efficient. See the section: Electric space heaters --- Sam.)
I have a bathroom version of this device, and it works.
Battery operated pencil sharpeners use a small DC motor for power. These tend to be whimpier than their AC counterparts but all other comments apply. Always try a fresh set of batteries first.
The motors are typically of the series wound universal type. These have carbon brushes which are prone to wear. However, given the relatively short total usage of a blender, this is not usually a problem.
Disconnecting (and labeling!) connections one at a time may permit the source of a problem to be localized. Diodes can be tested with a multimeter (they should read open in one and only one direction) and resistors checked as well. Shorts in a motor with multiple taps on its windings may be difficult to identify or locate. Shorted windings can result in overheating, incorrect speeds, or even a blender that runs with the power switch supposedly in the off position as the wiring is sometimes sort of strange!
Bad bearings will result in any number of mechanical problems including excessive or spine tingling noise, vibration, a seized rotor or very sluggish rotation. Sometimes, disassembly, cleaning, and oiling will be effective but since these rotate at high speed, don't count on it. Unfortunately, cheap bronze bushings are often used instead of ball bearings. However, substituting a set from another similar unit might work since it is usually the bronze bushing and not the motor shaft that fails.
The most sophisticated units will have a variable speed control - similar to a light dimmer. If this goes bad - the blender always runs at full speed - then the active element (triac) has probably blown. Replacement is possible and the part types should be readily available.
If there is no heating, check the element and thermal protector with an ohmmeter. If the element is open, it is probably time for a new coffee maker. The thermal protectors can be replaced but the underlying cause may be a defective, shorted overheating element so it may not be worth the trouble. Timers can develop bad contacts and bad connections are possible on electronic controller circuit board wiring.
I wish I had thought of this sooner rather than throwing out the first coffee maker and I had planned to throw this one out. For some reason I thought I would just look inside to see what was up.
Where I live the water is hard (well) and there is constant scaling and buildup of calcium. We heard that all you have to do is to run a mixture of vinegar through the coffee maker to rejuvenate.
A friend and the 2 of ours all started to leak very badly when the vinegar/water mixture when through. I though that the internal plumbing had corroded through the metal parts and the vinegar dissolved the calcium that was protecting the holes and therefore unrepairable. Who knows where these ideas come from.
Now for the technical solution.
The element that is used to boil the water and uses the bubbles to bring hot water to top of coffee maker is the same element that is used to keep the pot warm.
There is a metal tube attached to the metal warming element and this unit has a heating element embedded. There are 2 rubber hoses attached. One brings cold water to heater and the other brings boiling water to top. The cold water tube has a check valve that prevents the bubbling water from going to cold water reservoir.
When vinegar is added the calcium scales start to dissolve and in 3 of 3 so far, this blocked the metal tube. The water starts to boil and since the cold water inlet has a check valve the water pressure can only buildup to where the rubber tube is blown off the metal pipe. No damage to parts.
To fix:
AC operated clocks depend on the AC line frequency (60 Hz or 50 Hz depending on where you live) for time keeping. The accuracy of a line operated clock is better than almost any quartz clock since the long term precision of the power line frequency is a very carefully controlled parameter and ultimately based on an atomic clock time standard.
Therefore, most problems are related to a clock motor that does not run or will not start up following a power outage. Once running, these rarely fail.
The most common problems are either gummed up oil or grease inside the motor and gear train, broken gears, or broken parts of the clock mechanism itself. See the sections on "Synchronous timing motors" for repair info.
Battery operated quartz clocks usually operate on a 1.5 V Alkaline cell (do not replace with NiCds as they do not have a long absolute life between charges even if the current drain is small as it is with a clock).
First, test the battery. Use a multimeter - usually anything greater than 1 V or so will power the clock though if it is closer to 1 V than 1.5 V, the battery is near the end of its life. The clock may run slow or fast or erratically on a low battery.
With a good battery, failure to run properly is usually mechanical - one of the hands is hitting against the glass front or something like that. Don't forget to check any on/off switch - these are not expected but are often present presumably to permit you to start the clock at precisely the right time. I had one case where the fine wire to the solenoid that operates the once per second clock mechanism broke and had to be resoldered but this is exceedingly rare.
If the clock consistently runs slow or fast with a known good battery, there is usually a trimmer capacitor that can be adjusted with a fine jeweler's straight blade screwdriver. Without test equipment the best you can do is trial and error - mark its original position and turn it just a hair in one direction. Wait a day or week and see if further adjustment is needed (right, like you also won the lottery!) and fine tune it.
If the hands should fall off (what a thought!), they can usually be pressed back in place. Then, the only trick is to line up the alarm hand with the others so that the alarm will go off at the correct time. This can usually be done easily by turning the hour hand counterclockwise using the setting knob in the rear until it is not possible to turn it further. At this point, it is lined up with the alarm hand. Install all hands at the 12:00 position and you should be more or less all set.
AC powered carving knives include a momentary power switch, small motor (probably universal type), and some gearing. Congealed food goo as well as normal lubrication problems are common. The power switch is often cheaply made and prone to failure as well. The cord may be abused (hopefully not cut or damaged by careless use of the knife!) and result in an intermittent connection at one end or the other. For motor problems, see the appropriate sections on universal motors.
For battery powered knives, bad NiCds cells are a very likely possibility due to the occasional use of this type of appliance.
See the section: Small permanent magnet DC motors and the document: AC Adapters, Power Supplies, and Battery Packs for information on repair.
Sluggish operation may be due to cookie dough embedded in the gearing. Fine particles of flour often find their way into the gears - clean and lubricate. There may be a specific relationship that needs to be maintained between the two main beater gears - don't mess it up if you need to disassemble and remove these gears or else the beaters may not lock in without hitting one-another.
The speed control may be a (1) selector switch, (2) mechanical control on the motor itself (a governor/spring/switch arrangement), or (3) totally electronic. Parts may be replaceable although, for portables at least, a new mixer may make more sense.
For sluggish operation (non-mechanical), sparking, burnt smells, etc., see the section: Problems with universal motors.
As usual, cord and plug problems, bad bearings, burnt motor windings, and broken parts are all possibilities.
An iron consists of a sole plate with an integrated set of heating coils.
Steam irons will have a series of holes drilled in this plate along with a steam chamber where a small amount of water is boiled to create steam. A steam iron can be used dry by simply not filling its reservoir with water. Those with a spray or 'shot of steam' feature provide a bypass to allow hot water or steam to be applied directly to the article being ironed.
Over time, especially with hard water, mineral buildups will occur in the various passages. If these become thick enough, problems may develop. In addition, mineral particles can flake off and be deposited on the clothes.
A thermostat with a heat adjustment usually at the top front of the handle regulates the heating element. This is usually a simple bimetal type but access to the mechanism is often difficult.
Where an iron refuses to heat, check the cord, test the heating element for continuity with your ohmmeter, and verify that the thermostat is closed.
An iron that heats but where the steam or spray features are missing, weak, or erratic, probably has clogged passages. There are products available to clear these.
Newer irons have electronic timeout controllers to shut the iron off automatically if not used for certain amount of time as a safety feature. Failure of these is not likely and beyond the scope of this manual in any case.
When reassembling an iron, take particular care to avoid pinched or shorted wires as the case is metal and there is water involved - thus a potential shock hazard.
Since most of these are so inexpensive, anything more serious than a broken wire or plug is probably not worth repairing. The heating element may develop a broken spot - particularly if something like a fork is carelessly used to fish out an English muffin, for example. (At least unplug it if you try this stunt - the parts may be electrically live, your fork is metal, you are touching it!). They may just go bad on their own as well.
Being a high current appliance, the switch contacts take a beating and may deteriorate or melt down. The constant heat may weaken various springs in either the switch contact or pop-up mechanism as well. Sometimes, some careful 'adjustment' will help.
Controllers may be thermal, timer based, or totally electronic. Except for obvious problems like a bent bimetal element, repair is probably not worth it other then as a challenge.
The following applies directly to several Sunbeam models (and no doubt to many others as well).
(From: John Riley (jriley@calweb.com).)
I will assume that the toaster is either a model ATW or possibly an older model 20 or the like.
When you drop the bread in the toaster it trips a lever that is attached to the bread rack. This lever pushes in on the contacts inside of the thermostat (color control switch) which actually turns the toaster on. In "most cases" adjusting the screw on the bottom of the toaster will do the trick. The proper adjustment is to adjust the carriage tension so that the bread rack in the side where it marked for a single slice of bread comes just to the uppermost limit of its travel. Any more is overkill.
If you have adjusted it as mentioned above and it still won't go down, there is one more thing you can try. Take the toaster a sort of BUMP it down onto the table rather firmly. Sometimes a piece of crumb will get in between the thermostat contacts. A couple of good "bumps" on the table will usually dislodge the particle.
If all of the above doesn't work, and you know the cord isn't bad, them you may very well have a thermostat that has gone south. They are still available for replacement on most models. Suggest you check with your local SUNBEAM AUTHORIZED SERVICE for price and availability.
(From: B. Gordon (bgg1@earthlink.net).)
If the suggestions already given for the A20 and their successors don't work, then the problem may be corrosion of the German-silver electrical contacts. Like the rest of the 1940s-1950s Sunbeam toaster products, these contacts are much larger than they would need to be, but after 50 years or so of use, even these over-engineered switch contacts may need some light filing/cleaning. I have saved two vintage Sunbeam toasters from the appliance graveyard by this quick and simple repair technique.
Modern toaster oven (broilers) use Calrod style elements - usually two above and two below the food rack. Depending on mode, either just the top (top brown/broil), just the bottom (oven), or both sets (toast) will be energized. Each pair may be wired in series meaning that a failure of one will result in both of the pair being dead. Very old units may use a coiled NiChrome element inside a quartz tube.
Thermostats are usually of the bimetal strip variety with an adjustment knob. A cam or two on the shaft may also control main power and select the broil function in the extreme clockwise position.
There may be a mode switch (bake-off-broil) which may develop bad contacts or may fuse into one position if it overheats. These are often standard types and easily replaceable. Just label where each wire goes on the switch before removing it to take to an appliance repair parts store.
Newer models may use an electronic timer for the toast function at least. I assume it is not much more than something like an IC timer (555) operating the trip solenoid. However, I have not had to deal with a broken one as yet.
Testing is relatively straightforward. Check the heating elements, thermostat, mode switch,, cord, and plug. While replacements for heating elements and thermostats are often available, removing the old one and wiring the new one may not be straightforward - rivets may be used for fastening and welds for the wire connections. You will have to drill the rivets with an electric drill and replace them with nuts, bolts, and lockwashers. Crimp splices or nuts and bolts can be used for the wiring. Take extra care in reassembly to avoid any bare wires touching the metal cabinet or other parts as well as insulation being cut by sharp sheetmetal parts. The high temperature fiberglas or asbestos insulation is not very robust. In the end, it may not be worth it with full featured toaster oven/broilers going for $20-30 on sale.
Some more details and comments are provided in the section: Troubleshooting a toaster oven.
Before doing this, there are basic things to check:
The broiler option is similar to top brown.
Thinking about which elements need to be powered for which mode, and whether the thermostat is involved (not for toasting), will help to narrow down the area of attack.
If a heating element is found to be bad either by inspection or the ohmmeter check, it can be replaced though this may only make sense from a cost perspective if you have one that can be salvaged from another appliance. If the length and resistance are similar, it should work. Attaching the cut wires may be a challenge unless you are into welding. However, a mechanical connection with a screw and nut will work though for how long is anyone's guess. Also see below. Solder can't be used.
Visually inspect the heating elements. Failure of a Calrod(tm) type often results in an external wart of blemish where the internal coil shorted and melted the cladding. Nichrome (wire) elements fail by breaking somewhere along their length.
And/or measure the resistance of each of the elements. Typical values are 10 to 12 ohms for a single Calrod type or 20 to 25 ohms for a complete Nichrome coil. (Your measurements will vary depending on the actual wattage of the oven. These values are typical in the U.S.A. for operation on 115 VAC.)
(From: Terry (tsanford@nf.sympatico.ca).)
Get a 'wire-nut' connector. Not one of the usual ones with a wire spiral inside it; but one of the ones that has a brass insert with a screw to secure the wires. See 'Note' re set screw. Throw away the plastic outer shell. Put end of the element heating wire and the end of a short piece of heat resistant wire into the wire nut brass insert and tighten the screw; real tight cos it's going to get somewhat hot! Dress the wire and/or suspend what is now your brass connector so that it is clear of everything or use some woven 'glass' heat resistant tubing to cover the connection. Repeat at other end as necessary. Probably last for quite a while. Note: Look for one that has a set-screw that can be tightened with a hexagonal 'Allen' wrench rather than a straight edge screwdriver. With these it would seem you can get the screw and therefore contact with the wires much tighter! Another connection that might work, but have not used for this is to clip the screw terminals off the end of a duff oven element and use those as screw terminals to secure a connection to the toaster heating element wire? Those oven element terminals do get hot in normal use anyway!
Apparently, the only real difference between a "toaster oven" and a "toaster oven/broiler" is that the latter has a means of disabling the bottom heating element while in oven (non-timed) mode - and, of course, the price!
                  +- - - - - - + - - - - - - - + All part of Oven Control
                  :            :               :
                 S1A      S1B _:_              :        R1          R2
  AC H o--+------/ -----------o o------+---+---:-----/\/\/\/\----/\/\/\/\---+
          |  Oven Power    Thermostat  |   |   :          Top Element       |
          |                            |   |   :                            |
          |         S2 ___ Toast On    |   |  S1C       R3          R4      |
          +------------o:o-------------+   +---/ ----/\/\/\/\----/\/\/\/\---+
                        :              |     Broil      Bottom Element      |
           +-------+    :           R5 /   Top Brown                        |
       +-->| Timer |--+ :  Toast   47K \   (Full CW)   R1-R4: 8-12 ohms     |
       |   +-------+   )|| Release     /                                    |
   Light/Dark          )|| Solenoid    |   +--+ IL1 Power                   |
   Temp. Sensor       +                +---|oo|---+ Indicator               |
                      |                NE2 +--+   |                         |
  AC N o--------------+---------------------------+-------------------------+
Aside from the CMOS IC based toast timer, this is a fairly basic design:
The toast function and oven/broiler are controlled separately. A single Power/Temperature/Broil knob controls the oven/broiler. This is entirely electro-mechanical with a conventional bimetal thermostat. Toast darkness is based only on time using CD4541B timer chip to release a manually activated Toast lever. Older 'dumber' toasters often were more sophisticated in their operation using a combination of time and temperature. Not this one.Its conventional counterpart would be identical except using a mechanical and/or toast temperature sensor in place of the IC timer. Despite what you might think, the most likely failures are NOT in the 'high-tech' electronics but the usual burnt out heating element(s), bad cord or plug, broken wires, and tired switches.
If you notice an increase in motor noise (whining or squealing, grinding, knocking) then the motor and fan should be inspected and parts replaced if necessary. Sudden failure is unlikely but if it were to happen - seized bearings, for example - an overtemperature thermal protector should shut down the heating element or entire oven. Some of these may not be self resetting (thermal fuse).
Where a NiChrome coil type heating element is used, a break will be obvious. If it is very near one end, then removing the short section and connecting the remainder directly to the terminal will probably be fine. See the section: Repair of broken heating elements.
For appliances like waffle irons, burger makers, and similar types with two hinged parts, a broken wire in or at the hinge is very common.
Note that since these operate at high temperatures, special fiberglass (it used to be asbestos) insulated wiring is used. Replace with similar types. Take extra care in reassembly to avoid shorted wires and minimize the handling and movement of the asbestos or fiberglas insulated high temperature wiring.
As always, check for bad connections if the popper is dead or operation is erratic.
Problems with heating can arise in the heating element, thermostat, and thermal protector.
If the stirrer doesn't turn, a gummed up motor or stirrer shaft (since these are only used occasionally) may be the problem. See the chapter: Motors 101.
As always, check for bad connections if the popper is dead or operation is erratic.
Problems with heating can arise in the heating element, thermostat, and thermal protector.
The motor is probably a small PM DC type and there will then be a set of diodes or a bridge rectifier to turn the AC into DC. Check these and for bad bearings, gummed up lubrication, or other mechanical problems if the motor does not work or is sluggish. See the chapter: Motors 101.
Obviously, if you can disassemble the unit to the point of access to the connections to the heating element, a simple continuity check of each component (heating element, thermostat/switch, fuse if any, line cord, etc.) will identify whether there is a bad part. Similarly, if there is no switch, thermostat, or any other accessible parts - the entire thing is a sealed glob with a line cord - if there is no continuity, it is bad.
However, for the more general case, there are two ways to test a heat tape if whether it is alive or not isn't obvious by feel and you can't get inside. If you cannot get to the connection to the actual heating element, then the tests need to be performed with any power switch or thermostat in the 'on' position. However, it may not be possible to get a thermostat to go on if you are inside a nice heated house. It may need to be bypassed or the tests run where it is cold!
The basic components of a bread machine are:
Common problems: Blown thermal fuse (screwed to outside of chamber in series with everything, open heating element, leaking stirrer seal, bad or stuck release solenoid.
Common problems: Bad belt or one that has popped loose, bad motor or motor in need of lubrication.
Common problems: Blown triacs, contamination in touchpad due to overzealous cleaning, faulty microprocessor, surge or lightning damage.
Like any other electronic device, a power surge or lightning strike can wipe out the controller rendering the bread machine dead as, well, a loaf of bread. Unless there are obviously blown parts AND you get very lucky, the only solution with any likelihood of success is a total brain transplant (controller board replacement) - which is probably more expensive than a new bread machine.
I have a 1903 Singer foot-pumped sewing machine which we have since electrified and still runs fine. A couple of drops of sewing machine or electric motor oil every so often is all that is needed. They were really built well back then.
Although the appearance of the internal mechanism may appear intimidating at first, there really is not that much to it - a large pulley drives a shaft that (probably) runs the length of the machine. A few gears and cams operate the above (needle and thread) and below (feet and bobbin) deck mechanisms. Under normal conditions, these should be pretty robust. (Getting the adjustments right may be another story - refer to your users manual). Sometimes if neglected, the oil may seriously gum up and require the sparing use of a degreaser to loosen it up and remove before relubing.
If the motor spins but does not turn the main large pulley, the belt is likely loose or worn. The motor will generally be mounted on a bracket which will permit adjustment of the belt tension. The belt should be tight but some deflection should still occur if you press it gently in the middle.
If the motor hums but nothing turns, confirm that the belt is not too tight and/or that the main mechanisms isn't seized or overly stiff - if so, it will need to be cleaned and lubrication (possibly requiring partial disassembly).
The electric motor is normally a small universal type on a variable speed foot pedal (see the section: Wiring a sewing machine speed control).
If the motor does not work at all, bypass the foot pedal control to confirm that it is a motor problem (it is often possibly to just plug the motor directly into the AC outlet). Confirm that its shaft spins freely. All normal motor problems apply - bad wiring, worn brushes, open or shorted windings, dirty commutator. See the section: Problems with universal motors.
The common foot pedals are simply wirewound rheostats (variable resistors) which have an 'off' position when the pedal is released. They are simply wired in series with the universal motor of the sewing machine (but not the light) and can be left plugged in all the time (though my general recommendation as with other appliances is to unplug when not in use.
While not as effective as a thyristor type speed controller, these simple foot pedals are perfectly adequate for a sewing machine. There are also fancier speed controls and using a standard light dimmer might work in some cases. However, there are two problems that may prevent this: the sewing machine motor is a very light load and it is a motor, which is not the same as a light bulb - it has inductance. The dimmer may not work, may get stuck at full speed, or may burn out.
If dead, check for continuity of the plug, cord, switch, and coil. IF sluggish, clean thoroughly - hair dust is not a good lubricant. Sliding parts probably do not require lubrication but a drop of light oil should be used on any rotating bearing points.
Note that since a resonance is involved, these types of shavers may not work well or at all on foreign power - 50 Hz instead of 60 Hz or vice versa - even if the voltage is compatible.
A shaver that runs sluggishly may have a dead NiCd cell - put it on charge for the recommended time and then test each cell - you should measure at least 1.2 V. If a NiCd cell reads 0, it is shorted and should be replaced (though the usual recommendation is to replace all cells at the same time to avoid problems in the future).
Note that in terms of rechargeable battery life, shavers are just about optimal as the battery is used until it is nearly drained and then immediately put on charge. The theoretical 500 to 1000 cycle NiCd life is usually achieved in shaver applications.
Over 30 years, I did have to replace the rechargeable NiCd batteries 2 or 3 times (readily available from any electronics distributor and easily installed in about 10 minutes), disassembled and cleaned the interior and lubricated the gears and motor several times (quite straightforward for anyone with even minimal mechanical skills and a Philips screwdriver), and repaired a plastic part of the on/off switch. But there was no need to buy replacement items at 6 to 24 month intervals as has been suggested is required for the current crop of electric shavers. I'm still using the original blades (they really do stay sharp, but have worn down somewhat). When the need does arise, there are still after-market replacement blade/header sets available for around $20.) Have the manufacturers of electric shavers so de-engineered mechanical designs to support the sales of expensive consumables like blades?
The built-in charger is dirt simple consisting of a bridge rectifier and resistor, not the sophisticated microprocessor controlled affair of modern shavers that apparently don't provide any essential benefits. I really don't find the pressing need to upgrade the operating system in my shaver to MS Vista! :) Yes, it was my responsibility to plug in the charger every week or so when the batteries ran down. It did take 24 hours for a complete recharge but believe it or not, this was rarely a problem since I don't shave more than once a day (and the shaver would run plugged in even if the batteries were nearly flat if there was a pressing need). I routinely got the 500 or so charge/discharge cycles expected of NiCd batteries without the complexity that appears designed primarily to enhance the manufacturer's bottom line by making it difficult or impossible to perform simple maintenance or battery replacement with expendibles that make the overall cost of ownership higher than for blades!
(Merged comments from: Jerry Greenberg (jerryg50@hotmail.com) and Paul Grohe (grohe@galaxy.nsc.com).)
I used to service some of the Philips models of shavers. These are the same as the Norelco. When the batteries are dead the shaver will not run. The shaver has a sophisticated uPC (for what it does) that manages its operation. When it sees the batteries as dead, it will inhibit the shaver from being able to run. If the batteries are shorted, nothing will even light up at all.
The little "power supply" does not have enough "juice" to run the motor. The motor runs off the cells. If the cells are *dead* (shorted), nothing will work.
You can "test" the power supply by either listening carefully, or, holding it up to an AM (MW) radio tuned off to the end (no station) while plugging the razor in.
If the charger is okay, but the cells are shorted or weak, you will hear a quick "ping" followed by a stretched-out, "constipated" squeal. This is the little switching power supply quitting under the "dead weight" of the cells.
A "good" razor will have a nice, steady squeal (or "hiss" on the radio).
Once the shaver is opened, if you are mechanically skilled, it is worth the effort to disassemble the top head assembly where the motor goes in to, and do a thorough cleaning. You can lubricate the gears and shafts with a very light silicon lubricant. The motor is held in position with two spring clips. Care must be taken to not break the plastic pieces.
Everything snaps together. Opening the case is usually the toughest part.
And take it apart over a paper towel. Powdered hair will fall out all over the place as you take it apart. Keep a dust-buster or vacuum near by to suck up any escaping "dust". The stuff is worse than wallboard dust!
If you do any soldering, do it in a well ventilated place.
Burning hair is not a pleasant smell!
I'm on my third set of cells after 12 years. Last month I
installed new 1200 mA/H NiMh cells.
Also: While you have the motor removed - it is a good idea to
"clean" the motor brushes by connecting it to an adjustable power
supply and slightly over-voltaging it to make it run faster than
normal (with no load). Run it full-out for about 5 minutes (or
until it runs smoothly). Run it in both directions, too. This
will eliminate any "chugging", stalling or rough starts you may
be experiencing with older units.
As for original parts, Norelco will supply them if the shaver model is
less than about 5 to 7 years old. Usually the replacement parts are not
expensive in relation to replacing the shaver. As for replacement
parts, they would only supply the complete circuit boards, batteries,
and any mechanical parts if they are defective.
Mine is as good as new now!
Problems can occur in the following areas:
Of course, getting inside may prove quite a challenge and in general one must
consider the hand unit to be a throw-away item since it is generally glued
together - permanently. While it is possible to use a hacksaw to carefully
cut around the case, the resulting repair once the thing is put back together
will be decidedly of the 'Jerry-rigged' type and sealing will be difficult
and long term reliability and safety would be questionable.
(From: Jeff & Sandy Hutchinson (sandy2@flatoday.infi.net).)
It's darned near impossible to replace the batteries on the Interplak
toothbrush without destroying the recharging circuit. The base of the hand
unit has a little pickup coil in it, and when you unscrew the cap to get at
the batteries, you break the connections to the pickup coil. Best to do an
exchange with the factory.
(From: Bill Finch (alioth@ix.netcom.com).)
I've done this twice. Use a tubing (or pipe) cutter at the seam. Rotate and
tighten the cutter slowly until the thing falls apart. Fish out the guts and
resolder a new battery in place. Slip everything back into the lower tube.
Glue the top back on with PVC pipe sealant. It helps to make a simple jig to
hold the top steady while the PVC cement sets. Try not to get excess cement
on the external plastic or you wife will complain. A good trick here is to
mask with drafting tape or whatever.
If this fails just buy a new toothbrush.
(From: Chip Curtis (ccurtis@zilog.com).)
I had a problem with my Braun and found that the unit's PCB was rather
wet. After drying it out and coating it the unit still turned on from
time to time and I noticed that during the false runs the transistor was
not saturating. It didn't take long to see that the problem is caused by
the transistor's base being left wide open. Any noise on the base or
small current flow from PCB leakage will cause the transistor to fire and
the brush noise is enough to keep it triggering and running on.
The fix; tack a 1M or whatever (no smaller than 47K) resistor from the
base of the transistor to ground. The pull-down won't hurt current
consumption when the unit is off because the reed switch is open, and the
small bias won't make much of a difference when the unit is running.
A coil in the charging base (always plugged in and on) couples to a mating
coil in the hand unit to form a step down transformer. The transistor, Q1,
is used as an oscillator at about 60 kHz which results in much more efficient
energy transfer via the air core coupling than if the system were run at 60
Hz. The amplitude of the oscillations varies with the full wave rectifier 120
Hz unfiltered DC power but the frequency is relatively constant.
For the toothbrush, a 4 position switch selects between Off, Low, Medium, and
High (S1B) and another set of contacts (S1A) also is activated by the same
slide mechanism. The motor is a medium size permanent magnet type with carbon
brushes.
This Braun electric toothbrush (original model) would turn itself on and keep
running until its batteries were discharged.
The toothbrush can be disassembled by pulling the base off with slip joint
pliers (do not pull too hard because there is only about 1" of slack in
the charging coil wires). With the base off, the mechanism slides out of
the case.
There is a simple charging circuit, charging LED, 2 NiCd cells, and a reed
switch driving the base of an NPN transistor. The transistor collector
drives the motor.
I charged the battery, but the problem of the motor running with the reed
switch open didn't recur until I held my finger on the transistor for
about 10 seconds seconds. Grounding the transistor base turned it off
again, and I could repeat this cycle. Since there wasn't anything else to
go wrong I decided to replace the transistor. I couldn't read the
marking, but it's in a SOT89 package and the motor current is 400-700 mA so
it must be something like a BC868. However, I didn't have any surface
mount or TO92 transistors that could handle the current, so I used a
2SD882 (small power tab package), which I was able to squeeze into some
extra space in the center of the charging coil.
Some have built in infra-red heat which may just be a set of small light
bulbs run at low voltage to provide mostly heat and little light (a filter
may screen out most of the light as well). Obviously, individual light
bulbs can go bad - if they are wired in series, this will render all of
them inert.
At least one brand - Conair - has had problems with bad bearings. Actually,
poorly designed sleeve bearings which fail due to the eccentric load. If you
have one of these and it becomes noisy and/or fails, Conair will repair
(actually replace) it for $5 if you complain in writing and send it back to
them. They would like a sales receipt but this apparently is not essential.
First determine if the problem is with the heat, air, or both.
For heat problems, check the element for breaks, the thermal protector
or overtemperature thermostat (usually mounted in the air discharge), the
connections to the selector switch, and associated wiring.
Newer models may have a device in the plug to kill power to the unit should it
get wet. See the sections: "What is a GFCI?" and "The Ground Fault Circuit
Killer (GFCK)".
For air problems where the element glows but the fan does not run, check the
fan motor/bearings, connections to selector switch, and associated wiring.
Confirm that the blower wheel turns freely and is firmly attached to the
motor shaft. Check for anything that may be blocking free rotation if the
blower wheel does not turn freely. The motor may be of the induction,
universal, or PM DC type. For the last of these, a diode will be present
to convert the AC to DC and this might have failed. See the appropriate
section for problems with the type of motor you have.
This safety 'enhancement' must have been designed by engineers with too much
time on their hands (or the wrong sort of incentive bonus plan). Get a few
drops of water on one of these appliances and it goes in the garbage.
The irony is that once the GFCK blows, the owner is likely to just cut off the
GFCK plug and replace it with a normal plug (rather than throwing the
appliance away or having it properly repaired, as was no doubt the intent),
thus eliminating the protection altogether!
The GFCK (my designation) is a device contained in an oversize plug which is
part of the cordset of some newer hand-held (at least) appliances that may be
used in wet areas like kitchens and baths but where there may be no GFCI
protection (see the section: What is a GFCI?. I
first ran across one of these on a late model Conair blow dryer (which is why
this section on GFCKs is here rather than with the GFCI information).
In a nutshell, the GFCK permanently disconnects power to the appliance - at
the plug - should electrical leakage of more than a few milliamps be present
within the appliance. Unlike a GFCI, ther is NO reset button and no way to
get inside short of drilling out the rivets holding the plug together! In
fact, the unit I dissected uses an SCR to grossly overdrive and blow out a
normal resistor which by its placement holds a mechanical latch in place for a
pair of contact releases that disconnect the plugs prongs from the wires of
the cord. With the resistor gone, the prongs of the plug go nowhere so
everything beyond them becomes totally dead, electrically - forever. Thus,
even if dropped into a bathtub, the appliance will not cause electrocution.
Sorry, these can't be used as part of murder mystery plots!
Admittedly, the GFCK works regardless of whether the outlet the appliance is
plugged into is 2-prong, 3-prong, correct or reverse polarity, or GFCI
protected, and thus provides a high level of safety. But, this may be taking
cost reduction to an extreme rather than providing a resettable basic GFCI
(just H-G faults). Having said that, there is merit to disabling the
appliance permanently since there is no way to know how much damage may have
been done internally by the water (or whatever caused the GFCK to trip) and
it's safety may always be suspect.
All this is mounted inside the plug:
The Ground wire in the cord (G) goes from the circuit in the plug back to the
metal parts of the dryer (though as usual with a modern appliance, it is
mostly made of plastic). Note that there is no Ground wire to the outlet -
just to the appliance. The theory goes that should the device get wet,
current is more likely to flow to the nearby metal parts and via the cord's
Ground wire to the GFCK than to some other earth ground (including a person
touching an earth ground). In fact, this device does NOT sense a current
imbalance like a true GFCI - just leakage to its internal Ground wire, but
under realistic circumstances, this should be a reliable indication of a
fault.
A fault condition would result in current flowing between H and G in the cord.
When this exceeds about 3 mA, the SCR (Q1) triggers putting R1 essentially
across the line (maybe limited a bit by L1). R1, which was physically holding
the latch for the plug circuit breakers CB1 and CB2, now explodes releasing
both these contacts. Power is shut off to the appliance - permanently!
Hopefully, the plug doesn't catch fire in the process! :)
As noted, cutting off this fancy plug and replacing it or the entire cordset
with a conventional one provides the same level of safety IF AND ONLY IF the
appliance is used ONLY in a GFCI protected outlet (the cord Ground wire is
left disconnected in this case or can be attached to the third prong of a
three prong plug). The alternative of installing a 3-prong plug on
the appliance and then only using it in a properly grounded 3-prong outlet
doesn't provide the same protection as there can still be enough leakage to be
lethal without blowing a fuse or tripping a breaker (and the ground wire in
the sample I have wouldn't be adequate to carry a major fault current anyhow).
And, guess what? This Conair blow dryer died not because the GFCK had been
activated, but because the soldering to the R1 was defective and it pulled
loose!
Note that some designs are very hard on cassettes - yanking at the tape
since only increased tension is used to detect when the tape is at the end.
These may eventually stretch the tape or rip it from the reel. I don't
really care much for the use of tape rewinders as normal use of rewind and
fast forward is not a major cause of VCR problems. Sluggish or aborted
REW and FF may simply indicate an impending failure of the idler tire or
idler clutch which should be addressed before the VCR gets really hungry
and eats your most valuable and irreplaceable tape.
Problems with tape rewinders are usually related to a broken or stretched
belt or other broken parts. These units are built about as cheaply as
possible so failures should not be at all surprising. The drive motor can
suffer from any of the afflictions of similar inexpensive permanent magnet
motors found in consumer electronic equipment. See the section:
Small permanent magnet DC motors. A broken belt is
very common since increased belt (and tape) tension is used to switch the unit
off (hopefully). Parts can pop off of their mountings. Flimsy plastic parts
can break.
Opening the case is usually the biggest challenge - screws or snaps may
be used. Test the motor and its power supply, inspect for broken or
dislocated parts, test the power switch, check and replace the belt if
needed. That is about it.
A vacuum cleaner consists of:
I have always been able to remove the bad section and then graft what is
left back on to the connector. Without seeing your vacuum, there is no way
to provide specific instructions but that is what creativity is for! :-)
It might take some screws, tape, sealer, etc.
$100 for a plastic hose is obviously one approach manufacturers have of
getting you to buy a new vacuum - most likely from some other manufacturer!
Note: Some vacuum cleaners with power nozzles use the coiled springs of the
hose as the electrical conductors for the power nozzle. If you end up cutting
the hose to remove a bad section, you will render the power nozzle useless.
I suppose there will be degree-credit university courses in the operation
of these space age vacuums as well! --- sam
A NiCd battery pack powers a small DC permanent magnet motor and centrifugal
blower. A simple momentary pushbutton power switch provides convenient
on/off control.
Aside from obvious dirt or liquid getting inside, the most common problems
occur with respect to the battery pack. If left unused and unplugged for
a long time, individual NiCd cells may fail shorted and not take or hold
a charge when the adapter is not plugged back into the wall socket. Sluggish
operation is often due to a single NiCd cell failing in this way.
See the appropriate sections on "Batteries" and "Motors" for more information.
While replacing only selected cells in any battery operated appliance is
generally not recommended for best reliability, it will almost certainly
be much cheaper to find another identical unit at a garage sale and make
one good unit out of the batteries that will still hold a charge. It is
better to replace them all but this would cost you as much as a new
Dustbuster.
The NiCd cells are soldered in (at least in all those I have seen) so
replacement is not as easy as changing the batteries in a flashlight but
it can be done. If swapping cells in from another similar unit, cut the
solder tabs halfway between the cells and then solder the tabs rather than
to the cells themselves if at all possible. Don't mess up the polarities!
In the case of genuine Dustbusters, where a new battery is needed and you
don't have a source of transplant organs, it may be better to buy the
replacement cells directly from Black and Decker. They don't gouge you on NiCd
replacements. B&D is actually cheaper than Radio Shack, you know they are the
correct size and capacity, and the cells come with tabs ready to install.
They'll even take your old NiCds for proper re-cycling.
There are no serviceable parts inside the sealed cover - forget it as any
repair would represent a safety hazard. The control unit may develop bad
or worn switches but even this is somewhat unlikely. It is possible to
disassemble the control to check for these. You may find a resistor or diode
in the control - check these also. With the control open, test the wiring to
the pad itself for low resistance (a few hundred ohms) between any pair of
wires). If these test open, it is time for a new heating pad. Otherwise,
check the plug, cord, and control switches.
Extended operationg especially at HIGH, or with no way for the heat to escape,
may accelerate deterioration inside the sealed rubber cover. One-time thermal
fuses may blow as well resulting in a dead heating pad. One interesting note:
Despite being very well sealed, my post mortems on broken heating pads have
shown one possible failure to be caused by corrosion of the internal wiring
connections after many years of use.
Older style controllers used a bimetal thermostat which actually sensed
air temperature, not under-cover conditions. This, it turns out, is a
decent measurement and does a reasonable job of maintaining a comfortable
heat setting. Such controllers produced those annoying clicks every couple
of minutes as the thermostat cycled. Problems with the plug, cord, power
switch, and thermostat contacts are possible. The entire controller usually
unplugs and can be replaced as a unit as well.
Newer designs use solid state controls and do away with the switch
contacts - and the noise. Aside from the plug and cord, troubleshooting
of a faulty or erratic temperature control is beyond the scope of this
manual.
I contacted Sunbeam through their Web site with model, date of purchase,
lot number codes, and so forth. "Reply may take up to 3 business days.".
After 3 days, received canned email that assumed I was an idiot
and listed tests to make sure it wasn't my error. "Plug it in, make
sure outlet is live, turn on control, fold in 3 to check for heat,
etc.". I replied I had done all that and also measured the power
being consumed and there was almost none. Nothing so far except
an automated reply that it may take up to 3 business days. Really?
I would assume that a company that cares about customer satisfaction
would be able to handle this is a quicker manner, at least after the
first canned reply. Perhaps their assessment was correct, I was an
idiot for continuing to purchase Sunbeam blankets!
After 4 days of not getting any reply, I went through the Web site
again and re-entered all the information. Three days later, the
reply was that the blanket was purchased in 2006 and out of warranty.
So I don't know if they made a mistake or I entered some code incorrectly,
I'll give them the benefit of the doubt. But I did give up on doing this
via the Web and went the old fashioned way - by phone. That worked
much better with relatively minimal wait times except once where they
simply suggested trying at a later time due to high call volume.
But after getting by the auto-attendant aroid - which wasn't bad as all
it asked was what type of inquiry this was (warranty) and the type of
product (bedding) - an actual genuine human being was on the other end
of the line. This went smoothly and with a bit of prodding, he even
offered to send a prepaid shipping label for returning the blanket.
And what was sent back to me was an entirely new blanket with
a more modern controller.
This one was also replaced. For the record: Tested out of the box on
27-Dec-2021. Measured 2 A when first turned on dropping to around 1 A
after a couple minutes with the blanket rolled up.
I am currently using the replaced #3 so will not know how this one ages
for awhile (hopefully). :)
In all the cases of warranty repair so far, the remedy was listed as "Replaced
Module" or "Replaced Blanket". As far as the module, there is a small circuit
board in the plastic wart near the connector. After giving up on a warranty
repair on #1, I opened the "module". There are perhaps a half dozen simple
parts on the board, all tested good. I suspect bad connections to the heater
wiring, or just deterioration of the wiring itself. (More on this malady
below.) NONE of these blankets had been mistreated, gotten wet or even
damp accidentally, or laundered. It's interesting that #3 and #4 were
simply replaced instead of being repaired. That would make sense if it
was heater wiring deterioration.
For most of the repairs, I had to pay for shipping to the repair depot ($10-12)
but Sunbeam paid for the return. On one, they sent a prepaid shipping label.
Apparently that is at the local manager's discretion. They would not pay
in the last instance.
For #2-4, I measured the power used by the blankets when new to have something
to compare to if they broke. When there was no heat, it dropped to almost
zero. The controls behaved normally but had no effect on power. So this
was NOT the normal reduction in heating over time that has been reported on
some reviews of the Sunbeam blanket technology. For #4, the current was
much lower than when originally tested.
Sunbeam apparently uses what's known as "Positive Temperature Coefficient"
or PTC material for the heater wiring. This provides a sort of self
regulation - as it gets warmer, its resistance increases and limits
the power and is touted as a safety feature. But apparently whatever
they use does deteriorate with use. "Designed to degrade." :)
Go figure. And for the technodweebs reading this, the heater
seems to be driven with a very slow pulse width modulation having something
like an 80 second cycle. So, on a control with 20 positions (L to H or 1 to
20) for example, when set to "L" or "1", the heat is on for 4 seconds and off
for 76 seconds;) at "10", it 40 on and 40 off; on "H" or "20" or "PH" (if
available), it's on continuously.
Amazingly, this slow on-off is not detectable as any variation
in warmth. This may be different when first
turned on where it may run at around half power for a minute or so
regardless of where the control(s) are set. The electronic
controls are silent and there is no reliable way to know when it is
actually drawing power without measuring it. The PAC 0530 Style X85A
controllers are really nice with automatic time-of-day turn on with Preheat
and selectable duration, but setting it up is confusing and the manual is
pretty useless.
Conclusions: Sunbeam heated blankets work really well when they work but
expect them to have a 2 year life before needing repairs or replacement.
How can Sunbeam remain the most popular brand? One reason is probably
that reviews on sellers like Amazon are heavily weighted to satisfaction
shortly after the purchase - most buyers don't write follow-up reviews
when something breaks.
My previous blankets were Fieldcrest. They lasted 15 to 20 years without
any problems. These had mechanical controls which made periodic clicking
sounds, there were lumpy over-temp thermostats in the wiring, but they kept
on working. Eventually one failed from an open connection. The other started
leaking blue-green goo from the thermostat lumps. :( :)
My most recent one is from SoftHeat™. It's kind of a step backwards without
the fancy Sanbeam control which was always a challenge to program. ;-)
There are just 10 labeled heat levels (though it may just be a potentiometer)
and a fixed duration 10 hour auto-off.
And instead of sending switched line voltage to the blanket heating wire, it
uses high frequency Pulse Width Modulation (PWM) of current from a low
voltage DC power supply. The low voltage is used as a major selling point with the
claim that it is much safer. There is probably some merit to that.
The 10 hour on-time is not digitally-precise though, probably because only the DC output
of the power pack is available in the controller, not the usual line frequency reference.
And this blanket never gets quite as warm as a Sunbeam when new, using only about half
the maximum power. It is actually quite nice though. However, see the next
section. ;-( ;-)
The power adapter appears to be an unmodified standard model rated at
18.75 V and 3.5 A. It goes only to the control which then passes the
Pulse Width Modulated (PWM) output to the blanket heater. The heating wire
appears to simply be thin stranded copper hookup wire with a room temperature
resistance of around 6 ohms. The insulation may not even be anything special. So the
maximum power at 100% PWM is under 60 W, reducing slightly as the heater wire
increases with temperature. But the change is very small,
unlike the Sunbeam blankets which use special wire with a high Positive
Temperature Coeffient (PTC) of resistance to limit current should the
temperature go too high.
The symptom of this failure is that the control shuts off after a
few seconds, same as if the blanket is disconnected from the cable.
And indeed, assuming the cable isn't actually unplugged, the cause is broken
wires at the connector due to corrosion or rough handling (though that
latter would have to be REALLY rough!)
It is a 3 pin (2 used) AMP (TE Connectivity) Mate-N-Lock II connector with
male pins in a female shell securely tied and wrapped in the outer cover
fabric. Once this is carefully peeled away, the connector will come out with
ample free wire available to make the repair.
In my case, the wire ends near the connector were reduced to a fraction of
their original size due to corrosion with noticeably browned insulation.
The blanket has never been washed or stored in a humid location.
That corrosion was probably the cause of the failure, not abuse. Both
wires were broken off at the connector.
But I don't recommend attempting to reattach the wires directly to the
original pins. Cut them off an inch or so from the connector beyond
any evidence of browned insulation and add a couple inches of
flexible larger diameter insulated wire between the blanket heater wires
and (preferably) new AMP pins. I soldered mine because using crimp
connections on thin wire requires matching the connector pin to the
wire size fairly precisely. That could very well have been an issue
with the original crimps! ;-(
Add heat-shrink tubing over the exposed solder joints. Them carefully thread
the connector with wires back into the blanket interior. Rather than securing
with the blanket fabric (though that may happen automagically), a tie-wrap
or two should do the trick.
This should end up being more robust and long lived than the original.
The components of the typical $45 unit are:
The piezo transducer sets up a standing wave on the surface of the water pool.
The level is sensed with a float-switch to ensure no dry-running (kills the
piezo) and the blower/fan propels the tiny water droplets out of the cavity.
A few manufacturers are nice enough to include a silly air filter to keep any
major dust out of the 'output' - do clean/check that once in a while.
Common problems:
CAUTION: Unless you know what you are doing (and have gotten shocked a
few times in your life) DO NOT play with the piezo driver module. Most
run at line voltage with sometimes 100+V on heatsinks - which are live.
Note: piezo's in general are driven with voltage, as opposed to current. This
explains why you can expect high voltages - even in otherwise low-voltage
circuits. Case in point: the Polaroid ultrasonic sonar modules.
(From: Dave VanHorn" (dvanhorn@cedar.net).)
The Devilbiss units I used to repair, used about 1 W at 1 MHz (if I recall
correctly into a thick barium titanate transducer. Their most common problem
was cracked transducers.
There was a shaped cavity above the transducer, I would guess some sort of
Helmholtz resonator. You had to tune the operating frequency around to maximize
the plume, and then trim for a certain plume height with the output drive.
Don't stick your finger in the plume. Although the water is not hot, you
will discover that your finger is mostly water. It's kind of like slamming
your finger in a car door.
(From: ActiveParticle.)
Thinking about the above info on ultrasonic humidifiers and
their power output, I decided to experiment with an ultra-cheap
ultrasonic humidifier (useless for its intended application) and the
clear polystyrene front cover of a CD jewel case. With the water level
correctly set, placing the plastic sheet at the tip of the plume (cone
shaped tip of the water) just above the transducer resulted in a
cone-shaped section of material deforming outwards from the center
of the wave. In normal operation, a mist of water is ejected from this
location. The bottom of the sheet intersects the cone, and the
truncated part of the wave doesn't like this and melts its way
through. With the sheet in motion, a cut/trough about 3 mm wide
appears. Moving slowly results in a slightly larger amount of material
being displaced, up to about 5 mm. It doesn't go all
the way through the plastic for some reason. The effect
is the same as pressing a hot piece of metal against the plastic. The
process is continuous and you can draw patterns by moving the material
around on top of the standing wave. The deformed plastic was only
warm, not hot, though it may have been cooled by contact with the
water.
After seeing this firsthand, you will never feel the urge to stick
your finger in the plume again! I would not want to discover the
effects of a larger humidifier or ultrasonic cleaner on parts of your
body. This was with a $25 unit from a store closing special, so imagine what
a larger, more powerful one could do!
As an aside: Jewel cases are made from two kinds of polystyrene:
General Purpose Polystyrene (GPPS) and High-Impact Polystyrene
(HIPS). GPPS is crystal- clear but very brittle, and is used to mold
the front and back covers. HIPS is translucent to opaque but more
flexible, and is used to mold the tray. The tray needs to be flexible
so that the tray hub can grab the disc hub without breaking off. It's
unfortunate that the hinged part of the jewel case is made of such a
brittle material, as it's always the first thing to break ;)
(From: Roger Vaught (vaurw@onramp.net).)
At a local shop they sell small water fall displays made from limestone in a
marble catch basin. These are made in China. They use a small water pump for
the flow.
When I first saw one I thought the store had placed dry ice in the cavity
where the water emerged as there was a constant stream of cloud flowing from
it. Very impressive. It turns out they use the ultrasonic piezo gizmo to make
the cloud. The driver is a small 3 X 5 X 3 inch box with a control knob on
top. If you look into the cavity you can see the piezo plate and a small red
LED. The water periodically erupts into vapor. I haven't been able to get a
close look at the driver so I can't tell where it is made or if there is a
product name or manufacturer. They will sell that part of it for $150!
An ultrasonic cleaner contains a power oscillator driving a large piezoelectric
transducer under the cleaning tank. Depending on capacity, these can be quite
massive.
A typical circuit is shown below. This is from a Branson Model 41-4000 which
is typical of a small consumer grade unit.
Two windings on the transformer (T1, which is wound on a toroidal ferrite
core) provide drive (D) and feedback (F) respectively. L1 along with the
inherent capacitance of PT1 tunes the output circuit for maximum amplitude.
The output of this (and similar units) are bursts of high frequency (10s to
100s of kHz) acoustic waves at a 60 Hz repetition rate. The characteristic
sound these ultrasonic cleaners make during operation is due to the effects
of the bursts occuring at 60 Hz since you cannot actually hear the ultrasonic
frequencies they use.
The frequency of the ultrasound is approximately 80 kHz for this unit with a
maximum amplitude of about 460 VAC RMS (1,300 V p-p) for a 115 VAC input.
WARNING: Do not run the device with an empty tank since it expects to have
a proper load. Do not touch the bottom of the tank and avoid putting your
paws into the cleaning solution while the power is on. I don't know what,
if any, long term effects there may be but it isn't worth taking chances.
The effects definitely feel strange.
Where the device doesn't oscillate (it appears as dead as a door-nail), first
check for obvious failures such as bad connections and cracked, scorched, or
obliterated parts.
To get inside probably requires removing the bottom cover (after pulling the
plug and disposing of the cleaning solution!).
CAUTION: Confirm that all large capacitors are discharged before touching
anything inside!
The semiconductors (Q1, D1, D2, D3) can be tested for shorts with a multimeter
(see the document: Basic Testing of Semiconductor
Devices.
The transformer (T1) or inductor (L1) could have internal short circuits
preventing proper operation and/or blowing other parts due to excessive load
but this isn't kind of failure likely as you might think. However, where all
the other parts test good but the cleaning action appears weak without any
overheating, a L1 could be defective (open or other bad connections) detuning
the output circuit.
Where the transistor and/or fuse has blown, look for a visible burn mark on
the transducer and/or test it (after disconnecting) with a multimeter. If
there is a mark or your test shows anything less than infinite resistance,
there may have been punch-through of the dielectric between the two plates.
I don't know whether this could be caused by running the unit with nothing in
the tank but it might be possible. If the damage is localized, you may be able
to isolate the area of the hole by removing the metal electrode layer
surrounding it to provide an insulating region 1/4 inch in diameter. This
will change the resonant frequency of the output circuit a small amount but
hopefully not enough to matter. You have nothing to lose since replacing the
transducer is likely not worth it (and perhaps not even possible since it is
probably solidly bonded to the bottom of the tank).
When testing, use a series light bulb to prevent the power transistor from
blowing should there be a short circuit somewhere (see the document:
Troubleshooting and Repair of Consumer Electronic
Equipment) AND do not run the unit with and empty tank.
Here are some comments on ultrasonic cleaner repair. These would appear to be
more for larger units but some of the info should apply to the small ones
as well:
(From: B. Clark (bclarkson@primary.net).)
I spend a great deal of time repairing ultrasonic generators from sinks in
medical use. I can tell you this. While different manufacturers use
different circuits, the basic design is the same everywhere. The most
common failure mode is that the switching transistor(s) are shorted. When
this happens, does the fuse blow in your case? If this is true, replace
the rectifier bridge. If the circuit contains extra diodes, check those
for shorts as well. Always replace both transistors at the same time.
You can use ECG/NTE equivalents, so long as both are the same - don't
count on a new 2N6308 and an ECG283 working together in this case.
Assuming the fuse never blows and the output frequency is around 40 to 50 khz,
that rules out most of the small caps and resistors. Most generators that I
have worked on produce a wave around 45 khz. A bad cap or resistor would
cause it to be off frequency. The transducers should test as open. If they
test as anything other than open on an multimeter (after allowing for settling
as they are sensitive to vibration), then they could be bad. Transducer
failure in my experience is not that common. It may suggest that your
customer has been running the unit with the tank empty or only partially full.
The circuit is tuned. 100% of all generators sent to me have one or
more shorted transistors. The customer complaint is usually "No
ultrasonic action" or "Weak ultrasonic action". 99.999% of the time,
using an ohmmeter and replacing shorted semiconductors corrects the
problem. I have had one unit where a precision cap was out of tolerance
and detuned the circuit. One nearby hospital has sent in three 500 watt
units that were ran without the transducers connected. In all cases, the
fuse didn't blow, however each of the three caught on fire. One of these
has a 1/8 in hole through a coil in the transformer.
If any part drifts out of tolerance, the transistor will short. I have
seen perfectly fine circuits short switching transistors when the unit is
ran with no water in the tank. Do not attempt to run with one
transducer. You will meet with failure. You should attempt to replace
with the exact oem part when available. If you cannot find the original
and have determined a adequate substitute, replace both of them.
I keep mentioning transistors realizing that small units have only one. The
units I work on have 4 to help generate 500 watts of power.
(From: Lance Edmonds (lanceedmonds@xtra.co.nz).)
Essentially, a fog machine consists of a heater unit and a pump, plus
electronics to control the heater temperature, and control how much fog juice
is pumped through the heater.
Most common failures are severed remote control leads, burned out pumps, or
heating unit blockages.
I've never seen one with a fan, but many folks use a fan to disperse the fog
to the desired locations across a stage, etc.
Unlike dry-ice, fog from a "fogger" rises and disperses quite quickly unless
there is no ventilation... you can add some perfume (a few drops to the large
tank) to reduce the "flavor" of the fog... when it's thick it tastes and
smells horrid!
(From: krbjmpr@hotmail.com)
I have examined a couple machines just out of personal curiosity. what I
found was, and keep in kind that these were the lower end series, was
basically a high power heater and a small fluid pump.
From what I have seen , and can deduce, is that a high wattage heater block
constantly is heating a 'transition' tube. Temperature is unknown, but it
is damn hot. Temperature was controlled by a simple bimetal strip that looks
like it activated a triac or similar device. Heater power was supplied by
the triac. The fog fluid was pumped from the reservoir by a small fluid pump
that ran on 6 to 12 VDC. The amount of fog produced was controlled by a large
rheostat that had 12 volts applied to it, thereby creating a variable voltage
divider. Activation of the 12 volts to the pump for fog was through a small
relay that was able to be activated either through a switch added to the fog
machine that completed a circuit, or the machine was set on a timer
(internal) for fixed interval. Switch voltage was also 12 volts. Fog fluid
was injected into the transition tube, and the output nozzle was
significantly larger than the input. Estimated age of the machines was about
14 years or so.
After I saw the insides of these things, I am amazed that they are able to
demand $300 to $400 price tags. I am thinking about making one of these out of
a water-cooled resistor and gravity feeding a gallon jug of the juice through
an older 24 VAC sprinkler valve. One of those rainy day projects.
From: don@donklipstein.com (Don Klipstein)
I once fixed a "Ness" brand "Mini-Fogger". Turned out there was a
broken solder joint where the jack for the plug-in "remote" button went
into a circuit board.
Also sometimes, the pump sticks. Tapping the pump with a screwdriver
while attempting to run it may unstick it.
This thing is simple enough and made of parts that are reliable enough,
with the possible exception of the pump. I would mostly look for broken
connections or bad solder joints or clogs.
There is supposed to be a cutoff (float) switch to stop the dehumidifier
when the container is full. Hopefully, it works (and you didn't neglect
to install it when the unit was new!)
Common problems with these units are often related to the fan, humidistat,
or just plain dirt - which tends to collect on the cooling coils. The
sealed refrigeration system is generally quite reliable and will never need
attention.
An annual cleaning of the coils with a soft brush and a damp cloth is a good
idea. If the fan has lubrication holes, a couple of drops (but no more) of
electric motor oil should be added at the same time.
The fan uses an induction motor - shaded pole probably - and may require
cleaning and lubrication. See the section: Problems
with induction motors.
The humidistat may develop dirty or worn contacts or the humidity sensing
material - sort of like a hot dog wrapper - may break. If you don't hear
a click while rotating the control through its entire range, this may have
happened. If you hear the click - and the dehumidifier is plugged into
a live outlet - but nothing happens, then there is probably a problem in
the wiring. If just the fan turns on but not the compressor, (and you have
waited at least 5 minutes for the internal pressures to equalize after
stopping the unit) then there may be a problem with the compressor or its
starting relay (especially if the lights dim indicating a high current).
A very low line voltage condition could also prevent a refrigeration system
from starting or result in overheating and cycling. A sluggish slow rotating
or seized fan, or excessive dirt buildup may also lead to overheating and
short cycling.
A unit that ices up may simply be running when it is too cold (and you don't
really need it anyway). Dehumidifiers may include sensors to detect ice
buildup and/or shut off if the temperature drops below about 60 degrees F.
Common problems with garbage disposals relate to three areas:
The red reset button is a circuit breaker. Either the motor is drawing
too much current due to a shorted winding or a tight bearing or the breaker
is faulty. Without an ammeter, it will be tough to determine which it
is unless the rotor is obviously too tight.
If you have a clamp-on ammeter, the current while the motor is running
should be less than the nameplate value (startup will be higher). If
it is too high, than there is likely a problem with the motor. As an
alternate you could try bypassing the circuit breaker with a slow blow
fuse of the same rating as the breaker (it hopefully will be marked) or
a replacement breaker (from another dead garbage disposal!. If this
allows the disposer to run continuously your original little circuit
breaker is bad. These should be replaceable.
If the bearings are tight, it is probably not worth fixing unless it is
due to something stuck between the grinding disk and the base. Attempting
to disassemble the entire unit is likely to result in a leak at the top
bearing though with care, it is possible to do this successfully.
"I have an ISE In-Sink-Erator (tm), Badger I model. I tried turning mine on a
few minutes ago, the motor started then stopped and now nothing happens when I
flip the wall switch, not even a click."
Of course, first make sure there is nothing jamming it - use a flashlight
to inspect for bits of bone, peach pits, china, glass, metal, etc. Even a
tiny piece - pea size - can get stuck between the rotating disk and the
shredder ring. WITH THE DISPOSAL UNPLUGGED OR THE BREAKER OFF, work the
the rotor back and forth using the hex wrench that came with the unit or
a replacement (if your unit is of the type that accepts a wrench from below.
If it is not of this type, use the infamous broom handle from above.)
The internal circuit breaker will trip to protect the motor if the rotor
doesn't turn. Turn off the wall switch, wait a few minutes for the circuit
breaker and motor to cool, and then press the red reset button underneath
the disposal. If it does not stay in, then you didn't wait long enough or
the circuit breaker itself is defective. Then, turn on the water and try
the wall switch again (in-sink switch if it is a batch feed model).
Assuming it is still tight with nothing stuck inside and/or jams repeatedly:
(From: Rob-L (rob-l@superlink.net).)
That's about how long it takes for the nut to rust away on the shredder
disc of Insinkerator/Sears units. My comments will address ISE/Sears
deluxe models with the stainless disc, for those who might have one.
When the nut/washer rusts away, the disc will wobble and get jammed. With
the power off, try to rock the disc inside the unit. You might need to
wiggle the motor shaft with a 1/4" hex wrench under the unit.
If you can free things up, and the disc can be rocked, it's the
nut/washer. When that goes, so does the gasket, and unfortunately it
requires total disassembly of the grinding chamber to replace the little
gasket, because the disc will not come out otherwise. And if you don't
replace the gasket, water/gunk will run down the motor shaft and into the
motor. When those units go, you're better off to get a new disposer.
I think they intentionally use a non-stainless steel nut, because
otherwise the units would last a long time. Even the replacement nuts
will corrode. The motor shaft will also corrode, but not as fast as the
nut. With a stainless shaft and nut/washer, the disposer would give many
more years of service. And that's why they don't make 'em that way. :)
One part that is worth replacing is the mounting gasket. It's the part
with the flaps that you feed things through. It gets cut-up and damaged
by chlorine from sink cleaning or dishwasher discharge. (brittle, rough)
It's a $4 part, usually available at Home Depot next to the new disposers,
and it slips on in a matter of minutes -- you just disconnect the trap,
then drop the disposer down by undoing the retaining ring. Swap the
gasket, re-attach things, and your sink drain looks brand new.
By the time the leak is detected, it is probably too late to save the
disposal as corrosion of the steel shaft, excessive wear of the bronze
bushing, as well as possible electrical damage has already occurred.
Realistically, there is nothing that could have likely been done in any
case. It is virtually impossible to repack such a bearing in such a way
to assure that a leak will not develop in the near future.
If your previous garbage disposal was an ISE In-Sinkerator or Sears, then
replacement is usually a 10 minute job if the under-sink plumbing is in
reasonably good condition (doesn't crumble to dust when you touch it).
If the part that mounts to the sink is not corroded and not leaking, I
just leave it alone. The only tools required are a screwdriver and wire
strippers (possibly) to move the power cord or cable to the new unit and
a screwdriver or socket driver and a large adjustable wrench or pliers to
unscrew the drain pipe and dishwasher connection (if used). Complete
instructions should be provided with the replacement unit.
These motors are quite reliable but the bearing can rot/rust/sieze at
the base where it may be under water or at least in a humid environment.
The casing may leak at the bearing (if not magnetically coupled) or at the
wire connections. Repair of these motors is probably not worth the effort.
Three types of automatic switches are commonly used:
(From: Pete Peterson (peterson@usaor.net).)
I've repaired a couple with the same problem and its been the motor driver
transistors each time. There are two or three direct coupled transistors
from each side of the motor (probably equates to an H bridge) and one or
all of these go open. Probably under designed for the current they carry.
Just trace the wires from the motor out through the circuit and check the
first several transistors you come to.
Parts of a typical garage door operator (chain drive). Details may differ
on operators with worm screw or other drive schemes.
On units with DIP switches, both transmitter and receiver settings must
match exactly. In addition, for older units in particular, the contacts
on the switches may be dirty and/or oxidized so flipping each switch back
and forth a few times may be needed to make a reliable connection. I have
also seen a situation where one bit wouldn't work in one position - the
other position was fine.
AAA Remotes is
a replacement parts supplier but also has exploded diagrams and parts
lists for a variety of Chamberlain, Genie, and LiftMaster models.
Are there such things as IR remote controls for garage door openers
instead of the usual radio frequency variety?
For many types (Sears, Genie, etc.), there is a thermally operated
time delay consisting of a coil of resistance wire, a bimetal strip,
and a set of contacts. When the operator is activated, power is applied
to the heater which causes the bimetal strip to bend and close the
contacts turning on the light. Due to the mass of the bimetal strip,
it takes a couple of minutes to cool down and this keeps the light on.
The most common failure is for the fine wire in the heater to break at
some point. If you can locate the break, it may be repairable at least
as a temporary solution. You cannot solder it, however, so a tiny
nut and bolt or crimp will be needed. However, sticking contacts resulting
in a light that does not always go off are also possible. Cleaning the
contacts may help.
This part is very easily accessed once the sheetmetal cover is removed.
It is probably somewhere in the middle of the unit fastened with three
screws. Just remember to unplug the operator first!
Depending on the manufacturer, the original part may be available. I
know that it is for Sears models.
You could also use a time delay relay or a solid state circuit (RC delay
controlling a triac, for example) but an exact replacement should be just
a whole lot less hassle.
When it gets to the end of the track - be it at the top or bottom, there
must be something that it trips to shut down the motor. At the same time,
this is supposed to set things up so that the next activation will reverse
the door.
Does the door stop and shut off when it reaches the end or does it eventually
just give up and trip on the safety?
When it trips the switch to stop at the end of its travel, some mechanism
is toggled to change the 'state' of the door logic so that it knows to
go up the next time it is activated. It is probably this device - be it a
latching relay, mechanical two position switch, or a logic flip flop - that
is not being properly toggled.
I would recommend attempting to determine what device that switch is actually
supposed to toggle - it probably is in the operator unit itself (not the
control box).
First compare the antennas on the two remotes. If they are the same and
there are no broken connections, your problem lies elsewhere. The chance
of the wire itself being bad is pretty slim.
It could also be that the receiver and transmitter frequencies are not quite
identical. If the remote units have been abused, this is more likely. I
don't know about Genie but my (old) Sears has trimmers and I was able to
adjust it *very* slightly to match that of the receiver and boost sensitivity.
CAUTION: If you try this (1) mark the exact position where it was
originally and (2) do it only on the transmitter that has the problem. This
will minimize the possibility of shifting the frequency to where it might
interfere with other devices. See the section: Adjusting
garage door operator remote unit for more information.
It should not work at all if the switches are set improperly. In such a
case, first test and/or replace the battery. If this does not help, check
the switch settings.
The tuning is done via a variable capacitor trimmer (probably).
There will probably be a trimmer inside the hand unit (don't touch the one
in the receiver). Position yourself at a reasonable distance and use a
plastic tool to adjust it until the door operates while holding the button
down. The door will respond at increasing distances as you approach the
optimal setting.
Note: mark the original position first in case this has no effect!
This assumes there is an adjustment - if there is none, you may have an
actual electronic failure, bad connections, etc.
(From: Kirk Kerekes (redgate@tulsa.oklahoma.net).)
Go to a home center, and wander over to the garage door openers. Nearby,
you will find GDO accessories, and among the accessories will be a universal
replacement remote kit that includes a receiver, a transmitter and possibly
a power supply. For about $40, you can by and install the receiver in place of
the existing receiver. If your home center carries Genie openers, you can even
get an Intellicode add-on unit that uses Genie's scanner-proof code-hopping
technology.
Increasing the safety override force settings may help but are not a wise
solution as the door will then be more of a hazard to any legitimate
obstructions like people and pets.
Another possibility is that the motor start/run capacitor has weakened
and is not permitting the motor to provide the proper torque. You can
test the capacitor if you have a DMM with a capacitance scale or LCR meter.
Better yet, just replace it.
Chamberlain tech support told me they suggest I buy a whole new unit. Is
there any other way to make my door usable with a different remote, or
some other arrangement?"
(From: Panayiotis Panayi (panikos@mishka.win-uk.net).)
Which Chamberlain operator is it, i.e., which model number. You can
buy the handsets for Chamberlain operators up to 5 years old. If it
is older you will have to buy a new Rx & Tx for it. Most operators
have three screw terminals on the back for the attachment of Rxs.
The old Chamberlain operators conformed to this. The new ones have
the Rx built onto the main PCB inside the operator and have 4
screws externally for pushbuttons and infra red safety beams. If
yours has 4 screws you will have to provide a separate PSU for the
new Rx or solder two pieces of wire after the step down
transformer on the PCB. You must do it before the rectifiers.
Otherwise the current drain from the Rx will be too big for them.
Besides almost all modern separate Rxs take 24 VAC.
If there is access to your house from the garage, this security is even more
critical. Once inside the garage, a burglar can work in privacy at their
leisure - and a nice set of tools is probably there for their convenience
in getting through your inside door! Filling up a good sized car or truck
with loot - again in complete privacy - drive out and close the door behind.
No one will be the wiser until you get back.
All of the switches for a given location (i.e., inside and outside the storm
door) are wired in parallel. There will be three terminals on the chimes
unit - Common (C), Front (F), and Back or Rear (B or R). This notation may
differ slightly for your unit. Typical wiring is shown below. An optional
second chimes unit is shown (e.g., in the basement or master bedroom - more
can be added in parallel as long as the bell transformer had an adequate VA
rating.)
Where the pushbuttons are lighted, a small incandescent bulb is wired across
the switch contacts and mounted inside the button unit. It is unlikely that
this bulb will ever burn out since it is run at greatly reduced voltage.
However, if the button does not light but the bell works, this has happened.
Replace the pushbutton/light combination - locating a replacement bulb may
not worth the effort though Radio Shack is supposed to have something that
will work.
Most 'not-chiming' problems are due to the one or more of the following:
Note: where multiple switches operate the chimes from similar locations,
multiple wires may be connected to each switch terminal. Don' mix these up
or lose them inside the wall!
If just a single location doesn't work, that should narrows down the problem.
If only one switch does not work, first test the switch. If disconnecting
the wires from the switch does not result in full transformer voltage across
the wires, then there is a bad connection between you and the transformer,
the transformer has no power, is defective, or there is a short circuit
somewhere.
Note: due to coupling between the wires, there may be some voltage across
all combinations. The most will be across the relevant one (and this will
be the only combination that will sound the chimes if you are using them
as a voltage indicator).
A quick test to determine if the transformer is being powered is to
feel it! The transformer should be warm but not hot to the touch. If
it is stone cold, either there is no power or a bad connection in the
input line) circuit.
Test for voltage between the Common and Front or Back terminals when the
appropriate button is pressed.
The only concern is whether the existing transformer that operates the
chimes has enough capacity - you may need to replace it with one with a
higher 'VA' rating (the voltage rating should be the same). These are
readily available at hardware and electrical supply stores and home
centers.
Some people might suggest just paralleling an additional transformer across
the original one (which may be possible if the output phases match). I
would really recommend simply replacing it. (This is probably easier
mechanically in any case.) Unless the transformers output voltages as
designed are identical, there will be some current flowing around the
secondaries at all the times. At the very least, this will waste power
($$) though overheating is a possibility as well.
However, since the 'Y' outputs of the transformers are connected at all
times to the 'C' terminals of the of the chimes units AND the 'X' outputs
are tied together, any voltage difference between the 'Y' outputs will
result in current flow through the chimes coils even if no button is
pressed. Thus, the transformers must be phased such that there is no (or
very little) voltage between 'Y' outputs. Test between 'Y' outputs with a
multimeter set on AC Volts after you have the transformers powered: if you
measure about double the transformer voltage rating (e.g., 32 VAC), swap
ONE set of transformer leads (input or output but not both) and test again.
If it is still more than a couple volts, your transformers are not matched
well enough and you should purchase identical transformers or use the
approach in (1), above.
Another button can be added in parallel with any of the existing ones (i.e.,
between points X and F or X and B in the diagram). The only restriction is
that you may not be able to have more than one lighted button in each group
as the current passing through the lighted bulbs may be enough to sound the
chimes - at least weakly.
If you cannot trace the wiring (it is buried inside the wall or ceiling)
the only unknown is which side of the transformer to use. If you pick the
wrong one, nothing will happen when you press the button.
The bell or chimes portion may be either an electromechanical type - a coil
forming an electromagnet which pulls in a plunger to strike a gong or bell.
See the section: Electromechanical doorbells and chimes.
Others are fully electronic synthesizing an appropriate tone, series of tones,
or even a complete tune on demand. Repair of the electronics is beyond the
scope of this document. However, there are several simple things that can
be done:
First, remove the batteries or kill power to all transmitters and wait see if
the problem still occurs.
A common type of motor that may be used in these is a small AC split phase or
capacitor run induction motor. The relative phase of the main and phase coils
determines the direction. These probably run on 115 VAC. A capacitor may
also be required in series with one of the windings. If the antenna does not
turn, a bad capacitor or open winding on the motor is possible. See the
chapter: Motors 101 for more info on repair of these
types of motors.
The base unit is linked to the motor unit in such a way that the motor
windings are powered with the appropriate phase relationship to turn the
antenna based on the position of the direction control knob. This may
be mechanical - just a set of switch contacts - or electronic - IR detectors,
simple optical encoder, etc.
Here is some info on connections for some types:
(From: Will Shears (wshearsN@wyzz.sbgnet.com).)
The rotor is operated on 24 volts AC. The wires are used like this:
OR, the third lead was a meter lead, and the rotor turned a pot that changed
the meter reading according to the position of the pots' turning. The rest is
the same.
Inside the box was a 70 uF, 50 V or so NON POLARISED capacitor, or an AC
capacitor. Usually the capacitor was connected across the #2 and #3 lead. It
provided a phase shift for the motor, and you put 24 volts from #1 to #2 for
forward, and to #1 and #3 for reverse. The other lead will either pulse as the
rotor turns, or the voltage will change between the #1 & #4 lead, assuming
there is a load resistor across the terminals. I would try a 470 ohm 1 watt
resistor to start, and probably a 100 to 200 will be right. If you have a
VOM, check for resistance across 1 and 4, if you get some, not a short, it is
the second type, if you get a short or open, it is a pulse type.
(From: Al Cunniff (acunniff@erols.com).)
Here is one place that is devoted to antenna rotors if you give up:
Note: They don't have email built into their site, but the site tells you just
about everything else you need to know about their business and service. It
has a good rotor FAQ section too.
I'm not connected in any way with Norm's,
See the sections on these types of motors for more details than the following
summaries provide.
A single or multiple stage gear reducer drops the relatively high speed
at which these motors are most efficient to whatever the tool actually
requires, increasing the torque as well.
Universal motors can also be speed controlled relatively easily using a
variant of a simple light dimmer type circuit. Excellent torque is
maintained over a very wide range extending to nearly 0 RPM.
Speed control is easily accomplished by low cost electronic circuits which
chop the power (pulse width modulation) rather than simply using a rheostat.
This is much more efficient - extremely important with any battery operated
device.
For example, a typical drill press may have one or two sets of stepped
pulleys providing 3 to 15 or more speeds by changing belt positions. A
continuously variable cone drive is also available as an option on some
models. This is extremely convenient but does add cost and is usually not
found on less expensive models.
An internal thermal overload protector may be incorporated into larger
motors. WARNING: this may be self resetting. If the tool stops on its own,
switch off and unplug it before attempting to determine the cause.
Generally, these induction motors are virtually maintenance-free though
cleaning, tensioning, and lubrication may be required of the drive system.
However, electronic speed control of induction motors, while possible,
is relatively complex and expensive requiring a variable frequency
variable voltage power supply. Therefore, universal motors may be used
on stationary tools like scroll saws with continuously variable electronic
speed control.
As technology marches on, there will be increasing use of electronically
controlled motors in all sorts of appliances and power tools. Greatly
increased efficiency and finer control are possible by using 3 phase
permanent magnet motors - similar to larger versions of brushless DC fan
motors - with integrated power control electronics. But, for these
applications, that is largely in the future (currently: Spring 2000).
As with over-the-counter drugs, extra strength does not necessarily translate
into faster relief, higher current does not always mean better performance,
and horsepower ratings much above what you would compute from V x A may be
more of a marketing gimmick than anything really beneficial.
Newer ones have the grounded cordset while the newest 'double insulated
tools' are of mostly plastic construction and are back to a 2 wire ungrounded
cord.
As with any electrical appliances, inspect cords regularly and repair or
replace any that are seriously damaged - if the inner wiring is showing,
nicked, or cut; if the plug is broken or gets hot during use, or where
the cord is pulled from or broken at the strain relief.
Typical problems include:
A gummed up but not too badly rusted chuck can be rescued with penetrating
oil like WD40 or Liquid Wrench: spray it into the chuck, let it sit for few
minutes, then use the chuck key to start working it back and forth. Pretty
soon it should be free - rotate through its entire range back and forth.
Spray and spin a couple more times and it should be fine for another 20.000
holes.
I have upgraded a couple of these drills to ball bearings. The substitution
is straightforward requiring disassembly of the drill - removing of the
front gear reducer and then one side of the case. At this point, the old
sleeve bearing is easily freed from its mounting (just the plastic of the
case) and pulled from the shaft. The shaft is likely undamaged unless you
attempted to continue running the drill even after going deaf.
The drills I upgraded had bearings that were 7/8" OD, 5/16" thick, and with
a 5/16" ID center hole. The old ones were worn by almost 1/32" oversize
for the center hole but the motor shaft was undamaged. I found suitable
replacement double sealed ball bearings in my junk box but I would assume
that they are fairly standard - possibly even available from Sears Parts as
I bet they are used in the next model up.
If the gear reducer needs to come apart to access the motor, take note of
any spacer washers or other small parts so you can get them back in exactly
the correct locations. Work in a clean area to avoid contaminating the
grease packing.
The bearing should be a press fit onto the shaft. Very light sanding of
the shaft with 600 grit sandpaper may be needed - just enough so that the
new bearing can be pressed on. Or, gently tap the center race with hammer
(protected with a block of wood). Make sure that the bearing is snug when
mounted so that the outer race cannot rotate - use layers of thin heat
resistant plastic if needed to assure a tight fit (the old sleeve bearing
was keyed but your new ball bearing probably won't have this feature).
These drills now run as smoothly as Sears' much more expensive models.
In addition to the problems listed in the section: AC
line powered drills, these are also subject to all the maladies of battery
operated appliances. Cordless tools are particularly vulnerable to battery
failure since they are often use rapid charge (high current) techniques.
Ball bearings are used which have long life but are probably replaceable
if they fail (noisy, excessive runout, etc.).
The plug, cord, trigger, and interlock switches are prone to problems and
should be checked if the tool doesn't run at all.
A reciprocating saw is very similar but uses a much larger motor and beefier
gearing.
In addition to motor problems, there can be problems with damage, dirt, or
need for lubrication of the reciprocating mechanism.
These have a high power universal motor and gear reducer. Most have the
motor mounted transversely with normal pinion type gears driving the
chain sprocket. A few models have the motor mounted along the axis of
the saw - I consider this less desirable as the gyroscopic character of
the rotating motor armature may tend to twist the saw as it is tilted
into the work.
Inexpensive designs suffer from worn (plain) bearings, particularly at the
end of the motor opposite the chain since this is exposed to the elements.
Normal maintenance should probably include cleaning and oiling of this
bearing. A loud chattering or squealing with loss of speed and power is an
indication of a worn and/or dry bearing Replacement with a suitable ball
bearing is also a possibility (see the section: Upgrading
the bearings on a Craftsman drill since the approach is identical.
Keep the chain sharp. This is both for cutting efficiency and safety. A
dull chain will force you to exert more pressure than necessary increasing
the chance of accidents. Chains can be sharpened by hand using a special
round file and guide or an electric drill attachment. Alternatively, shops
dealing in chain saws will usually have an inexpensive chain sharpening
service which is well worth the cost if you are not equipped or not inclined
to do it yourself.
One key to long blade and bar life is the liberal use of the recommended
chain oil. Inexpensive models may have a manual oiler requiring constant
attention but automatic oilers are common. These are probably better - if
they work. Make sure the oil passages are clear.
The chain tension should be checked regularly - the chain should be free to
move but not so loose that it can be pulled out of its track on the bar. This
will need to snugged up from time-to-time by loosening the bar fastening nuts,
turning the adjustment screw, then retightening the nuts securely.
There may be a slip clutch on the drive sprocket to protect the motor if the
chain gets stuck in a log. After a while, this may loosen resulting in
excessive slippage or the chain stopping even under normal conditions. The
slip clutch can generally be tightened with a screwdriver or wrench.
Miter and cutoff saws are similar but are mounted on a tilting mechanism
with accurate alignment guides (laser lights in the most expensive!).
Small light duty grinders may be 1/4 HP or less. However, this is adequate
for many home uses.
Wet wheels may run at much slower speeds to keep heat to a minimum. Being
in close proximity to water may in itself create problems.
Due to the nature of their use, sanders in particular may accumulate a lot
of dust and require frequent cleaning and lubrication.
A power planer is similar in many ways but the motor drives a set of cutters
rather than a sanding belt.
I much prefer a belt driven compressor to a direct drive unit. One
reason is that a motor failure does not render the entire compressor
useless as any standard motor can be substituted. The direct drive
motor may be a custom unit and locating a replacement cheaply may be
difficult.
Drain the water that collects in the tank after each use.
Inspect the tank regularly for serious rust or corrosion which could result
in an explosion hazard.as well.
Portable airless paint sprayers use a solenoid-piston mechanism inside the
spray head itself. There is little to go wrong electrically other than the
trigger switch as long as it is cleaned after use.
Professional airless paint sprayers use a hydraulic pump to force the
paint through a narrow orifice at extremely high pressure like 1000 psi.
With all types, follow the manufacturer's recommendations as to type and
thickness of paint as well as the care and maintenance before and after use
and for storage.
Warning: high performance paint sprayers in particular may be a safety
hazard should you put your finger close to the output orifice accidentally.
The pressures involved could be sufficient to inject paint - and anything
else in the stream - through the skin resulting in serious infection or worse.
Some types package the heating element and replaceable tip in a separate
screw-in assembly. These are easily interchangeable to select the
appropriate wattage for the job. Damage is possible to their ceramic
insulator should one be dropped or just from constant use.
High quality temperature controlled soldering stations incorporate some
type of thermostatic control - possibly even with a digital readout.
Possible problems include:
Note: a soldering gun is not a precision instrument and should not be used
for fine electronics work - you will ruin ICs and printed circuit boards.
There are no doubt countless variations on implementation. Two that I've
seen are:
The most common problem will be no heat:
Given the low cost of these things, repair beyond fixing broken wires
or swapping parts from identical units is probably not worth it. There
is no way to fix either type of heating element or thermostat other than
by replacement.
Problems occur with bad cords, switch, motor brushes, bearings, or a
burnt out motor from excessive use under adverse conditions.
As with inexpensive electric drills, sleeve bearings (usually, the top
bearing which is exposed somewhat) in the motor can become worn or dry.
Replacing with a ball bearing is a worthwhile - but rather involved -
undertaking if this happens. See the section: Upgrading
the bearings on a Craftsman drill as the technique is similar (once you
gain access - not usually a 10 minute job).
Of course, you probably will not get away without cutting the power cord
a couple of times as well! See the sections on power cords. One way to
avoid the humiliation (other than being half awake) is to wrap a cord
protector around the first 2 or 3 feet of cord at the tool. This will
make the cord larger in diameter than the inter-tooth spacing preventing
accidental 'chewups'.
Tungsten replaced carbon as the filament material once techniques for
working this very brittle metal were perfected (Edison knew about tungsten
but had no way of forming it into fine wire). Most light bulbs are now filled
with an inert gas rather than containing a vacuum like Edison's originals.
This serves two purposes: it reduces filament evaporation and thus prolongs
bulb life and reduces bulb blackening and it allows the filament to operate
at a higher temperature and thus improves color and brightness. However,
the gas conducts heat away so some additional power is wasted to heating
the surroundings.
Incandescent lamps come in all sizes from a fraction of a watt type smaller
than a grain of wheat to 75 kW monster bulbs. In the home, the most common
bulbs for lighting purposes are between 4 W night light bulbs and 250-300 W
torch bulbs (floor standing pole lamps directing light upwards). For
general use, the 60, 75, and 100 W varieties are most common. Recently,
55, 70 and 95 W 'energy saving' bulbs have been introduced. However, these
are just a compromise between slightly reduced energy use and slightly less
light. My recommendation: use compact fluorescents to save energy if these
fit your needs. Otherwise, use standard light bulbs.
Most common bases are the Edison medium (the one we all know and love) and
the candelabra (the smaller style for night lights, chandeliers, and wall
sconces.
Three-way bulbs include two filaments. The three combinations of which
filaments are powered result in low, medium, and high output. A typical
3-way bulb might be 50 (1), 100 (2), and 150 (1+2) W. If either of the
filaments blows out, the other may still be used as a regular bulb.
Unfortunately, 3-way bulbs do tend to be much more expensive than ordinary
light bulbs. There may be adapters to permit a pair of normal bulbs to
be used in a 3-way socket - assuming the space exists to do this safely
(without scorching the shade).
The base of a 3-way bulb has an additional ring to allow contact to the second
filament. Inexpensive 3-way sockets (not to be confused with 3-way wall
switches for operation of a built-in fixture from two different locations)
allow any table lamp to use a 3-way bulb.
Flashlight bulbs are a special category which are generally very small
and run on low voltage (1.5-12 V). They usually have a filament which is
fairly compact, rugged, and accurately positioned to permit the use of a
reflector or lens to focus the light into a fixed or variable width beam.
These usually use a miniature screw or flange type base although many
others are possible. When replacing a flashlight bulb, you must match
the new bulb to the number and type of battery cells in your flashlight.
Automotive bulbs are another common category which come in a variety of
shapes and styles with one or two filaments. Most now run on 12 V.
Other common types of incandescent bulbs: colored, tubular, decorative,
indoor and outdoor reflector, appliance, ruggedized, high voltage (130 V).
Having said that, several things can shorted lamp life:
It may be possible to get your power company to put a recording voltmeter
on your line to see if there are regular extended periods of higher than
normal voltage - above 120 to 125 V.
To confirm that the problem is real, label the light bulbs with their date
(and possibly place of purchase or batch number - bad light bulbs are also
a possibility). An indelible marker should be satisfactory.
Of course, consider using compact or ordinary fluorescent lamps where
appropriate. Use higher voltage (130 V) bulbs in hard to reach places.
Bulbs with reinforced filament supports ('tuff bulbs') are also available
where vibration is a problem.
A halogen bulb is an ordinary incandescent bulb, with a few modifications.
The fill gas includes traces of a halogen, often but not necessarily iodine.
The purpose of this halogen is to return evaporated tungsten to the filament.
As tungsten evaporates from the filament, it usually condenses on the inner
surface of the bulb. The halogen is chemically reactive, and combines with
this tungsten deposit on the glass to produce tungsten halides, which
evaporate fairly easily. When the tungsten halide reaches the filament, the
intense heat of the filament causes the halide to break down, releasing
tungsten back to the filament.
This process, known as the halogen cycle, extends the life of the filament
somewhat. Problems with uneven filament evaporation and uneven deposition of
tungsten onto the filament by the halogen cycle do occur, which limits the
ability of the halogen cycle to prolong the life of the bulb. However, the
halogen cycle keeps the inner surface of the bulb clean. This lets halogen
bulbs stay close to full brightness as they age. (recall how blackened
an ordinary incandescent bulb can become near the end of its life --- sam).
In order for the halogen cycle to work, the bulb surface must be very hot,
generally over 250 degrees Celsius (482 degrees Fahrenheit). The halogen may
not adequately vaporize or fail to adequately react with condensed tungsten
if the bulb is too cool. This means that the bulb must be small and made
of either quartz or a high-strength, heat-resistant grade of glass known
as "hard glass".
Since the bulb is small and usually fairly strong, the bulb can be filled
with gas to a higher pressure than usual. This slows down the evaporation
of the filament. In addition, the small size of the bulb sometimes makes it
economical to use premium fill gases such as krypton and xenon instead of
the cheaper argon. The higher pressure and better fill gases can extend
the life of the bulb and/or permit a higher filament temperature that results
in higher efficiency. Any use of premium fill gases also results in less heat
being conducted from the filament by the fill gas, meaning more energy leaves
the filament by radiation, meaning a slight improvement in efficiency.
Halogen bulbs usually fail the same way that ordinary incandescent bulbs
do, usually from melting or breakage of a thin spot in an aging filament.
Thin spots can develop in the filaments of halogen bulbs, since the
filaments can evaporate unevenly and the halogen cycle does redeposit
evaporated tungsten in a perfect, even manner nor always in the parts of
the filament that have evaporated the most. However, there are additional
failure modes which result in similar kinds of filament degradation.
It is generally not a good idea to touch halogen bulbs, especially the more
compact, hotter-running quartz ones. Organic matter and salts are not good
for hot quartz. Organic matter such as grease can carbonize, leaving a dark
spot that absorbs radiation from the filament and becomes excessively hot.
Salts and alkaline materials (such as ash) can sometimes "leach" into hot
quartz, which typically weakens the quartz, since alkali and alkaline
earth metal ions are slightly mobile in hot glasses and hot quartz.
Contaminants may also cause hot quartz to crystallize, weakening it. Any of
these mechanisms can cause the bulb to crack or even violently shatter.
For this reason, halogen bulbs should only be operated within a suitable
fully enclosed fixture. If a quartz halogen bulb is touched, it should
be cleaned with alcohol to remove any traces of grease. Traces of salt
will also be removed if the alcohol has some water in it.
Another problem with dimming of halogen lamps is the fact that the halogen
cycle works best with the bulb and filament at or near specific optimum
temperatures. If the bulb is dimmed, the halogen may fail to "clean" the
inner surface of the bulb. Or, tungsten halide that results may fail to
return tungsten to the filament.
Halogen bulbs should work normally at voltages as low as 90 percent of
what they were designed for. If the bulb is in an enclosure that conserves
heat and a "soft-start" device is used, it will probably work well at even
lower voltages, such as 80 percent or possibly 70 percent of its rated
voltage.
Dimmers can be used as soft-start devices to extend the life of any
particular halogen bulbs that usually fail from "necking" of the ends of
the filament. The bulb can be warmed up over a period of a couple of
seconds to avoid overheating of the "necked" parts of the filament due to
the current surge that occurs if full voltage is applied to a cold filament.
Once the bulb survives starting, it is operated at full power or
whatever power level optimizes the halogen cycle (usually near full power).
The dimmer may be both "soft-starting" the bulb and operating it at slightly
reduced power, a combination that often improves the life of halogen bulbs.
Many dimmers cause some reduction in power to the bulb even when they are set
to maximum.
(A suggestion from someone who starts expensive medical lamps by turning up
a dimmer and reports major success in extending the life of expensive special
bulbs from doing this.)
(From: Susanne Shavelson (shavelson@binah.cc.brandeis.edu).)
People have often mentioned experiencing epidemics of light-bulb-death
after moving into a new (to them) house. The same thing happened to us
for a few months after moving last year into a 55-year-old house. After
most of the bulbs had been replaced, things settled down. I am persuaded
by the theory advanced by David (?) Owen in his wonderfully informative
and witty book "The Walls Around Us" that houses undergo a sort of nervous
breakdown when a new occupant moves in, leading to all sorts of symptoms
like blown bulbs, plumbing problems, cracks in the walls, and so forth.
Now that the house has become more accustomed to us, the rate at which
strange phenomena are occurring has slowed.
When cold, NTC thermisters have a high resistance. As they warm up, the
resistance decreases so that the current to the light bulb is ramped up
gradually rather than being applied suddenly.
With a properly selected (designed) thermistor, I would not expect the
light output to be affected substantially. However, while reducing the
power on surge may postpone the death of the bulb, the filament wear
mechanism is due to evaporation and redeposition of the tungsten during
normal operation. This is mostly a function of the temperature of the
filament.
A thermistor which was not of low enough hot resistance would be dissipating
a lot of power - roughly .8 W/volt of drop for a 100W bulb. Any really
substantial increase in bulb life would have to be due to this drop in voltage
and not the power-on surge reduction. The bulb saver (and socket) would
also be heating significantly.
The bulb savers that are simply diodes do not have as much of a heat
dissipation problem but reduce the brightness substantially since the
bulbs are running at slightly over half wattage. Not surprisingly, the
life does increase by quite a bit. However, they are less efficient at
producing light at the lower wattage and it is more orange. If you are
tempted to then use a higher wattage bulb to compensate, you will
ultimately pay more than enough in additional electricity costs to
make up for the longer lived bulbs.
My recommendation: use high efficiency fluorescents where practical.
Use 130 V incandescents if needed in hard to reach places where bulb
replacement is a pain. Stay away from bulb savers, green plugs, and
other similar products claiming huge energy reduction. Your realized savings
for these products will rarely approach the advertised claims and you
risk damage to your appliances with some of these.
Reducing the power on surge with a thermistor will reduce the mechanical
shock which will postpone the eventual failure. 5X or even 20 % increase
in life is pushing it IMHO.
I do believe that Consumer Reports has tested these bulb savers with
similar conclusions (however, I could be mistaken about the kind of
bulb savers they tested - it was quite awhile ago).
Motors come in all shapes and sizes but most found in small appliances
can be classified into 5 groups:
Open frame motors in line operated appliances with a single coil off to
one side are almost always shaded pole induction motors. To confirm, look
for the copper 'shading rings' embedded in the core. There will usually
be either 1 or 2 pairs of these. Their direction is determine by the
orientation of the stator frame (position of the shading rings).
For enclosed motors, first check to see if there are carbon brushes on
either side of a commutator made of multiple copper bars. If so, this
is almost certainly a series wound 'universal' motor that will run on
AC or DC though some may be designed for DC operation only.
If there are no brushes, then it is likely a split phase induction or
synchronous motor. If there is a capacitor connected to the motor, this
is probably used for starting and to increase torque when running.
Where there is a capacitor, it is likely that how this is wired to the
motor determines the direction of rotation - make sure you label the
connections!
Very small motors with enclosed gear reducers are usually of the synchronous
type running off the AC line. Their direction of rotation is often set by
a mechanical one-way clutch mechanism inside the casing.
Motors used in battery operated tools and appliances will usually be of
the permanent magnet DC type similar to those found in toys and electronic
equipment like VCRs and CD players. Most of these are quite small but there
are exceptions - some electric lawnmowers use large versions of this type of
motor, for example. These will be almost totally sealed with a pair of
connections at one end. Direction is determined by the polarity of the
DC applied to the motor.
For universal and DC permanent magnet motors, speed control may be accomplished
with an internal mechanical governor or electronic circuitry internal or
external to the motor. On devices like blenders where a range of (useless)
speeds is required, there will be external switches selecting connections
to a tapped winding as well as possibly additional electronic circuitry. The
'solid state' design so touted by the marketing blurb may be just a single
diode! A similar approach may also be used to control the speed of certain
types of induction motors (e.g., ceiling fans) but most are essentially fixed
speed devices.
Once identified, refer to the appropriate section for your motor.
Construction consists of a stationary set of coils and magnetic core called the
'stator' and a rotating set of coils and magnetic core called the 'armature'.
Incorporated on the armature is a rotating switch called a 'commutator'.
Connection to the armature is via carbon (or metal) contacts called 'brushes'
which are mounted on the frame of the motor and press against the commutator.
Technically, these are actually series wound DC motors but through the use of
steel laminated magnetic core material, will run on AC or DC - thus the name
universal.
Speed control of universal motors is easily achieved with thyristor
based controllers similar to light dimmers. However, simply using a
light dimmer as a motor speed controller may not work due to the
inductive characteristics of universal motors.
Changing direction requires interchanging the two connections between the
stator and the armature.
This type of motor is found in blenders, food mixers, vacuum cleaners,
sewing machines, and many portable power tools.
However, the source of the open may not be the windings but a blown thermal
fuse - see below.
For appliances subject to dust or dirt like vacuum cleaners and woodworking
toole (and others as well), the brushes may just get stuck from accumulated
debris and not be able to make consistent contact. Carefully remove the
brushes and clean them and their mounting channels so they slide in and out
freely.
Note: Whenever removing carbon brushes, make a note as to their exact
orientation as replacing them in the same way will minimize wear and
break-in time.
Sometimes, there is a thermal fuse buried in the windings that will blow
due to overheating before any serious damage has occurred. If so, cleaning
and relubing the bearings or remedy of whatever other problem caused the
overload and replacement of the thermal fuse may be all that is needed. See
the section: Thermal protection devices - thermal fuses
and thermal switches for precautions when replacing these and the document:
Notes on the Troubleshooting and Repair of AC
Adapters, Power Supplies, and Battery Packs.
WARNING: Don't just bypass the protection device or the next time you
may be dealing with your fire insurance company!
Also test for a short to the frame - this should read infinity. If lower than
1 M or so, the motor will need to be replaced unless you can locate the fault.
An open or shorted armature winding may result in a 'bad spot' - a position
at which the motor may get stuck. Rotate the motor by hand a quarter turn and
try it again. If it runs now either for a fraction of a turn or behaves
normally, then replacement will probably be needed since it will get stuck
at the same point at some point in the future. Check it with an ohmmeter.
There should be a periodic variation in resistance as the rotor is turned
having several cycles per revolution determined by the number of commutator
segments used. Any extremely low reading may indicate a shorted winding.
Any erratic readings may indicate the need for brush replacement or cleaning.
An unusually high reading may indicate an open winding or dirty commutator.
Cleaning may help a motor with an open or short or dead spot.
A motor can be tested for basic functionality by disconnecting it from the
appliance circuit and running it directly from the AC line (assuming it is
intended for 115 VAC operation - check to be sure).
CAUTION: series wound motors can overspeed if run without a load of any kind
and spectacular failure may result due to centrifugal disassembly of the
armature due to excess G forces. In other words, the rotor explodes. This is
unlikely with these small motors but running only with the normal load
attached is a generally prudent idea.
A spring presses the brush against the rotating commutator to assure good
electrical contact at all times. A flexible copper braid is often embedded
in the graphite block to provide a low resistance path for the electric
current. However, small motors may just depend on the mounting or pressure
spring to provide a low enough resistance.
The typical universal motor will have between 3 and 12 armature windings
which usually means a similar number of commutator segments. The segments
are copper strips secured in a non-conductive mounting. There are supposed
to be insulating gaps between the strips which should undercut the copper.
With long use, the copper may wear or crud may build up to the point that
the gaps between the copper segments are no longer undercut. If this
happens, their insulating properties will largely be lost resulting in an
unhappy motor. There may be excessive sparking, overheating, a burning
smell, loss of power, or other symptoms.
Whenever checking a motor with a commutator, inspect to determine if the
commutator is in good condition - smooth, clean, and adequately undercut.
Use a narrow strip of wood or cardboard to clean out the gaps assuming
they are still present. For larger motors, a hacksaw blade can be used
to provide additional undercutting if needed though this will be tough
with very small ones. Don't go too far as the strength of the commutator's
mounting will be reduced. About 1/32 to 1/16 inch should do it. If the
copper is pitted or worn unevenly, use some extra fine sandpaper (600 grit,
not emery cloth or steel wool which may leave conductive particles behind)
against the commutator to smooth it while rotating the armature by hand.
Since the carbon brushes transmit power to the rotating armature,
they must be long enough and have enough spring force behind them to
provide adequate and consistent contact. If they are too short, they
may be unstable in their holders as well - even to the point of being
ripped from the holder by the commutator causing additional damage.
Inspect the carbon brushes for wear and free movement within their holders.
Take care not to interchange the two brushes or even rotate them from their
original orientation as the motor may then require a break-in period and
additional brush wear and significant sparking may occur during this time.
Clean the brushes and holders and/or replace the brushes if they are broken
or excessively worn.
An appliance, vacuum cleaner, or motor repair shop may have replacement carbon
brushes. However, even if you cannot locate an exact replacement, buy a set
of slightly larger ones. They can usually be filed down to fit rather easily
(the graphite is soft but messy).
I don't know whether the following approach is viable but it may be worth a
try if you can't locate a proper replacement carbon brush. I wonder if the
brand of battery matters? :-)
(From: rtotman@oanet.com).
Why on earth would you not make new brushes yourself from the carbon rod from
the center of a cheap battery. You can file or grind the graphite to just the
size you need. Free too.
I have done this many times with motors as small as an electric shaver to ones
as large as vacuum cleaners. There is very little difference I can see in both
the life of the new brushes and of the commutator segments they bear on.
Electric drills are hard on brushes if you use them a lot and they get hot. I
have re-brushed several drills and they are all still in service.
Which part of the motor is bad? The armature or stator? How do you
know? (A smelly charred mess would probably be a reasonable answer).
Rewinding a motor is probably going to way too expensive for a small
appliance or power tool. Finding a replacement may be possible since
those sizes and mounting configurations were and are very common.
However, I have, for example, replaced cheap sleeve bearings with ball
bearings on a couple of Craftsman power drills. They run a whole lot
smoother and quieter. The next model up used ball bearings and shared
the same mounting as the cheaper sleeve bearings so substitution was
straightforward.
Most of the following description applies to all the common types of
induction motors found in the house including the larger fractional
horsepower variety used in washing machines, dryers, and bench power
tools.
Construction consists of a stationary pair of coils and magnetic core called
the 'stator' and a rotating structure called the 'rotor'. The rotor is
actually a solid hunk of steel laminations with copper or aluminum bars running
lengthwise embedded in it and shorted together at the ends by thick plates.
If the steel were to be removed, the appearance would be that of a 'squirrel
cage' - the type of wheel used to exercise pet hamsters. A common name for
these (and others with similar construction) are squirrel case induction
motors.
These are normally called single-phase because they run off of a single-phase
AC line. However, at least for starting and often for running as
well, a capacitor or simply the design of the winding resistance and
inductance, creates the second (split) phase needed to provide the rotating
magnetic field.
For starting, the two sets of coils in the stator (starting and running
windings) are provided with AC current that is out of phase so that the
magnetic field in one peaks at a later time than the other. The net
effect is to produce a rotating magnetic field which drags the rotor
along with it. Once up to speed, only a single winding is needed though
higher peak torque will result if both windings are active at all times.
Small induction motors will generally keep both winding active but larger
motors will use a centrifugally operated switch to cut off the starting
winding at about 75% of rated speed (for fixed speed motors). This is
because the starting winding is often not rated for continuous duty
operation.
For example, a capacitor run type induction motor would be wired as shown
below. Interchanging the connections to either winding will reverse the
direction of rotation. The capacitor value is typical of that used with
a modest size fan motor.
Speed control of single-phase induction motors is more complex than
for universal motors. Dual speed motors are possible by selecting
the wiring of the stator windings but continuous speed control is
usually not provided. This situation is changing, however, as the
sophisticated variable speed electronic drives suitable for induction
motors come down in price.
Direction is determined by the relative phase of the voltage applied
to the starting and running windings (at startup only if the starting
winding is switched out at full speed). If the startup winding is
disconnected (or bad), the motor will start in whichever direction
the shaft is turned by hand.
This type of motor is found in larger fans and blowers and other
fixed speed appliances like some pumps, floor polishers, stationary
power tools, and washing machines and dryers.
Direction is fixed by the position of the shading rings and electronic
reversal is not possible. It may be possible to disassemble the motor
and flip the stator to reverse direction should the need ever arise.
Speed with no load is essentially fixed but there is considerable
reduction as load is increased. In many cases, a variable AC source
can be used to effect speed control without damaging heating at any speed.
This type of motor is found in small fans and all kinds of other low
power applications like electric pencil sharpeners where constant speed
is not important. Compared to other types of induction motors, efficiency
is quite poor.
Check for free rotation, measure voltage across the motor to make sure it
is powered, remove any load to assure that an excessive load is not the
problem.
If an induction motor (non-shaded pole) won't start, give it a little help
by hand. If it now starts and continues to run, there is a problem with
one of the windings or the capacitor (if used).
For all types we have:
For capacitor run type:
For larger induction motors with centrifugal starting switches:
For the case of induction motors, ignore any comments about brushes as
there are none. With shaded pole motors, the entire assembly is often
not totally enclosed with just stamped sheet metal brackets holding the
bearings.
Follow these steps to minimize your use of 4 letter expletives:
While it is apart, brush or blow out any built up dust and dirt and thoroughly
clean the shaft, bushings, commutator, and starting switch (present in large
induction motors, only).
Relubrication using electric motor oil for plain bearings and light grease
for non-sealed ball/roller bearings.
CAUTION: cleanliness is absolutely critical when repacking bearings or
else you will be doing this again very soon.
Badly worn ball bearings will need replacement. However, this may be better
left to a motor rebuilding shop as they are generally press fit and difficult
to remove and install.
Reassemble in reverse order. If installation of the brushes needs to be
done before inserting the armature, you will need to feed them in spring
end first and hold them in place to prevent damage to the fragile carbon.
Tighten the nuts or bolts evenly and securely but do not overtighten.
Measure the resistance between each pair of windings to determine the common.
That goes to the AC Neutral.
The one with the higher resistance is probably the phase winding. The other
winding goes directly to the AC Hot. If the resistances are similar, it
doesn't matter which you use. If the resistances are very different, it may
be a split phase induction motor that doesn't even need a capacitor. (It
won't hurt to try it without for a short time. If the motor has enough torque
and doesn't overheat, no cap is needed.)
Select a capacitor value so that its impedance at 60 Hz (1/2pifC) is between
1 and 2 times the resistance of the winding. It has to be a cap rated for
250 VAC, continuous duty. The value I gave is sort of a guess but will get
it running. The idea is to maximize the phase shift while still getting
useful power to the phase winding. For a small motor, a few uF should work.
The cap goes between AC Hot and the phase winding.
This should get it going. If torque is too low, the uF value of the cap may
need to be increased. Check that the motor isn't overheating once you have
it running.
Also see the section: Single-phase induction motors.
Here is an example for a common multispeed furnace blower motor. In this
case there is no capacitor and thus there are few unknowns.
So, how do I connect the motor?"
From the resistance readings, it would appear that the Black, Blue, and Red
are all taps on a single winding. My guess (and there are no warranties :-)
would be: White is common, black is HIGH, blue is MEDIUM, red is LOW.
I would test as follows:
Alternatively, if you have a Variac (variable autotransformer) of
sufficient ratings, just bring up the voltage slowly.
Small PM DC motors are used in battery or AC adapter operated shavers,
electric knives, and cordless power tools.
Similar motors are also used in cassette decks and boomboxes, answering
machines, motorized toys, CD players and CDROM drives, and VCRs. Where
speed is critical, these may include an internal mechanical governor or
electronic regulator. In some cases there will be an auxiliary tachometer
winding for speed control feedback. This precision is rarely needed for
appliances.
As noted, direction is determined by the polarity of the input power
and they will generally work equally well in either direction.
Speed is determined by input voltage and load. Therefore, variable
speed and torque is easily provided by either just controlling the
voltage or more efficiently by controlling the duty cycle through pulse
width modulation (PWM).
These motors are usually quite reliable but can develop shorted or open
windings, a dirty commutator, gummed up lubrication, or dry or worn bearings.
Replacement is best but mechanical repair (lubrication, cleaning) is
sometimes possible.
Check across the motor terminals with an ohmmeter. There should be a periodic
variation in resistance as the rotor is turned having several cycles per
revolution determined by the number of commutator segments used. Any
extremely low reading may indicate a shorted winding. An unusually high
reading may indicate an open winding or dirty commutator. Cleaning may help
a motor with an open or short or dead spot as noted below. Erratic readings
may indicate the need for cleaning as well.
Also check between each terminal and the case - the reading should be high,
greater than 1M ohm. A low reading indicates a short. The motor may still
work when removed from the equipment but depending on what the case is
connected to, may result in overheating, loss of power, or damage to the
driving circuits when mounted (and connected) to the chassis.
A motor can be tested for basic functionality by disconnecting it from the
appliance circuit and powering it from a DC voltage source like a couple
of 1.5 V D Alkaline cells in series or a DC wall adapter or model train power
pack. You should be able to determine the the required voltage based on the
battery or AC adapter rating of the appliance. If you know that the appliance
power supply is working, you can use this as well.
The following applies to the common DC permanent magnet (PM) motors found
in tape players and cassette decks used for the capstan.
Note that many motors are actually marked with voltage and current ratings.
Internal regulators may be electronic or mechanical (governor). One way to
tell if there is an internal electronic regulator is to measure the
resistance of the motor. If it is more than 50 ohms and/or is different
depending on which direction the meter leads are connected, then there is
an electronic regulator.
Another technique is to disconnect the motor completely from the circuit
and power it for a few seconds in each direction from a 9 V or so DC source.
This may blow out the crud. The long term reliability of both of these
approaches is unknown.
WARNING: Never attempt to power a motor with an external battery or power
supply when the motor is attached to the appliance, particularly if it
contains any electronic circuitry as this can blow electronic components
and complicate your problems.
It is sometimes possible to disassemble the motor and clean it more
thoroughly but this is a painstaking task best avoided if possible.
See the section: Disassembling and reassembling a
miniature PM motor.
Unless you really like to work on really tiny things, you might want to just
punt and buy a replacement. This may be the strategy with the best long
term reliability in any case. However, if you like a challenge, read on.
CAUTION: disassembly without of this type should never be attempted with high
quality servo motors as removing the armature from the motor may partially
demagnetize the permanent magnets resulting in decreased torque and the need
to replace the motor. However, it is safe for the typical small PM motor
found in appliances and power tools.
Select a clean work area - the permanent magnets in the motor will attract
all kinds of ferrous particles which are then very difficult to remove.
Follow these steps to minimize your use of 4 letter expletives:
Check that the gaps in the commutator segments are free of metal particles
or carbonized crud. Use a sharp instrument like an Xacto knife blade to
carefully clear between the segments. Clean the brushes (gentle!), shafts,
and bushings.
When reassembling, make sure to use your brush spreader when installing the
cover.
DC brushless motors may be of ordinary shape or low profile - so called
pancake' style. While not that common in appliances yet, they may be found
in small fans and are used in many types of A/V and computer equipment (HD,
FD, and CD drives, for example). Fortunately, they are extremely reliable.
However, any non-mechanical failures are difficult to diagnose. In some
cases, electronic component malfunction can be identified and remedied.
Not that common in appliances but this is changing as the technology matures.
Direction may be reversible electronically (capstan motors in VCR require
this, for example). However, the common DC operated fan is not reversible.
Speed may be varied over a fairly wide range by adjusting the input
voltage on some or by direct digital control of the internal motor drive
waveforms.
The most common use for these in appliances are as small cooling fans
though more sophisticated versions are used as servo motors in VCRs and
cassette decks, turntables, and other precision equipment.
For fans with ball bearings, check the bearings for free rotation and runout
(that they do not wobble or wiggle excessively). If bad, replacement will
be needed, though this may not be worth the trouble. These are generally
sealed bearings so lubrication is difficult in any case. On the other hand,
they don't go bad very often.
Reassemble in reverse order.
These consist of a stator coil and a magnetic core with many poles and a
permanent magnet for the rotor. (In many ways, these are very similar to
stepper motors). The number of poles determines the speed precisely and
it is not easily changed.
Direction is sometimes determined mechanically by only permitting the motor
to start in the desired direction - they will usually be happy to start either
way but a mechanical clutch prevents this (make note of exactly how is was
positioned when disassembling). Direction can be reversed in this manner
but I know of no actual applications where it would be desirable. Others
use shading rings like those in a shaded pole induction motor to determine
the direction of starting.
Speed, as noted, is fixed by construction and for 60 Hz power it is
precisely equal to: 7200/(# poles) RPM. Thus, a motor with 8 poles
will run at 900 RPM.
However, if your motor does not start on its own, is sluggish, or squeals,
cleaning and lubrication may be all that is needed. However, to get to the
rotor bearing requires removal of the cover and in most cases the rotor as
well. This may mean popping off a press-fit pinion gear.
Feel and listen for a dry bearing:
The shaft may be difficult to turn or it may turn with uneven torque.
A motor with a worn or dry bearing may make a spine tingling high pitched
sound when it is turning under power. A drop of light machine oil (e.g.
electric motor oil) may cure a dry noisy bearing - at least temporarily.
Runout - wobble from side to side - of a motor shaft is rarely critical
in a small appliance but excessive side-to-side play may result in
noise, rapid bearing wear, and ultimate failure.
For AC motors in particular, steel laminations or the motor's mounting
may be loose resulting in a buzz or hum. Tightening a screw or two
may quiet it down. Painting the laminations with varnish suitable for
electrical equipment may be needed in extreme cases. Sometimes, the
noise may actually be a result of a nearby metal shield or other
chassis hardware that is being vibrated by the motor's magnetic field.
A strategically placed shim or piece of masking tape may work wonders.
Here is a possible option for, in this case, a planer:
(From: Ed Schmitt (easchmitt@penn.com).)
I located a person who rewinds motors and had the job done for $60.00.
That was over 7 years ago, and the planer is still working. Look around
and find some of our elderly craftsman who know how to rewind motors.
You'll save a bundle, and have a working tool.
(From: Michael Sloane (msloane@worldnet.att.net).)
That is an interesting thought - I have a 1942 Cat road grader with burned
out wiring in the 6 V wiper motor. Cat wants $200(!) for a new one, so I
would like to find someone who would rewind the old one (and make it
12 V at the same time). I wouldn't even bother with the so-called
auto-electric guys, all they do is replace the brushes and diodes on
starters and alternators.
A growler is basically an AC electromagnet exciting the windings in the
armature. A shorted armature winding will act as a the secondary of a
transformer resulting in a high current flow and high induced magnetic field.
Hold a piece of spring steel like a hacksaw blade as a probe over the armature
as you rotate it slowly on the electromagnet. A shorted winding will show up
as a strong audible vibration of the 'probe' - thus the name growler.
Most motor shops won't bother with the universal motors because they are much
cheaper to replace than repair. However, if yours is a special be prepared to
pay standard rates for the service. Email the
Electrical Apparatus Service
Association to find the EASA shop nearest you.
If you think the motor may be fairly common pick up a Grainger catalog or go
to: Grainger or: Grainger Universal Motor Index.
If this is for a power tool, contact the tool manufacturer for the authorized
service center nearest your location.
Editor's note: Yes, I know this is supposed to be the "Small Appliance FAQ"
but so be it. Until and if I write a "Large Appliance FAQ", this chapter
will have to do. :-)
The USENET newsgroups alt.home.repair,
misc.consumers.house, and
sci.electronics.repair may be
appropriate for appliance repair questions as well.
The typical oven thermostat uses a bulb type thermometer/thermostat
that feeds a diaphragm or Bourdon tube back at the control. A Bourdon
tube is a coiled flattened tube that wants to straighten out when
pressure is applied to it.
Most ovens still use a fluid filled bulb that transmits pressure
directly back to a pressure switch located in the control. When you
turn the knob on the control, you are adjusting a cam that changes the
position of the contacts inside.
The sensor/sender is a larger copper tube (the bulb portion) that
feeds into a capillary copper tube (your large copper wire - is a
tube) that runs to the control.
The procedure given below assumes that your oven has a mechanical thermostat
which is still the most common type. For an electronic thermostat - one in
which the set-point is entered via a touchpad - the adjustment (if any) will
likely be on the controller circuit board rather than under the temperature
knob. If you do attempt calibration of an electronic thermostat, make double
sure that you have located the correct adjustment screw!
(Portions from: ken859@sprynet.com).
Most thermostats have a calibration screw located under the knob. Try pulling
the knob off and look at the shaft. Some shafts have a small screw located
in the center. Rotating this screw will change the trip point at which the
thermostat will turn on and off. This is determined by the sensor located
inside the oven itself. Some other schemes allow for the entire control
to rotate with respect to the scale. You will need to identify the type
used on your oven
You can also have your oven calibrated by an appliance service technician
by locating them in your yellow pages and have him/her make a house call but
you wouldn't be reading this if you wanted someone else to do it!
The following procedure can be performed by almost anyone who knows which end
of a screwdriver to poke into the screw head. :-) The first procedure is
for controls where the adjustment screw changes the trip point temperature:
Rotate the adjustment in small increments!
Where the adjustment only changes the knob pointer position, the procedure is
much simpler:
If you really want to be the oven to be accurate, Turn the oven off and allow
it to completely cool. The, repeat the above complete procedure 2 more times
or until the accuracy you desire is achieved.
Repeating this procedure may seem redundant but some thermostats because of
their mechanical nature have a margin of error. Also due to the mechanical
nature, some settling of the parts inside does occur.
As long as the heating elements in the oven do not fail, the oven should
maintain its accuracy for quite some time. A simple check of the oven
once every 6 months or once every year will assure you that your baking
temperatures will be accurate.
Given 2 element and 2 voltages there are 8 possible connection
possibilities. I don't know which 5 my GE range uses.
Newer ranges use a single element or just parallel the two elements and
use variable power control (pulse width modulation or thyristor phase
control) to obtain arbitrary heat levels and/or a thermostat to sense
the actual temperature.
BTW, this GE range is about 46 years old and still going strong (except
for the 1 hour timer which died about 5 years ago.)
(The following experiments from: Mark Zenier (mzenier@netcom.com).)
From my multiple renovations of my mother's stove of a similar vintage:
Warm is 120 volts applied to both elements of a burner in series.
Low is 120 volts applied to one of the two elements. The burners are
wired so that they are not the same. Half of the burners used the
center element, the others used the rim element. Usually split between
front burners and rear. (This is a GE, other companies used two
interleaved spiral elements.)
Third is 120 volts applied to both elements.
Second is 240 volts applied to one element, like Low, it varies
from burner to burner.
High is 240 volts applied to both elements.
If one element is completely dead on all heat settings, the control is
probably bad or there is a broken wire. If it is stuck on high for
all control settings or is erratic, the control is bad - replacements
are readily available and easily installed.
On ranges with push button heat selection, a pair of heating elements are
switched in various combinations across 120 and/or 240. If some heat
settings do not work, the most likely cause is that one of the heatings
elements is burnt out although a bad switch is also possible. Kill power
to the range and test the heating elements for continuity. Replacements
are available from appliance parts stores or the places listed in the section:
Parts suppliers.
Warning: only consider the following if you are absolutely sure you understand
the safety implications of working directly with line voltage - it is not very
forgiving. There is both an electrocution and fire hazard involved.
(From: Donald Borowski (borowski@spk.hp.com).)
I have had success with welding heating element wires back together using a
"carbon arc torch". I did this on a ceramics kiln recently.
I extracted the carbon rods from two carbon/zinc D cell ('Classic' or 'Heavy
Duty' variety, alkalines do hot have carbon rods). I filed one end to a point.
I wired a circuit as follows:
Of course, all safety warnings apply: Dangerous power line voltages,
welder's mask needed for protect eyes, possible dangerous chemicals in D
cell, etc.
This should work for other types of Nichrome coiled or ribbon heating
elements as well.
I vaguely recall seeing many years ago a suggestion of making a paste of
borax and putting it over the twisted-together ends. I guess it was
supposed to act as a self-welding flux. Anyone else recall this?
Due to the high temperatures at which they operate, welding may provide
better long term reliability of heating elements than mechanical fasteners.
However, in most cases, the following extreme measures are not really needed.
Warning: only consider the following if you are absolutely sure you understand
the safety implications of working directly with line voltage - it is not very
forgiving. There is both an electrocution and fire hazard involved.
(Portions from: K. T. Chan (ktchan@hk.gin.net).)
The circuit inside is a chipset handling the generation the of driving signal
to the MOSFET power invertor. Control by the Q of the resonance power coil. If
the load ia low the Q is high and the circuit cuts the drive. And then sends
out probing pulses to test the load (your pan). If the load is big enough, the
drive will be turned on to the power circuit. There has to be a large enough
load - a wedding ring won't do it!
I damaged the 110 V one and opened up an old 200 V one.
I wanted to repair one before but the spare parts and circuit diagram are
rare. And the product is cheap (at least in some parts of the world. Check at
Sunpentown. (Too bad it is mostly
in Chinese!). The one I had been using for 10 years. The price is less then
$200 US. I had the first one from Japan, a 110 V model.
WARNING: There are several capacitors inside that may be charged to as much
as 300 volts. The charge they can hold is probably not dangerous but may be
painful or startling. Discharge these before touching anything inside or
attempting to check components. Use a screwdriver blade or test clips and
then confirm that they are discharged with your multimeter.
If you need a high temp silastic (e.g., for refitting glass windows in ovens)
then the Black silastic sold for car windscreen sealing from the local service
station or garage is the stuff. Works well. Someone here waited several
months and paid $80 for what he could buy down the road for $10 - it was even
the same brand.
Freezer is normal but fresh food compartment isn't even cool
---------------------------------------------------------
Some possibilities:
If you just turned it on a week ago and it is not acting up, a failure of
the defrost timer is quite likely. On an old fridge, the grease inside
dries out/gunks up and restarting from cold results in it not running.
It takes about a week for enough ice to build up to be a problem.
This is a $12 repair if you do it yourself or $100 or so if you call someone.
Could be other things but that is what I would check first. On a GE, it is
usually located at the bottom front and there is a hole in the front in which
you can poke your finger to turn it clockwise by hand. Turn it until you
hear a click and the fridge shuts off. You should not get melting in the
evaporator compartment and water draining into the pan at the bottom. The
fridge compressor should start up again in 10-20 minutes but I bet in your
case it won't as the timer needs replacement.
If open - at the terminals of the element - it is bad.
If there is still none, the contacts on the defrost timer may be bad, you
may be in the normal cycle by mistake, the main thermostat may be defective
or not calling for cooling, the wiring may be incorrect or have bad
connections, or there may be no power to the outlet.
If there is voltage across the defrost thermostat, it is defective or
the temperature is above 32 F. Confirm by jumpering across the defrost
thermostat and see if the defrost heater comes on.
If the timer never advances, the motor is likely not running due to gummed
up lubrication, a broken or loose gear, or a broken wire. On some of these
timers, the connections to the motor are to the moving contacts and break
after a few years. These can be repaired by soldering them to a more stable
location.
One indication that the motor is not being powered is for it to be ice cold
even after several hours with the compressor (and thus the timer) being on.
Normally, the coil runs warm to hot. If the timer never advances even with
a toasty winding, the lubrication is gummed up or a gear has broken.
Generally, the defrost timer is an SPDT switch operated by a cam on a small
motor with a 4 to 8 hour cycle (depending on model). For an exact replacement,
just move the wires from the old timer to the same terminals on the new unit.
For a generic replacement, the terminal location may differ. Knowing what is
inside should enable you to determine the corresponding terminal locations
with a multimeter.
The terminal numbering and wire color code for the defrost timer in a typical
GE refrigerator is shown below:
* H is the Hot wire after passing through the main thermostat (cold control)
in the fresh food compartment.
Since the defrost timer only runs when the compressor is powered, it will
defrost more frequently when the fridge is doing more work and is likely to
collect more frost. This isn't perfect but seems to work.
A starting relay senses the current flowing to the run winding of the
compressor motor (the coil is a few turns of heavy wire in series with
the run winding) and engages the starting winding when that current is
above a threshold - indicating that the rotor is not up to speed.
A PTC thermistor starts with a very low resistance which increases to
a high value when hot. Proper operation depends on the compressor getting
up to speed within a specific amount of time.
For testing only, you can substitute an external switch for the starting
device and try to start it manually.
CAUTION: Do not bypass a faulty starting device permanently as the starting
winding is not intended to run continuously and will overheat and possibly
burn out if left in the circuit.
Assuming you have waited long enough for any pressures to equalize (five
minutes should do it if the system was operating unless there is some
blockage - dirt or ice - inside the sealed system), you can test for proper
operation by monitoring the voltage on the start and run windings of the
compressor motor. If there is line voltage on both windings and it still
does not start up - the overload protector switches off or a fuse or circuit
breaker pops - the compressor is likely bad.
The sealed unit has 3 pins usually marked: S (Start), R or M (Run or Main),
and C (Common). The starting relay is usually mounted over these pins in a
clip-on box. The original circuit is likely similar to the following:
Note the Thermal Protector (often called a "Guardette" which I presume is a
brand name). This shuts off power to the compressor if the temperature rises
too high due to lack of proper cooling (defective compressor/condenser cooling
fan, missing cardboard baffle, or clogged up (dusty) comdensor; an overload
such as a blockage in the sealed system (bad news), or low line voltage.
I would guess that the solenoid to shift it into spin is binding or
erratic. Thus opening the door gives switches it on and off like the
timer but since it sometimes works, it sometimes works by cycling the
door switch.
There are several possibilities:
One common failure is of the motor that drives the electromechanical
controller. And, the problem may be a 2 cent plastic gear!
The symptoms are that the timer never advances. The cause is that
due to age, use, or gummed up grease, the pinion gear on the rotor
of the timing motor cracks and the timer fails to move.
As of 2001, the entire motor was available from Maytag for about $55,
and generic versions from other appliance parts suppliers for around
$30. (An Internet search of "Maytag parts" will turn up several
possible suppliers.) However, a repair may be possible. There
is no way to order just the gear but what's left of it is usually
salvageable. Whether the repair lasts a week or 10 years, no
guarantees but it is fairly easy. Here is the sequence of
steps to perform the repair:
Now you (or your spouse) will have no excuses to deal wtih those
piles of dirty laundry!
Of course, clean the inside filter regularly. This is usually very easy
requiring little or no disassembly (see your users manual). Some slide
out without even removing the front cover (e.g., Emerson Quiet Kool).
I generally do not bother to open them up each year (and we have 4).
Generally, not that much dirt and dust collects inside. A cover during
the winter also helps.
Use a vacuum cleaner on the condenser coils in the back and any other easily
accessible dirt traps.
If you do take the cover off, check the fan motor for free rotation. If
it is tight indicating bad bearings or lack of lubrication, it will have
to be disassembled, cleaned, and lubricated - or replaced. If there are
lubrication holes at the ends of the motor, put a couple drops of electric
motor oil in there while you have it open.
These units have a sealed freon system - so if anyone's been into it
before - you can tell from obvious saddle valves clamped on. Generally,
if it cools and the air flow is strong, it is OK.
These units tend to be very reliable and low maintenance.
It could be several things:
The three major causes of an air conditioner freezing up are:
You cannot fix this yourself without specialized equipment. For a room
air conditioner that isn't too old, it may be worth taking it in to a
reputable shop for an evaluation. For a central air conditioner, you will
have to call an HVAC service company for repairs.
The fact that the Freon is low means that there is a leak which would also
need to be repaired. Freon does not get used up.
(From: Bernie Morey (bmorey@aardvark.apana.org.au).)
I've repaired our electric dryer several times over the years and kept it
going well beyond its use-by date.
My main problems have been:
Did all these without any guide -- just carefully inspecting the work before
starting and making diagrams of wiring and ESPECIALLY the main drum belt. I
generally have to get my wife to help me with the main belt -- hard to get
the tensioner in position while stopping the belt slipping down the far side
of the drum.
These things are mechanically and electrically pretty simple -- if it's not
working the fault is usually obvious.
(From: Larry Brackett (appliparts@aol.com).)
Here are some things to check for a Kenmore or Whirlpool dryer not running.
These things will apply to any dryer. The difference being the identification
and location of these parts in different dryers. Always look at the wiring
picture for your product to see what these are. The identifying numbers and
letters here will not apply to all Whirlpool dryers. Please remember this.
(From: Bernie Morey (bmorey@aardvark.apana.org.au).)
The dryer is likely cutting out because a thermostat is tripping. The
fundamental reason is probably that the exhaust air is too hot. And the air
flow is probably too hot because it is restricted -- lower volume of air at
higher temperature. Check these things out:
Outside vents are often plastic tubing with a spiral spring steel coil for
stiffness -- check for kinks or obstructions.
An exact cause would be hard to identify. However, only the plug and
receptacle are involved - this is not a case of an outside cause. Such
a failure will not normally blow a fuse or trip a breaker since the current
does not increase - it is not a short circuit.
It is definitely wise to replace both the plug and receptacle in such
cases since at the very least, the socket has lost its springiness due to
the heating and will not grip well.. Make sure that the prongs on the new
plug make a secure fit with the socket.
On plugs having prongs with a pair of metal strips, spreading them out a bit
will make much better contact in an old receptacle.
In general, if a plug is noticeably warm, corrective action should be taken
as it will likely get worse. Cleaning the prongs (with 600 grit sandpaper)
and spreading the metal strips apart (if possible) should be done first but
if this does not help much, the plug and/or socket should be replaced.
Sometimes, the original heating problem starts at the wire connections to
the plug or socket (even inside molded units) - loose screws, corroded wires,
or deteriorated solder joints.
As to why it is now different, I assume that this is a dedicated outlet so
nothing else you added could affect it. Thus you are left with something
changing in the dryer or the GFCI somehow becoming overly sensitive.
It is possible that there is now some electrical leakage in the dryer wiring
just from accumulated dirt and grime or dampness. This could be measured
with an AC milliamp meter or by measuring the resistance between the AC wires
and the cabinet. If this test shows up nothing, I would recommend just
putting on a grounded outlet without a GFCI. It could also be that due
to wear, the motor is working harder at starting resulting in just a tad
more of an inductive current spike at startup.
Greetings. Well, since it's a moist/damp environment... I'd suspect a
bad connection first. You will need to pop off the front bottom panel
and get at the wires that actually connect the solenoid to the timer
motor (and/or wire harness). You will need an ohmmeter to check the
resistance of the coil - if it's OK (20-200 ohms I would guess), that's
not the problem. Well, that leaves you with pretty much the wires that
connect the timer motor (a MULTI-contact switch driven by a timer motor
like those found in old clocks that plugged into outlets) and the switch
itself. I hope the dishwasher is unplugged... Since the dishwasher
operates as a closed system (because of the "darned" water :-) it will
be difficult to test it in circuit. I suggest that you try to trace
the wires that come off the solenoid to their other ends... and then test
the wires themselves. If you feel this is too much for you, call the
repair folks - ask around... see if anyone else knows a particular
service that has a good record...
In particular, the following series of sections on Ground Fault Circuit
Interrupters (GFCIs) is present at the CodeCheck web site and includes some
nice graphics as well. Specifically:
GFCI by Sam
Goldwasser.
Continuing with the water analogy used elsewhere in this document, the
Hot is equivalent to the water supply and the Neutral is equivalent to
the drain. The flow rate (current) can be high and do work like running
a pump as long as all the water goes down the drain. But if there is a
leak and the water splashes out on to the ground, then the the water
equivalent of a GFCI will trip and shut off the water.
The (electrical) GFCI will trip in a fraction of a second at currents (a
few mA) well below those that are considered dangerous. Note that a GFCI
is NOT a substitute for a fuse or circuit breaker as these devices are still
required to protect equipment and property from overloads or short
circuits that can result in fire or other damage.
GFCIs can be installed in place of ordinary outlets in which case they
protect that outlet as well as any downstream from it. There are also
GFCIs that install in the main service panel. Either will provide the
same level of safety but the breaker will automatically protect
everything on its circuit no matter how it is wired while the outlet
version will only protect the outlet and other outlets downstream
from it.
Note that it may be safe and legal to install a GFCI rated at 15 A on a
20 A circuit since it will have a 20 A feed-through. Of course, the GFCI
outlet itself can then only be used for appliances rated 15 A or less.
Many (if not most) GFCIs also test for a grounded neutral condition where a
low resistance path exists downstream between the N and G conductors. If such
a situation exists, the GFCI will trip immediately when power is applied even
with nothing connected to the protected outlets.
Therefore, advice like "use a GFCI in place of the normal outlet to prevent
appliance fires" is not really valid.
There may be some benefit if a fault developed between Hot and Ground but that
should blow a fuse or trip a circuit breaker if the outlet is properly wired.
If the outlet is ungrounded, nothing would happen until someone touched the
metal cabinet and an earth ground simultaneously in which case the GFCI would
trip and provide its safety function. See the section:
Why a GFCI should not be used with major
appliances for reasons why this is not generally desirable as long as
the appliance or outlet is properly grounded.
However, if a fault occurs between Hot and Neutral - a short in the motor, for
example - a GFCI will be perfectly happy passing almost any sort of overload
current until the GFCI, wiring, and appliance melts down or burns up - a GFCI
is not designed to be a fuse or circuit breaker! That function must be
provided separately.
To detect a Hot to Ground fault, both current carrying wires pass through the
core of a sense coil (transformer). When the currents are equal and opposite,
there is no output from its multiturn sense voltage winding. When an imbalance
occurs, an output signal is produced. When this exceeds a threshold, a circuit
breaker inside the GFCI is tripped.
GFCIs for 220 VAC applications need to monitor both Hots as well as the
Neutral. The principles are basically the same: the sum of the currents in
Hot1 + Hot2 + Neutral should be zero unless a fault exists.
To detect a grounded neutral fault, a separate drive coil is continuously
energized and injects a small 120 Hz signal into the current carrying
conductors. If a low resistance path exists between N and G downstream
of the GFCI, this completes a loop (in conjunction with the normal connection
between N and G at the service panel) and enough current flows to again
trip the GFCI's internal circuit breaker.
GFCIs use toroidal coils (actually transformers to be more accurate) where the
core is shaped like a ring (i.e., toroid or doughnut). These are convenient
and efficient for certain applications. For all practical purposes, they are
just another kind of transformer. If you look inside a GFCI, you will find a
pair of toroidal transformers (one for H-N faults and the other for N-G faults
as described above). They look like 1/2" diameter rings with the main current
carrying conductors passing once through the center and many fine turns of
wire (the sense or drive winding) wound around the toroid.
All in all, quite clever technology. The active component in the Leviton
GFCI is a single chip - probably a National Semiconductor LM1851 Ground Fault
Interrupter. For more info, check out
National's LM1851
Specs.
Note that even though this is acceptable by the NEC, I do not consider it
desirable. Your safety now depends on the proper functioning of the GFCI
which is considerable more complex and failure prone than a simple fuse or
circuit breaker. If it's not tested periodically, reliability is even lower.
Therefore, if at all possible, provide a proper Code
compliant ground connection to all outlets feeding appliances with 3 wire
plugs.
You don't need grounded outlets for two wire appliances, lamps, etc. They
do essentially nothing if the third hole isn't occupied :-). A GFCI will
provide much more protection and it is permissible retrofit these into
ungrounded wiring.
You should have grounded outlets for the following:
However, if you are replacing old worn outlets anyhow, it does make sense to
upgrade to 3 prong outlets if they can be properly grounded without pulling
a new wire - for example, if the box is already grounded but simply not
connected to the old outlet.
In all cases, make sure that the new outlet is properly wired with respect to
the ground and H-N polarity. An improperly wired 3 prong outlet may be worse
than any 2 prong variety!
For one reason, consider the 'appliance' below:
The 'appliance' can actually be *all* loads on the circuit upstream of the
the Open Fault - all those with a grounded cabinet have it then become live!
On most GFCIs, the built-in tester is designed to actually introduce a small
leakage current so its results should be valid. Therefore, testing a single
GFCI outlet with an external widget is not really necessary except for
peace-of-mind. However, such a device does come in handy for identifying
and testing outlets on the same circuit that may be downstream of the GFCI.
An external tester is easy to construct - a 15 K ohm resistor between H and G
will provide a 7 mA current. Wire it into a 3 prong plug and label it "GFCI
Tester - 7 mA". The GFCI should trip as soon as you plug the tester into a
protected outlet. On a GFCI equipped for grounded neutral detection (as most
are), shorting the N and G conductors together downstream of the GFCI should
also cause it to trip (push buttons for both functions would be a useful
enhancement).
Note that such a tester will only work for GFCI protected outlets that are on
grounded (3 wire) circuits (unless you add an external ground connection).
Thus, just using a commercial tester may falsely indicate that the GFCI is bad
when in fact it is simply on an ungrounded outlet (which is allowed by Code in
a retrofit situation).
The test button will work whether or not the circuit includes a safety ground.
On most GFCIs, it passes a small current from Hot on the line side, via
an additional wire threaded through the sense coil, to Neutral on the
load side and therefore doesn't depend on having a safety Ground. The
use of the single wire introduces an imbalance in current.
The only exception to the above that I know of is Leviton's SmartLock GFCI
and any others that use the same technology. The following is from a Leviton
engineer:
I suppose you can purchase suitable low cost testers as well (but they are
subject to the same must-be-grounded restrictions). Try your local home
center or electrical supply distributor.
The general procedure for the test is as follows. (This assumes a live GFCI
circuit. If there is no power and the RESET button doesn't restore it,
testing will need to be done to determine if the problem is in the GFCI,
wiring, or a blown fuse/tripped circuit breaker at the service panel.):
If any of these don't work as expected, the GFCI is defective or the outlet
is miswired and there may be no protection.
Reminder: A separate Ground connection must be provided to use a GFCI tester
in an ungrounded outlet. Without one, the GFCI's TEST button must be used.
I personally would not feed a subpanel with a GFI breaker. Here are just a
few of the reasons:
(From: Jim Locke (jslocke52@yahoo.com).)
Tube radios made several decades ago are now collectors' items (literally
100s are offered for auction on
eBay) and they had a metal chassis which was often connected to one side
of the AC line. The user would get a shock if he or she simultaneously
touched the electrically hot chassis and a separate ground. There was no
safe way for the plug. Commonly, the chassis would be hot when the radio
was off but at ground potential when the radio was on, or vice versa,
depending on which way the plug was in the outlet. Earlier radios had set
screws in their knobs, which provided electrical connection from a human
turning the knob to the chassis. Also, screws through the bottom of the
case connected to the chassis, and the back had ventilation holes large
enough for fingers to reach the chassis. So, it was easy to connect the
body to the chassis. Later models provided isolated chassis, plastic
shafts for the knobs, etc., but still presented a shock hazard. I would
recommend that collectors of working tube radios power them through GFCI
devices. Furthermore, in a collection of radios, each radio should have a
separate GFCI device, to detect when a human completes the circuit between
two radios! If the two radios are on the same GFCI device, it will not
trip. There is still a shock hazard with either or both radios switched
off, but plugged in. More information may be found at
Fun With Tubes.
The most likely reason for these strange readings is that there is E/M
(electromagnetic) coupling - capacitive and/or inductive - between wires which
run near one another - as inside a Romex(tm) cable. Where one end of a wire
is not connected to anything - floating, the wire acts as an antenna and picks
up a signal from any adjacent wires which are energized with their 60 (or 50)
Hz AC field. There is very little power in these phantom signals but due to
the very high input resistance/impedance of your VOM or DMM, it is picked up
as a voltage which may approach the line voltage in some cases.
Another possibility is that the you didn't actually walk all the way down to
the basement to shut off power completely and the circuit is connected to a
high tech switch (such as one with a timer or an automatic dimming or off
feature) or a switch with a neon light built in. There will be some leakage
through such a switch even if it is supposed to be off - kill power completely
and test again.
Putting any sort of load between the wires in question will eliminate the
voltage if the cause is E/M coupling. A small light bulb with test probes can
be used to confirm this both by serving as a visual indication of significant
voltage (enough to light the bulb, if weakly) and to short out the phantom
voltage for testing with the multimeter.
There can be other causes of such unexpected voltage readings including
incorrect or defective wiring, short circuits in the wiring or an appliance,
and voltage drops due to high current in a circuit. However, the E/M coupling
explanation is often overlooked when using a multimeter.
I did an experiment using a Radio Shack DMM with a 10 M ohm input impedance.
It was set to AC volts and the red lead was plugged into the Hot side of a
live outlet:
The easiest thing to do is use an outlet tester. This simple gadget
gives a fairly reliable indication using three neon lamps. See the section:
Test equipment for details.
Or, using a multimeter set to "AC Volts":
This is best done with a lamp or other load plugged into the outlet. The
load will elminate the phenomenon of "phantom voltage" should one of the
wires not be connected. See the section: Phantom
voltage measurements of electrical wiring.
Or turn off the breaker for that outlet and remove the cover plate:
Of course, the wiring could be screwed up at the service panel or an outlet
upstream of this one.
(Experienced electricians would just hold onto the other prong of the tester
rather than actually grounding it. Their body capacitance would provide
enough of a return path for the Hot to cause the neon to glow dimly but
you didn't hear this from me :-). Yes, they survive without damage and don't
even feel anything because the current is a small fraction of a mA. DON'T
try this unless you are absolutely sure you know what you are doing!)
With one prong grounded, try the other prong in the suspect outlet:
The three neon bulbs are just between what should be (The first letter is
how the light is marked on mine):
I would recommend:
Some appliances like microwave ovens MUST have a proper safety ground
connection for safety. This not only protects you from power line
shorts to the case but also a fault which could make the case live
from the high voltage of the microwave generator.
But when I tried one line and the ground I got 125 V. Similarly, when I
tried the other line and the ground I also got 125 V. What's the scoop? Why
does the meter, and obviously the AC, think that there isn't 220 V coming in?
Any help is greatly appreciated - as this room is stinking hot right now!"
Did it ever work? It sounds like both slots are being fed from the same
phase of the power from the service panel. Check with a load like a 100
W light bulb between each slot and ground. This could have happened during
the original installation or during renovation.
Another possibility is that there is some other 220 V appliance on the
same line with its power switch in the ON position (and not working either)
AND one side of the line has a tripped breaker or blown fuse.
Yet another possibility:
(From: David L. Kosenko (davek@informix.com).)
My load center is GE unit. They make both full height and half height
breakers. If you use a half height breaker set for a 220 line, you must be
careful to install it across the two phases. It is very easy (especially if
you don't know about 220) to place the ganged breakers into a single full
height slot in the load center, giving you both lines off the same phase line.
It is also possible to inject a signal into the wire and trace it with a
sensitive receiver.
However, if you are desperate, here is a quick and easy way that is worth
trying (assuming your wiring is unshielded Romex - not BX - and you can power
the wire). Everything you need is likely already at your disposal.
Get a cheap light dimmer or a fixture with a light dimmer (like that halogen
torchier that is now in the attic due to fire safety concerns) and plug it
into an outlet on the circuit you want to trace. Set it about half brightness.
Now, tune a portable AM radio in between stations. If you position the
radio near the wire, you should hear a 120 Hz hum - RFI (Radio Frequency
Interference) which is the result of the harmonics of the phase controlled
waveform (see the section: Dimmer switches and light
dimmers. Ironically, the cheaper the dimmer, the more likely this will
work well since no RFI filtering is built in.
I have tried this a bit and it does work though it is somewhat quirky. I do
not know how sensitive it is or over how large a circuit it is effective.
It is somewhat quirky and even normal power may have enough junk on the
waveform to hear it in the radio. However, with a partner to flip the dimmer
off and on to correlate its position with what you hear, this may be good
enough.
(From: author unknown.)
The probe is really simple. All it consists of is a LM386 and a MPF102
JFET from Radio Shack. The MPF102 is connected as a source follower
with a 4.7k load resistor from source to ground. The gate has a 10M
resistor to ground and a 1M from gate to the probe tip. The drain of
course connects to the plus 9 VDC. There is a .1 uF coupling cap between
source and the input to the LM386. The LM386 is the standard circuit
found in the data sheet. You can put a 5K volume control between the
two pins to increase the gain. And of course you have to find a small
1.3 inch or 3 cm speaker to fit the probe. Use a 9 V battery.
The tone generator can be anything that oscillates. You could use a hex
inverter in the typical circuit. Or you could use a two transistor
astable multivibrator with 2.2k collector load resistors. Whatever you
use, make sure the coupling capacitor to the phone line is a 200 V or
higher NON POLARIZED capacitor, so it won't make any diff how you
connect it up. Remember that this little box takes a lot of beating
from stray voltages and stuff, like ringing currents. So it's best to
buy this and get one that's safe. I've burnt them out on occasion so I
suggest you don't build it but buy it for under $30.
(From: Bill Jeffrey.)
Go to the electrical department at Home Depot or Lowes and buy what I
call a "squeaker". More properly called, I think, a non-contact voltage
tester. It looks like a fountain pen. When you squeeze the pocket clip
against the body, it chirps once. Then if you hold the tip near an
energized wire, it chirps continuously.
There are two variants. One is labeled "100-250 volts". You must hold
it within an inch or so of a 120 VAC wire to make it chirp, so this may
not work for you if the wires are buried back between the wall studs.
But there is a "low voltage version" - mine says "12-90 VAC" that can
detect a 120 VAC wire from considerably farther away. This is probably
what you want. Mine is made by GB Instruments, model GVD-504LV (the LV
suffix meaning "low voltage").
If you don't have a Home Depot or Lowe's near you, the standard version
of these things is often available at Ace Hardware, etc - or on eBay -
but I'm not sure about the low-voltage version. Still, they are not
expensive, so try it out.
Symptoms include excessive flickering of lights (particularly if they get
brighter) when large appliances kick in, light bulbs that seem too bright
or too dim or burn out frequently, problems with refrigerators or freezer
starting due to low voltage, etc. In the worst case, one set of branch
circuits can end up with a voltage close to 220 VAC - on your poor 110 V
outlets resulting in the destruction of all sorts of appliances and
electronics. The opposite side will see a much reduced voltage which may be
just as bad for some devices.
It is a simple matter for an electrician to tighten up the connections but
this is not for the DIY'er unless you are familiar with electrical wiring and
understand the implications of doing anything inside the service panel while
it is live! Furthermore, the problem may actually be in the Neutral cable
outside your residence and that can only be dealt with by the power company.
Since it's exposed to the elements as well as squirrels and such, damage is
possible. An electrician will be able to eliminate internal problems, and
recommend contacting the power company if necessary.
Here is what can happen if you don't remedy the situation:
(From: Sinbad (sschwartz@moou.edu).)
Speaking from experience, I can tell you that if your ground goes you will
have no doubt about.
When I lost mine I was watching TV. The picture tore and then smoke came
out of the back of it. I also lost two VCR's, a dryer, a scanner, a
microwave, an AM/FM receiver, an amplifier (everything with a remote control
since these always have power going to them), a CD player and a scanner,
which also smoked.
The incandescent bulbs that were turned on turned blue and then white before
they burned out and a couple fluorescent fixtures burned out as the bulbs
arced and melted and cracked.
Fortunately, my insurance policy specifies replacement with no deductible,
but I still had to run around buying new stuff (except for the dryer, which
was repairable.)
The electrical cables buried underground run for about 600 feet.
Is GFCI tripping caused by electrical storms normal ? Are my GFCI breakers too
sensitive ? Is there any way to modify the circuits to avoid this?"
This doesn't surprise me. Long runs of cable will be sensitive to the
EM fields created by nearby lightning strikes. Those cables probably
have 3 parallel wires: H, N, G. The lightning will induce currents in
all three which would normally not be a problem as long as H and N are
equal. However, I can see this not being the case since there will be
switches in the Hot but not the Neutral so currents could easily unbalance.
These are not power surges as such and surge suppressors will probably not
help.
Since it happens with all of your GFCIs, it is not a case of a defective unit.
Perhaps there are less sensitive types but then this would reduce the
protection they are designed to provide.
(From: James Phillips (jamarno@juno.com).)
I quit having GFCI trouble after I fixed all the bad wiring connections, and I
haven't had trouble at all with GFCIs and my workshop, which I wired myself.
GFCI controller chips include a time delay to reduce false tripping. I used
to think GFCIs always tripped at 5 to 6 mA, but the UL allows up to a whopping
200 mA if the GFCI stops the current within 30 ms, and 6 mA leakage is allowed
to last 6 seconds.
According to National Semiconductor, their GFCI chips will stop a 200 mA fault
in 20 ms, a 6mA fault in .5 sec.
(From: David Buxton (David.Buxton@tek.com).)
In addition to the usual explanations dealing with safety around water,
another reason why kitchen outlets need a GFCI is the toaster. All too
often people stick a butter knife in there to dislodge some bread. If
the case was grounded there would be short from the element to the case.
So toasters are two wire instead of 3-pronged. So, you must have a GFCI
for any outlet that might take on a toaster.
New as in brand new or new for you? If it is a totally new home, the builder
should have them fixed and you should not sign off on the house until this is
done. While there is no imminent danger, the house inspector was being a bit
too casual for my tastes. It is not a big deal as in should stop you from
going through with the purchase but it really should be fixed.
As far as current present when the appliance is off, this is not quite true.
When properly wired, the power switch is the first thing in the circuit so it
cuts off power to all other parts of the internal wiring. With the reversal,
it is in the return - the rest of the wiring will be live at all times.
Except for servicing, this is really not that big a concern and does not
represent any additional electricity usage.
Normally (I assume these are 3 prong grounded outlets) you have the following:
Reverse polarity means that Hot and Neutral are interchanged. (Any other
variation like an interchange with the ground represents a serious safety
hazard and it should be corrected as soon as possible. The outlet should
not used until it is.)
For most appliances and electronics, reversed H and N does not really matter.
By design, it must not represent a safety hazard. However, there can be
issues - as you are concerned - with surge suppressors and susceptibility
to interference. In some cases, the metal case of a stereo could be
coupled to the Neutral by a small capacitor to bypass radio frequency
interference. This will be coupled now to Hot instead. While not a
safety hazard, you might feel an almost imperceptible tingle touching
such a case.
Surge suppressors may or may not be affected (to the extent that they are
ever effective in any case - unplugging the equipment including modem lines
and the like during an electrical storm is really the only sure protection
but that is another section). It depends on their design. Some handle the
3 wires in an identical manner and interchanging them makes no difference.
Others deal differently with the Hot and Neutral in which case you may lose
any protection you would otherwise have.
My advice: If you are handy electrically and have experience working on
residential wiring, correct them yourself. If not, get them corrected the next
time you have an electrician in for any reason. It is a 5 minute job
per outlet unless the wiring is extremely screwed up.
If there are only a few outlets involved, to be doubly safe, simply don't
use them. But if there are many, do get them corrected ASAP.
And always use a properly wired outlet for your computer to be doubly sure.
It is not an absolute emergency but I consider proper wiring to be very
desirable.
Here is another example:
Well, there should be very little voltage although it may not be 0.
Reversed polarity outlets are not unusual even in new construction.
Reversed H and N is not usually dangerous as appliances must be designed
so that no user accessible parts are connected to either H or N - even
those with polarized plugs. Think of all the times people use such appliances
in old unpolarized outlets or with unpolarized extensions cords. (There are
exceptions like electric ranges where there may be no separate safety ground
conductor but I assume you are talking about branch circuits, not permanently
wired-in appliances.)
There are a couple of instances where this may be an issue though.
As a practical matter, older lamps don't have polarized plugs, replacement
cords, plugs, or sockets/switches are often installed reversed, lamps are
jammed into non-polarized extension cords, and lamps often come from the
factory reverse wired. For permanently installed fixtures, the incidence of
reverse polarity is lower but non-zero due to simple errors or cut corners
during installation.
You should, of course, measure full line voltage between the H and G. The
safety ground, G, does not normally carry any current but is at the same or
nearly the same potential as N.
The voltage between G and (actual) N if quite low - a couple volts or less - is
probably just due to the voltage drop in the current carrying N wire. Turn
off everything on this branch circuit and it should go away. However, there
could also be a bad (high resistance connection) somewhere in the N circuit.
If the voltage reads high to either H or N - say, 50 volts - and you are
measuring with a high impedance multimeter, this is probably just due to an
open ground: a three prong outlet was installed without connecting the ground
(in violation of Code unless on a GFCI) and this leakage is just due to
inductive/capacitive pickup from other wires. See the section:
Phantom voltage measurements of electrical wiring.
Full line voltage on the G conductor relative to an earth ground (like a
copper cold water pipe) would represent a serious shock hazard to be corrected
as soon as possible - the appliance or outlet should *not* be used until
the repair is made. While unlikely, for anyone to screw up this badly, it
could happen if someone connected the green or copper wire, or green screw
to H instead of G.
In any case, it would be a good idea to correct the H-N reversals and determine
if the voltage on the G is an actual problem.
The power company just passes on the warranty of the manufacturer, which
is, in turn, merely an insurance policy whose premium in included in the
normal retail price of the unit. Basically, the power company is taking a
product with a wholesale cost of about $30, and "renting" it to consumers
for $40 to $100 a year.
Forever!
Nice work if you can get it.
Note that most homeowner and similar insurance policies already cover
lightning damage, and that the policy from the surge protector is
generally written to only apply to losses not already covered by other
insurance. As a result, you are paying for insurance that you will likely
*never* be able to make a claim against, even if the device is totally
ineffective.
The simplest whole-house protection is to purchase an Intermatic whole
house surge protector ($40 from Home Depot or Lowe's) and install it
yourself (or pay an electrician to do so -- maybe 15 minutes of work).
Then purchase inexpensive ($10 and under) plug-in surge protectors and
surge-protected power strips and use them all over the house at sensitive
equipment. Note that surge protectors and surge protected power strips
protect the _other_ outlets in the house as well as the ones they contain
(because the MOV's in inexpensive surge protectors are simply connected in
parallel with the power line), so the more of that that you have plugged
in, the more effectively protected your home is. Some power strips need to
be turned "on" for the MOV's to be connected to the power lines.
You can also buy MOV's and add your own custom protection -- but if you
don't already know that, you probably shouldn't be tinkering with such
things.
Note that you should only purchase surge protectors that contain a monitor
LED to tell you if the protector is still functioning -- MOV's deteriorate
when zapped by large surges. This is one reason why I recommend the
multiple-power-strip distributed-protection approach -- it is doubtful
that all of your surge protectors/power strips will get zorched at once.
Needless to say, any sensation of electricity while using the water indicates
a potentially very dangerous situation. (More so, apparently, for cows but
that is another story!).
The most likely cause assuming you haven't actually wired the plumbing into
the electrical system's Hot bus bar is some variation of bad or lack of
connections of the electrical system's ground. What happens is that the
unavoidable electrical leakage to the grounds of appliances and computer
equipment with 3 prong plugs (from line filter capacitors and such) feeds into
the grounding system of your house. If that is bonded to the actual earth
ground via the plumbing supply system and that has a bad connection, you can
get a voltage between the metal plumbing fixtures and the drain - which is
pretty well grounded going into the earth. The reverse is also possible
depending if there is plastic pipe at some point in your drain line.
While a tingle is unpleasant, an actual short in an appliance would be quite
deadly where such a situation exists.
Of course, it is also possible to create a situation of electrically live
pipes during renovation - by nailing a metal pipe bracket into an electrical
wire without realizing it. However, this type of screwup usually takes some
effort. :-)
A semi-infinite variety of wire and cable is used in modern appliances,
electronics, and construction. Here is a quick summary of the buzz words
so you will have some idea of what your 12 year old is talking about!
Solid wire may be used for general hookup inside appliances and electronics,
and building (and higher power wiring) but not for cords that need to be
flexible and flexed repeatedly.
Stranded wire is used for general hookup, building wiring, etc. It is
easier to position than solid wire (but tends not to stay put) and more
robust when flexed repeatedly. Cordsets always use finely stranded wire
but despite this, may develop problems due to flexing after long use.
Magnet wire is used where a large number of turns of wire must be packed as
tightly as possible in a limited space - transformers, motors, relays,
solenoids, etc.
The very thin insulation is susceptible to nicks and other damage.
Litz wire is used in high frequency transformers to reduce losses (including
the skin effect which results in current only traveling near the surface
of the wire - using multiple insulated strands increases its effective
surface area).
Like magnet wire, the insulation needs to be removed from all strands before
making connections.
Tinsel wire is found in telephone and headphone cords since it can be made
extremely flexible.
Repair is difficult (but not impossible) since it very fine and the
conductor must be unraveled from the core for soldering. The area of the
repair must be carefully insulated and will be less robust than the rest of
the cord.
Shielded wire is used for low level audio and video, and other analog or
digital signals where external interference needs to be minimized.
Note: Some houses during the '50s and '60s were constructed with aluminum
wiring which has since been found to result in significantly increased risk
of fire and other problems. For more information, see the references listed
in the section: Safe electrical wiring. However,
aluminum wiring is safe if installed according to very specific guidelines
(and is used extensively in power transmission and distribution - probably
for your main connection to the utility - due to its light weight and low
cost).
The first number is the AWG wire gauge.
The second number is the number of insulated conductors (excluding any bare
safety ground if present). For example:
(From: Frank (fwpe@hotcoco.infi.net).)
According to the 'Standard Handbook for Electrical Engineers' (Fink and Beaty)
the 'gauge' you referenced to is 'American Wire Gauge' or AWG and also known
as Brown & Sharp gauge.
According to above handbook, the AWG designation corresponds to the number of
steps by which the wire is drawn. Say the 18 AWG is smaller than 10 AWG and is
therefore drawn more times than the 10 AWG to obtain the smaller cross
sectional area. The AWG numbers were not chosen arbitrary but follows a
mathematical formulation devised by J. R. Brown in 1857!
It seems that everyone has their own pet formula for this (though I prefer
to just check the chart, below!).
(From: Tom Bruhns (tomb@lsid.hp.com).)
As I understand it, AWG is defined to be a geometric progression with AWG 0000
defined to be 460 mils diameter and 36 gauge defined to be 5.000 mils diameter.
This leads directly to the formula:
(From: David Knaack (dknaack@rdtech.com).)
You can get a fairly accurate wire diameter by using the equation:
I don't know where it came from, but it is handy (more so if you can do natural
base exponentials in your head).
In its simplest form, the cross sectional area is:
(The original table was provided by: Peter Boniewicz
(peterbon@mail.atr.bydgoszcz.pl). I added to it above #40.)
Wire Table for AWG 0000 to 47, with diam in mils, circular mils,
square microinches, ohms per foot, ft per lb, etc.
Note: Values for AWG #41 to #46 extrapolated from AWG #35 to #40 based on wire
gauge formula.
Ohms per 1000 ft, ft per Ohm, Ohms per lb, all taken at 20 degC (68 degF).
Sizes assume bare wire - insulation is extra. For hookup and similar
wire, this is easy to determine. For magnet wire, the additional diameter
will be a fraction of mil (0.001 inch) up to several mils depending on the
wire gauge and type. When in doubt, use a micrometer to compare the original
wire and the wire with insulation removed using a non-mechanical (e.g.,
chemical) stripper.
Apparently, you can buy wire down (up?) to size #60 - less than .000350 inches
in diameter! Check out MWS Wire
Industries if you are really curious about fine wire.)
In addition to the cross-section area, there are a few other factors. First
off, a stranded wire effectively has more surface area than a solid wire of
the same gauge, but much of this surface is "inside" the wire.
I checked out the label of a spool of #18 stranded wire and found it was
comprised of 16 strands of #30 wire. Given the info above that each reduction
of 3 in the gauge, then #18 has a cross-section area that is 16 times greater
than #30 -- so it *appears* to translate exactly.
Looking through a catalog for wire, I found that this more-or-less holds true,
though the occasional wire might have an extra strand or two. Here is what I
quickly found -- there are many more, but this is a sample:
(From: Smitty Two (prestwhich@earthlink.net).)
If you're winding your own coils, start with wire that's already coated.
I've wound guitar pickups, power and output transformers for tube
amplifiers, and coils for magnetic bearings. I usually buy wire from
MWS Wire Industries, although
there are many other suppliers, too.
You have a choice of several different insulating coatings. Some will
melt with the heat of a soldering iron, which makes termination easy,
and others require mechanical stripping.
Beyond the insulating varnish, you can also buy wire with an additional
coating that melts in an oven, fusing the coils together and making the
coil rigid without a core or bobbin. There are also coatings that melt
with solvent, and pulling the wire through a damp sponge of solvent
bonds the coils together.
To keep the coils quiet, if they aren't bonded by heat or solvent, you
can vacuum pot them in melted paraffin, or some commercial potting
compound.
First assuming a square wire cross-section:
The coil area then equals 0.188 square inches.
You could put a watt-hour meter on every appliance in your house but that is
probably not needed to estimate the expected electricity usage.
Check the nameplate on heating appliances or those with large motors. They
will give the wattage. Multiple these by hours used and the result is W-hours
(or kW-hours) worst case. Appliances that cycle like refrigerators and space
heaters with thermostats will actually use less than this, however.
Multiple light bulb wattages by hours used to get the W-hours for them.
Things like radios, clocks, small stereos, etc., are insignificant.
Add up all the numbers :-).
It would be unusual for an appliance to suddenly increase significantly in its
use of electricity though this could happen if, for example, the door on a
freezer or refrigerator is left ajar or has a deteriorated seal.
The implementation is quite clever - and often misunderstood. This type of
meter is designed to read true power (for residential customers, at least)
and operates as follows:
There is both a current electromagnet (which passes the user load current)
and a voltage electromagnet (connected across the AC line). The pole pieces
of these electromagnets are mounted in close proximity to the aluminum disk
and close to one-another. When the voltage and current are in phase, their
magnetic fields are roughly 90 degrees out of phase. Why? Because the load
current is in-phase with the AC voltage but the current in the voltage
electromagnet lags by 90 degrees since its winding acts like an inductor.
This results in a net torque on the disc which is proportional to voltage
times current. The disk acts like the rotor of an induction motor and rotates,
operating the dials. A permanent magnet also acts on the disk and acts to
limit the rotation due to induced eddy-currents - its restraining force is
proportional to speed. Rotation rate is therefore proportional to the
instantaneous power being consumed with a direct readout in kW-hours.
Where reactive power is involved and the voltage and current are out of phase,
the peak current will be higher (for the same real power) but the phase angle
will change resulting in reduced torque. These effects will tend to cancel
so the rotation rate will be essentially unchanged. Therefore, adding
capacitors or inductors to change the power factor in a house or apartment
(either to legitimately improve power factor or to cheat the power company)
will have little effect on the measured power usage. Note: Power factor is
equal to: cos(phase angle between voltage and current).
That's why it is called a kW-hour meter and not a VA-hour meter :-).
(Note that large industrial customers ARE charged for reactive power since
that extra current DOES stress generating and transmission facilities thus
requiring excess capacity so this does not apply in that case.)
It is quite possible that under extremely low power factor conditions, accuracy
may be compromised due to friction and materials non-linearities but over the
range of power factors generally encountered, these should be quite accurate.
For anything other than a simple heating appliance (see below) that uses a
lot of power, my advise would be to sell them and buy new when you get there.
For example, to power a microwave oven would require a 2kVA step down (U.S.
to Europe) transformer. This would weigh about 50 pounds and likely cost
almost as much as a new oven.
There are several considerations:
For electronic equipment like CD players and such, you will need a small
step down transformer and then the only consideration power-wise is the
frequency. In most cases the equipment should be fine - the power
transformers will be running a little closer to saturation but it is
likely they are designed with enough margin to handle this. Not too
much electronic equipment uses the line frequency as a reference for
anything anymore (i.e., cassette deck motors are DC).
Of course, your line operated clock will run slow, the radio stations
are tuned to different frequencies, TV is incompatible, phone equipment
may have problems, etc.
Some equipment like PCs and monitors may have jumpers or have universal
autoselecting power supplies - you would have to check your equipment
or with the manufacturer(s). Laptop computer, portable printer, and
camcorder AC adapter/chargers are often of this type. They are switching
power supplies that will automatically run on anywhere from 90-240 VAC,
50-400 Hz (and probably DC as well).
Warning: those inexpensive power converters sold for international travel
that weigh almost nothing and claim to handle over a kilowatt are not
intended and will not work with (meaning they will damage or destroy)
many electronic devices. They use diodes and/or thyristors and do not
cut the voltage in half, only the heating effect. The peak voltage may
still approach that for 220 VAC resulting in way too much voltage on the
input and nasty problems with transformer core saturation. For a waffle
iron they may be ok but not a microwave oven or stereo system. I also
have serious doubts about their overall long term reliability and fire
safety aspects of these inexpensive devices..
For small low power appliances, a compact 50 W transformer will work fine
but would be rather inconvenient to move from appliance to appliance or
outlet to outlet. Where an AC adapter is used, 220 V versions are probably
available to power the appliance directly.
As noted, the transformer required for a high power heating appliance is
likely to cost more than the appliance so unless one of the inexpensive
converters (see above) is used, this may not pay.
Note that if you plan to be moving between countries with different standards,
it may pay to invest in appliances specifically designed for multisystem
operation. However, there are all sorts of definitions of 'multisystem' - not
all will handle what you need so the specifications must be checked carefully
and even then, marketing departments sometimes get in the way of truth in
advertising!
For additional information, see the document:
International Power and Standards Conversion.
There are a couple of issues:
Using a relay controlled by the Triac to then switch the inductive load
may work but keep in mind that a relay coil is also an inductive load - a
much smaller one to be sure - but nonetheless, not totally immune to these
effects.
Most major brands of 12V lights are "sort of" interchangeable.
(Occasionally you have trouble getting the wire from one brand to
connect with the fixtures of another brand, but with a little fudging it
can usually be done.) So look for the brand/model that gives you
most of the lights you want in the styles you want, then augment with
add-ons from other brands. Be aware of the current limit of
transformers, though -- some kits have small transformers not sized for
add-ons, while others have quite a bit of excess capacity. I've got a
(mostly) Toro system I'm semi-satisfied with, though the built-in
photocell system has failed twice. (I'm going to install a separate
photocell & timer and just set the transformer to "On".)
Induction motors - the type in most large appliances - will run hotter
and may be more prone to failure at reduced line voltage. This is because
they are essentially constant speed motors and for a fixed load, constant
power input. Decrease the voltage and the current will increase to compensate
resulting in increased heating. Similar problems occur with electronic
equipment using switching power supplies including TVs, some VCRs, PCs and
many peripherals. At reduced line voltage, failure is quite possible. If
possible, this type of equipment should not be used during brownout periods.
The result can be a serious risk of shock that will go undetected until
the wrong set of circumstances occur.
The result may be an increased number of crashes and lockups or just plain
erratic weird behavior.
The result may be increased hard failures due to line spikes and overvoltage
events.
WARNING: most of these are flammable and harmful to your health -
use only in a well ventilated areas away from open flames. Well, OK,
except perhaps water unless you do your cleaning in a swimming pool and
drown. :)
CAUTION: Test that each of the cleaners or solvents you intend to use are
safe for plastics and painted surfaces by trying some in an inconspicuous
location first. Many of the ones listed above will damage or dissolve
paint, varnish, and/or lacquer, and printing on the equipment itself.
(From: Paul Grohe (grohe@galaxy.nsc.com).)
I use "Desolv-it", one of those citrus oil (orange) based grease and
"get's-the-kids-gum-out-of-your-carpet" cleaners (These are usually touted
as "environmentally friendly" or "natural" cleaners).
Spray it right on the label and let it soak into the paper for a minute or two,
then the sticker slips right off (it also seems to do well on tobacco and
kitchen grease residue).
The only problem is you have to remove the oily residue left by it. I just use
Windex (a window cleaner) to remove the residue, as I usually have to clean the
rest of the unit anyways.
(From: Bob Parnass, AJ9S (parnass@radioman.ih.att.com).)
I spray the label with WD40 and let it soak in for several minutes. This
usually dissolves the glue without damaging the paint and I can remove the
label using my fingernail.
(From: James Leahy (jleahy@norwich.net).)
My lamps were flashing each time I transmitted on 2 meters. HF
transmissions don't seem to cause any trouble. (that just knocks the
neighbor's TV out, har de har). Believe it or not, a simple snap-on
toroidal choke with the lamp cord wrapped as many turns possible near the
plug end cured it. Didn't want to bother with the several type of filter
circuits one could build to fix the problem. It may be a simple fix for
others with similar 2-way interference problems. One can get these chokes
at Radio Shack among other sources.
The new maintenance man at one of our customers, a rather large apartment
complex in Minneapolis, had purchased from us a case of 200 watt incandescents.
He returned to our office about a week later with the lamps, complaining that
they 'flashed' and that the residents were really upset that these lights
(used outside) were not letting them sleep.
Under the 'customer is right' rule, I replaced them immediately, no questions
asked. Of course I tested the 'bad' ones and found no defects.
When he returned with the new batch and the same complaint, he was really
upset, because the residents were now complaining to the management company
(his employer) about the situation.
I sat him down and asked him about the application. He explained that they
were being used in 16" white poly pole lights, along all the footpaths around
the complex.
I asked how they were switched, and he replied that they used to be on timers
but that after complaints that the lights were on during the daylight hours,
he had purchased, from his local hardware store, screw-in photocells. The type
into which the bulb screws. These were then, inside the globes with the bulbs.
Of course the reflection within the poly globe was enough to prompt the
photocell to switch the circuit off and cycle the lights all night.
It took him a minute or two to comprehend his error. I was able to recommend
an electrician to install more appropriate photocells. He remained a good
customer for several more years after this incident.
My amusement comes from the picture I have in my mind of the residents of this
rather up-scale apartment complex looking out of their windows to see all the
walkway security lights going on and off all night, and wondering what the heck
was going on! I imagine it was quite a sight.
With fancy expensive test equipment you might be able to detect it but
not in normal use. The savings of a hard wired appliance would be quite
small even for a high wattage device like a space heater.
However, the hard wired connection will be more reliable and should not
deteriorate over time whereas a plug and outlet can corrode and the
spring force decreases with multiple plugins and outs. The added resistance
will increase the losses. So, in this regard, directly connecting the device
into the house wiring is better.
Note that if the cord and/or plug gets hot in use, this is a loss (though
for a space heater, the heat is just coming from the cord/plug instead of
the elements inside) - and a possible fire hazard as well and should be
checked out. Sometimes, all it takes to remedy such a problem is to expand
the metal strips of the prongs of the plug so it makes better contact.
In the beginning we had but rocks and wood, not an efficient safe or practical
way to heat your home. This system was refined and did do a fair job, as long
as you didn't mind cold spots or care about your safety.
Then we got more creative and used coal and then oil. Oil was a far safer and
a better controlled system. Then came gas now that's the fuel, the fuel of
choice for most. It's also the one we are here to explain.
The older systems were really very simple. You had a small pilot light which
was always on. No safety, it just was lit, and we hoped it stayed lit. When
the thermostat called for heat we opened a solenoid (electric valve) and
allowed gas to flow in and hopefully get lit by the pilot light. If the pilot
had gone out the theory was that the majority of the gas would go up the
chimney and vent to the outside. This simple system, used for years did a
fair job. It lacked many features we take for granted today.
With the coming of more technology people started thinking more of safety and
expected more from there equipment. A device commonly known as a thermocouple
was a great start in the direction of safety. It is a union of dissimilar
metals that when heated generates electricity. Now we had a way to stop gas
flow if our pilot went out. By putting a solenoid in the pilot gas line we
could use a thermocouple to keep it powered open by the heat of the pilot.
Thus if our pilot went out the thermocouple would cool and stop producing
power to hold the solenoid open, gas flow would be interrupted. Power from
this control was also required prior to the main valve opening, this making
uncontrolled gas flows a thing of the past.
With the coming of the R.E.A. (Rural Electric Authority) power to every home
became a reality. We now could introduce a new concept, blowers. The fan
motor made forced air heat a reality. Now even the most distant room could be
heated and even temperatures became a real happening.
The addition of electricity allowed for the addition of safety controls which
resulted in greatly reducing the fiscal size of a furnace. We now had the
means to control running temperatures using the fan - turning it on and off by
the temperature and the on and off valve of the fire. Should by chance the
fan not start, the furnace would over heat and a high temperature switch would
turn the fire off. No melt down! very safe.
We all know that something simple that works well can't be left alone. Man
just has to make it more labor complex. Soon came the addition of some
actually neat ideas. First being the addition of humidity, in cold climates a
must, that also lowers your heat bill. The ability to run the fan just to
stir air, not add heat or cool. Then the electronic air cleaner. This one if
you have allergy is a must. I don't have one so can't tell if it is on or
off. BUT my son can tell in a matter of hours if its off.
And let's not forget the best of all air conditioning! In my world a must.
All of these additions were working steps towards our modern furnace.
The older burners were called ribbon (they sat in the combustion chamber) and
did a good job until we started going for higher efficiency. Then a major
problem arrived, with colder heat exchangers came condensation. This caused
the mild steel burners to rust and the size of the openings to get smaller,
making for a poor air to fuel ratio and just a terrible dirty burn, lots of
soot. The good news is stainless steel burners did solve this, how ever it's
an expensive fix.
Now remember what we said about something that worked? You got it! new style
burners, not all bad though. With the high efficiency furnaces comes a colder
stack temperature (fumes to chimney). They are cold enough that they possibly
would not raise without a little help. So a venter (blower) motor is used to
draw the fumes out of the heat exchanger and up the chimney. This made
possible a new style burner. It is in reality a far better burner then the
previous style. We call it, in shot. This burner is self adjusting for it's
air mixture and is positioned out side of the heat exchanger. It is more like
the fire from a torch. The fire is now sucked in to the heat exchanger by the
draft of the venter. keep in mind the burner sits out in mid air. In most
modern furnaces the heat exchanger is basically a piece of pipe with a burner
on one end and a venter on the other.
Knowing that good things get better, next we worked over the controls. Rather
then using temperature to turn on the fan we use a solid state timer. This
controls all fan functions. Remember the pilot light? It's gone. We now use
either a hot surface igniter or if your lucky a spark. The hot surface is
much like the filament of a light bulb. It upon demand gets very hot and is
used as the source for ignition, unfortunately like a light bulb it burns out.
Again remember the thermal couple? Yes it to is gone. We now use a micro
processor and electronically sense if the fire is lit.
On most modern furnaces the sequence of operation is as follows:
Venter stops. Vacuum is lost. Fire is turned off. Blower will run till
timer tells it to stop. You still have the old style over temperature
switches. All of this has made new furnaces extremely small, efficient and
safe. Do they require more maintenance? YES. If someone tells you different,
they tell less then the truth! But I will gladly pay the cost to have my
family safe and comfortable.
(From: Hauser Christoph (chhauser@bluewin.ch).)
The automatic toilets are active infrared devices. This means, you have a IR
transmitter and an IR receiver basically. More sophisticated systems use more
emitters and receivers or a PSD to get a triangulation. Some systems are
battery-operated with lithium 2CR5, CR-P2 or simply with four AA-cells.
Usually, the infrared system is activated every second up to every 4 seconds.
If the receiver sees a response, the sampling is higher. There also several
time delays included. The systems detects persons or objects in the range of
10 to 100 cm (4 to 40").
The valve for the flush is a bistable solenoid device. With a short pulse you
open the valve and with another and opposite polarity you close it. It's
possible to reach about 200,000 flushes with batteries and a life-cycle of 4
years. Often PIC's (Programmable Interface Controllers - one chip micros) are
used, because they have a low stand-by consumption.
You wonder, why I know this? It's my job to develop these devices!
In most cases, wiring is trivial and five minutes with your Mark I Eyeball(s)
and a pencil and paper (remember those? If not, use your PC and a schematic
capture software package) will result a complete schematic. There may still
be some uncertainties with respect to motor, transformer, or switch wiring
but testing with an ohmmeter or continuity checker should eventually prevail.
Other more drastic measures:
Whenever I'm stuck with some "Unprofitable" with a broken part,
I see if I can duplicate the functionality of the part. My
raw materials include:
If it's something intricate, my parts bin door is NEVER closed..
and it gives it's "body" to science :-)
If you have part of the old plastic lever, it's usually easy to
build up the broken off part. I like to heat up a segment of
piano wire and insert it into the remaining part in such a way
as to hit the most "meat" of the part. Then, using either epoxy
or plastic build up material, I form something that does the job.
Overall, I have about a 75% "plastic broken part" repair ratio.
After a while, you will be able to judge if it's doable. "lever"s
are usually easy... sliding assemblies are a pain in the @ss...
Simply set the screw on top of the hole, and press LIGHTLY on it with the tip
of your soldering iron. The iron will heat the screw, which then slides into
the post. After everything cools, you can take the screw out normally and the
threads are as good as new! If the post is badly stripped, you may want to
stuff the hole with extra plastic shaved from some non-critical area to
provide additional material.
You have to be careful not to overheat, or push too hard. But it works very
well.
For safety related items, the answer is generally NO - an exact replacement
part is needed to maintain the specifications within acceptable limits with
respect to line isolation (shock prevention) and to minimize fire hazards.
However, these components are not very common in small appliances.
For other components, whether a not quite identical substitute will work
reliably or at all depends on many factors. Some designs are so carefully
optimized for a particular part's specifications that an identical
replacement is the way to return performance to factory new levels. With
appliances in particular, may parts which perform common functions - like
thermostats - utilize custom mounting arrangements which precluded easy
substitution even if the electrical and thermal characteristics are an
exact match.
Here are some guidelines:
Here are a few titles for both small and large appliance repair:
Overall, this is an excellent book which I would not hesitate to recommend
as long as one understands its shortcomings. The coverage of both small
and large appliances, tools, and common yard equipment, as well as a
It is very well illustrated with hundreds upon hundreds of easy to
understand exploded diagrams. In fact, that is probably its most
significant feature. Where the equipment is similar to yours, it is
possible to use the pictures almost exclusively for understanding its
construction, operation, and disassembly/reassembly procedures.
The discussion of each type of more complex equipment provides one or
more troubleshooting charts. Each entry includes the level of difficulty
and identifies any needed test equipment (e.g., multimeter) for dealing
with that problem or repair.
However, this book is at best an introduction and once-over. Much of the
material is presented based on one or two models of a particular type of
devices while sort of implying that all the rest are similar. In all
fairness, very often this is sufficient as most models of simpler differ
only in details. However, for all but the most general repairs on the
more complex appliances, a book with more specific information would be
highly desirable before actually tackling the repair.
One significant shortcoming is that there are NO wiring diagrams of any
kind for any of the appliances. Their approach seens to be to just check
parts for failure. While this will be successful in many cases. a wiring
diagram would be useful when explaining appliance operation and would
help in logical troubleshooting to localize the problem.
Although there is a chapter on home electronics - audio, video, computer,
security systems, etc. - don't expect anything useful beyond very general
information and simple repairs like replacing belts and looking for bad
connections. While it isn't surprising that the treatment of this complex
equipment is superficial at best in a book of this type, in some cases it
is as though the editing was based on a page limit rather than including
a more complete summary but with fewer details. For example, the only
repair on a CD player beyond belts and lens cleaning is to test and replace
the tray loading motor (one particular model). Unfortunately, some of the
specific information is not entirely accurate either and may be misleading
and expensive. The safety instructions for the electronics (as well as
microwave ovens) is also a bit lacking considering some of the suggestions
for troubleshooting and parts replacement.
Some errata: Testing of microwave oven HV diodes (good ones will test bad),
HV discharging of TVs and monitors always (not needed) and possibly to
wrong place (should be to picture tube ground, not chassis ground) but no
mention of power supply capacitor discharging, not specific enough on
'good' and 'bad' resistance readings for various parts like motors.
This isn't the Fix-It-Yourself Manual but I expect that is coming on CDROM
if it is not out already. However, there is some information including
nice diagrams relating to door chimes, telephone wiring, incandescent and
fluorescent lighting fixtures, electrical switches, and heating and air
conditioning systems (in addition to everything else you ever wanted to
know about how your house works, tools and tool skills, materials and
techniques, and home repair and maintenance).
I have on several occasions been pleasantly surprised to find that some
companies really do stand behind their products and all it took was a phone
call or short letter. One only hears of the horror stories!
(From: lizard3 (lizard3@ix.netcom.com).)
Sears sells schematics and plans of all their appliances. This includes a
breakout of the entire machine with each part number. They have a toll-free
number to call. All you need is the model number and a credit card. We have
used their washing machine schematic a couple of times to replace some very
minor parts.
The original manufacturer of the appliance is often the best source for
unusual or custom parts. Many are quite willing to sell to the consumer
directly. Check for an 800 number and have complete information on model
and a part number if possible. However, their prices may be high - possibly
rendering a repair uneconomical.
There are numerous appliance repair centers that may be able to obtain parts
at lower cost - check your Yellow Pages. Their prices may be less than half
of those of the original manufacturer.
The following is a good source for consumer electronics replacement parts,
especially for VCRs, TVs, and other audio and video equipment but they
also carry a variety of common electronic components and appliance parts
like switches, range elements, defrost timers, light bulbs, and belts
VCR parts, Japanese semiconductors, tools, test equipment, audio, consumer
electronics including microwave oven parts and electric range elements, etc.
They specialize in microwave oven parts, but also carry some other major
appliance parts.
-- end V2.92a --
Electric toothbrushes
These are basically similar to any other small battery operated appliance or
tool such as a screwdriver or drill. The permanent magnet motor runs off of
rechargeable NiCd batteries and cause the bristles or whatever to oscillate,
rotate, or vibrate. Interchangeable 'brush' units allow each member of the
family to have their own. Coupling to the internal battery is often via a
'contactless' mechanism using a pair of coils to transfer AC inductively.
Inside the hand unit, this is rectified to charge the NiCd (usually) battery.
See the section: Inductively coupled charging circuit
for an example of one such design.
Since these must operate in a less than ideal environment (humid or actual
waterlogged!), contamination and corrosion is quite possible if the case is
not totally sealed. Some of the switches may be of the magnetic reed type so
that there don't need to be any actual breaks in the exterior plastic housing.
Even so, the motor shaft probably passes through a bushing in the housing and
this will leak eventually.
Inductively coupled charging circuit
This was found in an Interplak Model PB-12 electric toothbrush but similar
designs are used in other appliances that need to be as tightly sealed as
possible.
     E1           CR2          R1                                E3
  AC o----+----+--|>|-----+---/\/\---+----+----------------+-------+  Coupling
          |   ~|  CR1     |+   1K    |    |                |        ) Coil
        +-+-+  +--|<|--+  |          |    / R2             |        ) 200T
    RU1 |MOV|     CR3  |  |      C1 _|_   \ 390K           |        ) #30
        +-+-+  +--|>|--|--+   .01uF ---   /          CR5   |     E4 ) 1-1/2"
       E2 |    |  CR4  |       250V  |    \ MPSA +---|<|---|----+--+
  AC o----+----+--|<|--+             |    |   44 |         |    |
              ~        |-     R3     |    | Q1 |/ C    C3 _|_  _|_ C2
                       +-----/\/\----+----+----|     .1uF ---  --- .0033uF
      CR1-CR4: 1N4005  |     15K               |\ E  250V  |    |  250V
                       |                R4       |         |    |
                       +---------------/\/\------+---------+----+
                                        1K
The battery charger is nothing more than a diode to rectifier the signal
coupled from the charging base. Thus, the battery is on constant trickle
charge as long as the hand unit is set in the base. The battery pack is a
pair of AA NiCd cells, probably about 500 mA-h.
                                       S1B
                              S1A  +--o->o
                 D1           _|_  |       R1,15,2W
             +---|>|---+------o o--+   L o---/\/\---+
    Coupling |         |                   R2,10,2W |
       Coil  +        _|_ BT1          M o---/\/\---+
       120T (          _  2.4V                      |
        #30 (         ___ .5A-h        H o----------+
     13/16"  +         _                            |
             |         |        +-------+           |
             +---------+--------| Motor |-----------+
                                +-------+
Braun electric toothbrush repair
(From: David DiGiacomo (dd@Adobe.com).)
Hand massagers
These are simply motors with an off-axis (eccentric) weight or electromagnetic
vibrators. If the unit appears dead, check the plug, cord, on/off switch,
internal wiring, and motor for continuity. Confirm that the mechanical parts
turn or move freely.
Hair dryers and blow dryers
A heating element - usually of the NiChrome coil variety - is combined with
a multispeed centrifugal blower.
The Ground Fault Circuit Killer (GFCK)
Note: I have heard that the official name for these disasters is: Appliance
Leakage Circuit Interrupter (ALCI). I like mine better. :)
             <------------------------ Plug ---------------------->|<- Cord ->
              ___                                                  :
 Plug (H) <---o o---+-----------------------------------------------o H
              CB1*  |     =====        R1*                         :
                    +-----^^^^^-------/\/\-------------+-------+   :
                    |      L1                          |       |   :
                    |  120 T, #26, 3 layers       Q1 __|__     |   :
                    |  .1"x1" ferrite core    T34557 _\_/_     |   :
                    |                                / |       |   :
             MDC +--+--+   +-----+------+------+----'  |   C2 _|_  :
            Z251 | MOV |   |     |      |      |       | .1uF ---  :
                 +--+--+   |     /      |      |       | 250V  |   :
                    |      |  R2 \  C1 _|_ D1 _|_      |       |   :
                    |      | 300 / .22 ---    /_\      |       |   :
                    |      |     \  uF  |      |       |       |   :
                    |      |     |      |      |       |       |   :
                    +------|-----+------+------+-------+-------+   :
              ___   |      |                1N4004                 :
 Plug (N) <---o o---+---------------------------------------------------o N
              CB2*         |             R3  1K                    :
                           +--------------/\/\-------------------------o G
                                                                   :
* R1 is positioned to hold the latch for CB1 and CB2 in place until it
vanishes in a puff of smoke. It is interesting to note that R1 is NOT
a flameproof resistor - it looks like an ordinary 1/8 W carbon composition
type.
Curling irons
These are just a sealed heating element, switch, and thermal protector
(probably). Check for bad connections or a bad cord or plug if there is
not heat. A failed thermal protector may mean other problems. While
these are heating appliances, the power is small so failures due to
high current usually do not occur.
VCR cassette rewinders
Cassette rewinders typically consist of a low voltage motor powered from
a built in transformer or wall adapter, a belt, a couple of reels, and some
means of stopping the motor and popping the lid when the tape is fully
rewound.
Vacuum cleaners, electric brooms. and line powered hand vacs
Despite all the hype surrounding vacuum cleaner sales, there isn't much
difference in the basic principles of operation between a $50 and $1,500
model - and the cheaper one may actually work better.
Vacuum cleaner mechanical problems
Vacuum cleaner electrical problems
>
Vacuum cleaner hose damage
"We have been quoted a price of $100 to replace the hose on our Panasonic
(Mc-9537) vacuum cleaner. It has a rip in it; next to the plastic housing
where the metal tubing starts. Does anyone know if there is a more
economical way to solve this problem?"
High tech vacuum cleaners?
Excerpt from a recent NASA Tech Brief:
"The Kirby Company of Cleveland, OH is working to apply NASA technology to
its line of vacuum cleaners. Kirby is researching advanced operational
concepts such as particle flow behavior and vibration, which are critical
to vacuum cleaner performance. Nozzle tests using what is called Stereo
Imaging Velocity will allow researchers to accurately characterize fluid
and air experiments. Kirby is also using holography equipment to study
vibration modes of jet engine fans."
Dustbusters(tm) and other battery powered hand vacs
These relatively low suction battery powered hand vacuums have caught on
due to their convenience - certainly not their stellar cleaning ability!
Dustbusters left on continuous charge and battery problems
The low current trickle charger supplied with these battery operated hand-vacs
allow Dustbusters and similar products to be be left on continuous charge so
long as they are then not allowed to self discharge totally (left on a shelf
unplugged for a long time). Older ones, in particular, may develop shorted
cells if allowed to totally discharge. I have one which I picked up at a
garage sale where I had to zap cells to clear a shorts. However, it has been
fine for several years now being on continuous charge - only removed when used.
Floor polishers
A relatively large universal motor powers a set of counter-rotating
padded wheels. Only electrical parts to fail: plug, cord, power switch,
motor. Gears, shafts, and other mechanical parts may break.
Heating pads
Heating pads are simply a very fine wire heating element covered in thick
insulation and then sealed inside a waterproof flexible plastic cover.
Internal thermostats prevent overheating and regulate the temperature.
The hand control usually provides 3 heat settings by switching in different
sections of the heating element and/or just selecting which thermostat is used.
Electric blankets
As with heating pads, the only serviceable parts are the controller and
cordset. The blanket itself is effectively sealed against any repair
so that any damage that might impact safety will necessitate replacement.
Sunbeam warming blanket saga
I have had 4 Sunbeam warming blankets in the last 10 years or so. None
has lasted more than 2 years of (seasonal) use without requiring repair.
Fortunately, they all had 5 year warranties. (The exact durations of how
long they worked are from memory so they may not be totally accurate.):
SoftHeat electric blanket shuts off
This SoftHeat blanket had been highly recommended when the last of my
Sunbeam blankets went down hill. As noted above, it uses low voltage DC
rather than 115 VAC to power the heating wire and is claimed tob e safer
(which is probably is).
Humidifiers
There are three common types:
Ultrasonic humidifiers
(From: Filip "I'll buy a vowel" Gieszczykiewicz (filipg@repairfaq.org).)
Ultrasonic waterfalls?
I don't suppose you are likely to encounter these but if you do, servicing
procedures will be similar to those described in the section:
Ultrasonic humidifiers.
Ultrasonic cleaners
Ultrasonic cleaning is a means of removing dirt and surface contamination from
intricate and/or delicate parts using powerful high frequency sound waves in
a liquid (water/detergent/solvent) bath.
               R1        D1
 H o------/\/\-------|>|----------+
         1, 1/2 W  EDA456         |
               C1         D2      |
          +----||----+----|>|-----+
          |  .1 uF   |  EDA456    |  2
          |  200 V   |      +-----+---+ T1      +---+------->>------+
          |    R2    |     _|_ C2      )::  o 4 |   |               |
          +---/\/\---+     --- .8 uF D ):: +----+   |               |
          |   22K          _|_ 200 V   )::(         +               |
          |   1 W           -      1 o )::(          )::           _|_
          +-----------------+---------+ ::( O        ):: L1        _x_ PT1
          |           R3    |        7  ::(          )::            |
          |      +---/\/\---+   +-----+ ::( 5       +               |
         C \|    | 10K, 1 W     |    F ):: +---+    |               |
       Q1   |--+-+--------------+  6 o )::     |    |               |
         E /|  |  D3     R4       +---+        +----+------->>------+
          |    +--|<|---/\/\--+  _|_
          |           47, 1 W |  ---       Input: 115 VAC, 50/60 Hz
          |                   |   |        Output: 460 VAC, pulsed 80 kHz
 N o------+-------------------+---+
The power transistor (Q1) and its associated components form an self excited
driver for the piezo-transducer (PT1). I do not have specs on Q1 but based on
the circuit, it probably has a Vceo rating of at least 500 V and power rating
of at least 50 W.
Fog machines
If you don't know what a fog machine does, you probably don't need to read
this section!
Dehumidifiers
Electric dehumidifiers use a refrigeration system to cool a set of coils
which condenses water vapor. The heat is then returned to the air and
it is returned back to the room. On the surface, this seems like an
incredible waste of energy - cooling the air and heating it back up -
but it is very effective at removing moisture. A typical large dehumidifier
will condense something like 30 pints in 24 hours - which, unless you have
it located over a drain - then needs to be dumped by hand.
Garbage disposals
A garbage disposal is just an AC induction motor driving a set of centrifugal
hammers (they use to use sharp cutters but these were even more dangerous).
The cutters throw the food against an outer ring with relatively sharp slots
which break up the food into particles that can be handled (hopefully) by
the waste system. However, always use generous amounts of cold water (which
helps to cool the motor as well) and let it run for a while after there is
nothing left in the disposal and it has quieted down. This will assure a
trouble free drain. Otherwise, you may be inviting your friendly plumber
over for a visit!
Unless you are the truly die-hard doit-yourselfer, repair of disposals is
probably not a good use of your time. The ultimate reliability of all
but the most obvious and simple repairs is usually unknown and could be
very short. However, other than time, there is nothing to be lost by
at least investigating the source of the problem.
Garbage disposal pops reset button but nothing blocked
Even if nothing is stuck in it, is the rotor free - not too tight? If you
have that little wrench that comes with many disposers, you should be able
to turn the rotor relatively easily (I would say about 1 foot-pound of
torque or less if your arm is calibrated). A tight bearing may be the
result of a shaft seal leak - see the next section:
Garbage disposal seizes repeatedly.
Garbage disposal is stuck - hums but does not turn
Here are typical problems:
"I need help. Our garbage disposal is stuck. It hums but doesn't turn. If I
leave it on for more than a few seconds it trips the circuit breaker on the
unit. Any tips on how to solve this shy of buying a new unit? The unit is 7
years old."
Garbage disposal seizes repeatedly
A garbage disposal that doesn't have anything stuck in the cutting chamber
but seems to be hard to turn or will work with effort until left alone for
a day or two probably has a bad bearing caused by a leak at the shaft seal.
Of course, water gushing out of the lower part of the disposal (or *any*
amount of water dripping from inside the motor housing) is one indication
that there is a leak! This also represents a safety hazard so the disposal
should be left unplugged and not be used even if it still runs.
Garbage disposal replacement (or upgrade)
My general recommendation is to get the approximately $100 1/2-3/4 Hp Sears
(ISE In-Sinkerator(tm) manufactured) unit when it is on sale (which is about
every week). These now have at least a 4 year warranty.
Sump pumps and utility pumps
Sump pumps come in two major varieties:
Utility pumps are often of the submersible variety.
Most common problems are with switches that are no longer reliable or totally
broken. Universal replacements are generally available since the switch is
not usually an integral part of the motor/pump unit.
Toys
Since there are a semiinfinite number of variations on electrically powered
toys, the only comment I have is that these are almost always combinations
of small PM motors, switches, batteries, light bulbs - and totally impossible
to identify electronic components. With small kids, physical destruction is
probably a much more common occurrence than a part failure!
Incorrect response for remote control toys
The following may apply when there is no response or an uncontrolled response
for certain commands like turn left or move backwards:
Garage door operators
Typical garage door operators use a 1/3 to 3/4 horsepower induction motor
with a belt drive chain or screw mechanism to move the 'trolley' that actually
grabs the door. A switch or pair of switches activated at each end of travel
stops the motor and toggles the state (up or down) of the controller. Door
blockage sensors detect obstructions and stop or reverse travel. A light
turns on with motor start and stays on for 3-5 minutes thereafter, controlled
by a simple timer.
General garage door operator problems
Garage door operator light does not work correctly
Assuming the unit otherwise operates normally and you have tried replacing
the light bulb(s):
Garage door operator loses track of where it is
You press the button to close the door and it works fine. However, next
time you press the button to make the door go up and it tries to go down into
the ground.
Garage door remotes behave differently
"I've got 2 Genie garage door remotes. One of them works from about 100 yards
away; the other I almost have to be right next to receiver. I suspect that
the antenna is the problem; either too short, or blocked by something."
Adjusting garage door operator remote unit
This situation may arise if one hand unit operates normally but the other
has a very short range. If you have only one hand unit, it might also be
the problem though not likely to have just happened on its own - either
it was improperly set up at the factory (if new) or hand unit was dropped
once too often.
Improving sensitivity of garage door openers receivers
Where a garage is constructed with aluminum siding, the remote signal may
be significantly attenuated and of insufficient strength to activate the
receiver module (inside the garage) of the opener at any useful distance
or at all. Assuming the system operates normally otherwise (i.e., activation
is normal with the door open), two approaches (either or both together) can
be taken to solve this problem:
Universal remote/receiver units for garage door operators
So you lost your garage door remote or it got run over by your 4x4 :-). Or,
it just expired due to age. There are alternatives other than an entire new
operator if the remote is no longer available:
Garage door operator doesn't work reliably in cold weather
First, check the lubrication. The most common problem is likely to be
gummed up grease in the chain drive (if used) or the bearings of the
rollers. Note: the track itself generally doesn't require lubrication.
Chamberland garage door opener repair?
"My remote broke for my very old (defunct) chamberlain automatic garage
door opener.
Garage door operator security
While manufacturers of garage door operators make excellent claims of
security, this is of no value if you don't take advantage of whatever
features are included in your unit.
Identifying unknown transformer ratings in garage door operator
In a garage door operator, the transformer likely powers the controller
and receiver. If you can look at where its outputs go, you may be able to
infer something about the voltage even if the transformer is a charred mass.
Electromechanical doorbells and chimes
Most of these consist of a low voltage transformer powered directly from
the house wiring providing 10 to 20 VAC at its output, one or more switches
for the front door(s), one or more switches for the back door(s), and an
electromagnetic chimes unit.
             Bell Transformer                         Chimes
          H o----+                                     Unit
                  )||       X      _|_ Front door        F
                  )|| +-----+------- --------------------o
                  )||(      |
       115 VAC    )||(      |      _|_ Back door         B
   (Junction box) )||(      +------- --------------------o
                  )||(
                  )||(      Y                            C
                  )|| +----------------------------------o
                  )||
          N o----+
Weak or erratic mechanical chimes
This can be due to several things:
Adding an additional set of chimes
There are at least two ways of doing this (though the first one is more
straightforward and intuitive and therefore generally preferred).
Note: For either of these schemes, beyond some number of chimes units, the
current rating of the pushbutton switches will be exceeded resulting in early
failure. However, this should not happen unless your house is similar in size
to Bill Gates' mansion.
             Bell Transformer                         Chimes    Chimes
          H o----+                                    Unit 1    Unit 2
                  )||       X      _|_ Front door        F         F
                  )|| +-----+------- --------------------o---------o
                  )||(      |
       115 VAC    )||(      |      _|_ Back door         B         B
   (Junction box) )||(      +------- --------------------o---------o
                  )||(
                  )||(      Y                            C         C
                  )|| +----------------------------------o---------o
                  )||
          N o----+
             Bell Transformer                         Chimes    Chimes
          H o----+                                    Unit 1    Unit 2
                  )||       X      _|_ Front door        F         F
                  )|| +-----+------- --------------------o---------o
                  )||(      |
       115 VAC    )||(      |      _|_ Back door         B         B
   (Junction box) )||(      +------- --------------------o---------o
                  )||(
                  )||(      Y                            C         C
                  )|| +----------------------------------o    +----o
                  )||                                         |
          N o----+        From output Y of identical o--------+
                           second bell transformer
                           (H, N, X, wired in parallel)
How to add an addition button to a door bell
Refer to the diagram in the section: Electromechanical
doorbells and chimes.
Wireless doorbells or chimes
The transmitter and receiver portion of these units are virtually identical
to those of garage door operators. See the relevant sections on those units
for problems with activation.
Doorbell rings on its own
Old garage door operator guts for wireless chime
Don't toss the electronic remains of that old garage door operator. It would
probably be possible to use it as the basis for a wireless doorbell. Instead
of starting the motor, use its output to enable an electronic chime or buzzer.
The RF transmitter and receiver for a wireless chime is virtually identical
to that of a typical garage door operator.
TV antenna rotators
These consist of a base unit with some sort of direction display and knob
and a motor unit to which the TV antenna is mounted. Of course, the
troubleshooting of these installations is complicated by the
remote and somewhat inaccessible location of the motor unit. :-( Before
climbing up on the third story roof, confirm that you haven't lost power
to the motor unit and/or base station and that the connections between
them are secure.
This was connected to a knob switch, which also turned. Scenario is: the unit
is pointed halfway through the circle. turn the knob left, the rotor turns
and the indicator turns with it. when the rotor turns the same number of
"clicks" as you turned the knob, it stops. same for reverse.
5263 Agro Drive
Frederick, MD 21703
Phone 301-874-5885
Web: http://www.rotorservice.com/
Power Tools
Types of motors found in power tools
A variety of motor types are used depending on the type of tool. AC powered
portable tools usually use a universal motor due to it high power/weight
ratio and ease of electronic speed control. Cordless tools usually use a
high performance permanent magnet DC motor. Stationary power tools almost
always use some form of AC induction motor except where variable speed
is required.
Motors in AC line operated portable tools
Line operated portable (corded) power tools usually use a universal type
AC motor providing 3,000 to 30,000 RPM at the motor shaft. For the same
power rating, these will be significantly lighter than an induction motor.
Motors in cordless power tools
These are usually high performance permanent magnet DC motors using advanced
high strength and exotic magnetic materials. They are very compact and light
weight for their power output. As with all DC (brush type) motors, brush
wear is a common problem.
Motors in stationary power tools
Stationary power tools which do not require continuous speed control will
generally use some type of AC induction motor - split phase or capacitor
start/run. The motors generally operate at a fixed speed of around either
1725 or 3450 RPM (U.S., 60 Hz power). Stepped pulleys or continuous mechanical
speed/torque changers are used to obtain (usually) lower work piece speeds.
About horsepower ratings
One horsepower is equal to 746 watts of electrical power (100% efficiency).
Therefore, the most you can get continuously from a normal 115 V 15 A outlet
is about 2 HP. Any claims (for air compressors, for example) of higher
ratings on a normal outlet are totally bogus. Companies such as Sears
(Craftsman) like to specify 'Reserve Power' for their power tools which
as best as I can determine refers to the power available for a short time
and may relate to the mass - and inertia - of the rotating parts but not
the continuous power available. This may be useful to help saw through
a tough knot in a piece of hardwood but may not be terribly meaningful for
a wet/dry vacuum! Therefore, pay most attention to the continuous power
ratings if they can be found anywhere. A good indication is probably the
maximum amps required for the electrical service.
Cords for AC line operated portable power tools
Really old power tools had two wire cord plugs and no safety ground yet were
of all metal (solid and heavy!) construction. I would recommend that as
a matter of policy, these be retrofitted with a 3 wire grounded cordset.
Portable drills
The portable electric drill (now the rage is cordless) is probably one of
the two first tools that any handyman should own (the other being a saber
saw). It is used for many things in addition to drilling little holes -
drilling large holes, sanding, polishing, driving screws, etc. Therefore,
these tools get a lot of use - and abuse.
AC line powered drills
An AC line powered electric drill is just a universal motor with a two stage
(typical) gear reduced powering a chuck to hold the drill bit or attachment.
A continuous range speed control with a reversing switch is now standard
on most AC line powered drills.
Upgrading the bearings on a Craftsman drill
Very inexpensive models (like the $30 Father's day specials) may use sleeve
bearings in various locations instead of better quality longer lived ball or
roller bearings. One particular bearing tends to deteriorate rapidly,
especially if the drill is used for sanding or in dusty work environments
(as opposed to clean rooms :-) ). This is the motor bearing at the handle
end. The lubrication dries out or is absorbed by dust particles, the bearing
runs dry, wears, and fails with an ear shattering squeal. Even if you use ear
plugs, the speed and power are not adequate as the motor is laboring and
overloaded and motor failure would result from prolonged operation.
Cordless drills
Cordless drills use a permanent magnet DC motor operating off of a NiCd
(usually) battery pack. Manufacturers make a big deal out of the voltage
of the pack - 6, 7.2, 9.6, 12, 14, 18, etc. - but this really isn't a sure
measure of power and time between charges as a motor can be designed for any
reasonable voltage. A gear reducer follows the motor driving a chuck for
holding the drill or screwdriver bit, or attachment. These are most often
have a single or two speeds with reverse.
Other direct drive tools
Saber saws, reciprocating saws
These use a universal motor which drives a gear reducer and reciprocating
mechanism. Better models have a variable speed control so that the sawing
rate can be optimized to the work. All but the most inexpensive allow the
head to be rotated or rotate automatically based on feed direction adding
a bit of complexity.
Electric chain saws
WARNING: Read and follow all safety instructions using any type of
chain saw.
Circular saws, miter, and cutoff saws
These have a high power universal motor either directly driving the blade
or driving a gear reducer (high torque/large blade variety).
Grinding wheels
A dual shaft induction motor drives rotating grinding stones (or other tools
like wire brushes). Most common are fixed speed - usually around 3450 RPM
but variable speed operation is highly desirable to avoid overheating of
tempered metal during sharpening. All but the most inexpensive use sealed
ball bearings requiring no routine maintenance.
Polishers, rotary sanders
A gear reduced universal motor drives a rubber (usually) mounting plate
to which a sanding disk or polishing pad is attached.
Orbital sanders and polishers
In addition to the usual universal motor and its bearings, the orbital
mechanism may require cleaning and greasing periodically.
Belt sanders, power planers
A typical portable belt sander uses a gear or belt reduced universal motor
driving one of the rollers that the sanding belt rotates on under tension.
In decent quality tools, these should use ball or roller bearings which require
little attention.
Air compressors
A direct or belt drive induction motor (probably capacitor start)
powers a single or multiple cylinder piston type compressor. Typical
continuous motor ratings are between 1/4 and 2 HP (for a 115 VAC line).
Over and under pressure switches are used to maintain the pressure in
an attached storage tank within useful - and safe - limits. Most will
include an unloading valve to remove pressure on the pistons when the
compressor stops so that it can be easily restarted without damage to
the motor and without blowing fuses or tripping circuit breakers.
Paint sprayers
Traditional air powered paint sprayers may simply be an attachment to an
air compressor or may be a self contained unit with the compressor built in.
Since the active material is paint which dries into a hard mass (what a
concept!), cleaning immediately after use is essential. Otherwise, strong
solvents will be needed to resurrect a congealed mess - check your user's
manual for acceptable deadly chemicals.
Heat guns
These are similar to high performance hair dryers and subject to the same
problems - bad cord or switch, open heating element, defective thermostats,
universal motor problems, and just plain dirt and dust buildup.
Paint strippers
These are just a high power heating element attached to a cord. If there
is no heat, check for a bad plug, cord, or open element with your multimeter.
Soldering irons
Simple pencil irons use an enclosed heating element is attached to the
'business' end in some manner - screw thread, set screw, clamping ring,
etc. Failure to heat may be due to a bad plug, cord, bad connections,
or defective element.
Soldering guns
The common Weller Dual Heat soldering gun is a simple transformer with the
tapped primary winding in the bulk of the case and a single turn secondary
capable of 100 or more amps at around 1.5 V. The soldering element is simply
a piece of copper (possible with a shaped tip) which is heated due to the high
current passing through it even though it is made mostly of copper. The
'headlight(s)' (flashlight bulbs) operate off of a winding on the transformer
as well.
Hot melt glue guns
The typical consumer grade hot melt glue gun is about as simple an
electrical tool as it gets. A heating element
heats a metal or ceramic chamber where the hot melt glue stick material
(technically a thermoplastic adhesive) melts and is pushed out the front
as a semi-liquid.
Wet-dry vacs, yard blowers/vacs
A powerful universal motor driving a centrifugal blower is all there is
in this equipment. Unfortunately, many common models use cheaply made
motors which may fail simply due to use or from the dust and proximity
to liquids. The blower sucks air and whatever else into the holding tank.
A filter is supposed to prevent anything from getting through. The motor
itself should be sealed against direct contact with the dust/liquid section
of the machine.
Hedge trimmers
A gear reduced universal motor drives a reciprocating mechanism not too
dissimilar to a saber saw. In addition to the usual motor/electrical
problems, lubrication may be needed periodically. Should you accidentally
try to trim a steel fence instead of a bush, damage to one or more teeth
may occur. In this case, light filing may be needed to remove nicks and
burrs.
Electric lawn mowers
A large universal or permanent magnet DC motor drives one or two sets of
rotating blades. A load or dead short may be thrown across the motor to
act as a dynamic brake when stopping. As usual, when the mower does not
operate, check for bad plug, cord, switch, brushes, dirt, etc. See the
sections on motors.
Incandescent Light Bulbs, Lamps, and Lighting Fixtures
Editor's note: More information on incandescent light bulbs can be found
at: Don Klipstein's Lighting
Web Site.
Incandescent light bulbs - single and three way
The basic incandescent lamp operates on the same basic principles as
the original carbon filament lamp developed by Thomas Edison. However,
several fundamental changes have made it somewhat more efficient and
robust. However, modern bulbs are hardly efficient at producing lighte.
Typically, only about 3 to 7 percent of the electrical energy used by a
typical incandescent light bulb is turned into useful (visible) light. The
rest goes to waste (usually) as heat.
Why do my light bulbs seem to burn out at warp speed?
The lifespan of an average incandescent bulb is 750-1000 hours which is
about 1.5 months if left on continuously or roughly 4 months if used 8 hours
a day. So, if you are seeing a 3-4 month lifespan, this may not be that out
of line depending on usage. With a lot of bulbs in a house, you may just think
you are replacing bulbs quite often.
A bad neutral connection at your electrical service entrance could result
in certain circuits in your house having a higher voltage than normal -
multimeter would quickly identify any.
Halogen bulbs
(From: Don Klipstein (don@misty.com).)
Efficiency, lifetime, and failure modes of halogen bulbs
A halogen bulb is often 10 to 20 percent more efficient than an ordinary
incandescent bulb of similar voltage, wattage, and life expectancy. Halogen
bulbs may also have two to three times as long a lifetime as ordinary bulbs,
sometimes also with an improvement in efficiency of up to 10 percent. How much
the lifetime and efficiency are improved depends largely on whether a premium
fill gas (usually krypton, sometimes xenon) or argon is used.
Use of dimmers with halogen bulbs
Dimming a halogen bulb, like dimming any other incandescent lamp, greatly
slows down the formation of thin spots in the filament due to uneven
filament evaporation. However, "necking" of the ends of the filament remains
a problem. If you dim halogen lamps, you may need "soft-start" devices in
order to achieve a major increase in bulb life.
The humorous side of light bulbs
Also see the document: Engineering, Science, and Other
(Pretty Clean) Jokes Collection for all the light bulb jokes you could
never want.
Notes on bulb savers
These are usually either Negative Temperature Coefficient (NTC) thermisters
or simple diodes.
Can you prove that bulb savers do not work?
No, sorry, I don't have conclusive proof. I would love to be proved wrong - I
could save a lot on light bulbs. However, new bulbs do not fail upon
power on. Old bulbs do. If you examine the filament of a well worn
light bulb, you will see a very distinct difference in surface appearance
compared to a brand new one. The surface has gone from smooth to rough.
This change is caused by sustained operation at normal light bulb
temperatures resulting in unequal evaporation of the filament.
Motors 101
Small motors in consumer electronic equipment
A large part of the functionality of modern appliances is based on the
use of motors of one form or another. They are used to rotate, blow,
suck, sweep, spin, cut, grind, shred, saw, sand, drill, plane, time,
and control.
Each type of motor has its advantages and disadvantages. More than one type
may be suitable for any particular application.
Identifying type of unknown motor
Determining the actual type of motor is the first step toward being
able to test to see if it is being powered properly or if there is
a fault in the motor itself.
Universal motors
The Universal motor is the most common type of high speed motor found
in appliances and portable line operated power tools. Typical uses
include vacuum cleaners, floor polishers, electric drills, routers, and
sewing machines. They are likely to be found anywhere medium power, high
speed, and/or variable speed control are required capabilities. Note that
quiet operation is NOT a feature of these motors. Therefore, they will
not often be found in electronic equipment.
Problems with universal motors
These motors can fail in a number of ways:
Testing of universal motors
Test the field coils for continuity with an ohmmeter. An open winding is
bad and will require replacement of the entire stator assembly unless the
break can be located. Compare the resistance of the two windings - they
should be nearly equal. If they are not, a short in one of the windings
is likely. Again, replacement will be necessary.
About commutators and brushes in universal motors
A commutator is essentially a rotating switch which routes power to the
appropriate windings on the armature so that the interaction of the fixed
(stator) and rotating (armature) magnetic fields always results in a
rotational torque. Power is transferred to the commutator using carbon
brushes in most motors of this type. The carbon is actually in the form
of graphite which is very slippery as well. Despite that fact that graphite
is a relatively soft material, a thin layer of graphite is worn off almost
immediately as the motor is started for the first time and coats the
commutator. After this, there is virtually no wear and a typical set of
carbon brushes can last thousands of hours - usually for the life of the
appliance or power tool.
Repairing small universal motors
Too bad that the Sears lifetime warranty only applies to hand (non-power)
tools, huh?
Single-phase induction motors
Where a fixed speed is acceptable or required, the single-phase induction
motor is often an ideal choice. It is of simple construction and very
robust and reliable. In fact, there is usually only one moving part which
is a solid mass of metal.
                             1
      Hot o------+------------+
                 |             )||
                 |             )|| Main winding
                 |           2 )||
  Neutral o---+---------------+
              |  |
              |  |    C1     3         C1: 10 uF, 150 VAC
              |  +----||------+
              |                )||
              |                )|| Phase winding
              |              4 )||
              +---------------+
Shaded pole induction motors
These are a special case of single-phase induction motors where only a
single stator winding is present and the required rotating magnetic field is
accomplished by the use of 'shading' rings which are installed on the stator.
These are made of copper and effectively delay the magnetic field buildup in
their vicinity just enough to provide some starting torque.
Problems with induction motors
Since their construction is so simple and quite robust, there is little
to go bad. Many of these - particularly the shaded pole variety - are even
protected from burnout if the motor should stall - something gets caught in
a fan or the bearings seize up, for example.
If any of these faults are present, the motor will need to be replaced (or
rewound if economical - usually not for typical appliance motors). The only
exception would be if the location of the open or short is visible and can be
repaired. They usually are not.
Disassembling and reassembling a universal or induction motor
The description below assumes that the construction is of an enclosure
with an integral stator and brush holder. For those with an internal
structural frame, remove the outer casing first.
Inspect all components for physical damage or evidence of overheating or
burning. Bad bearings may result in very obvious wear of the shaft or
bushings or show evidence of the rotor scraping on the stator core.
Extended overloads, a worn commutator, or shorted windings may result in
visible or olfactory detected deterioration of wire insulation.
Wiring up a capacitor run induction motor
The following assume that the wires are unmarked and the motor is for use
on 110 VAC, 60Hz (make appropriate changes if 220 VAC):
Determining wiring for multispeed induction motor
Many motors have a wiring diagram on their nameplate. However, where this is
not the case, some educated guessing and experimentation will be necessary.
"Here's the problem - I have a squirrel cage fan that I would like to wire
up. Unfortunately, there's only these four wires hanging there and I would
hate to burn it up trying combinations. Here's what I know:
              White   Black   Blue   Red
     ------------------------------------
      White    0      1.5     2.2    2.9
      Black    1.5    0        .7    1.3
      Blue     2.2     .7     0       .7
      Red      2.9    1.3      .7    0
If it does not make any effort to start turning - just hums, go to plan B.
It may require a starting/running capacitor and/or not be a 3 speed motor.
Small permanent magnet DC motors
These are constructed like small versions of universal motors except that the
stator field is provided by powerful ceramic permanent magnets instead of a
set of coils. Because of this, they will only operate on DC as direction is
determined by the polarity of the input voltage.
Problems with small PM motors
These motors can fail in a number of ways:
Testing of small PM motors
An open or shorted winding may result in a 'bad spot' - a position at which
the motor may get stuck. Rotate the motor by hand a quarter turn and
try it again. If it runs now either for a fraction of a turn or behaves
normally, then replacement will probably be needed since it will get stuck
at the same point at some point in the future.
Identifying voltage and current ratings small PM motors
If the carcass of the device or appliance is still available, the expected
voltage may be determined by examining the original power supply - batteries,
voltage regulator, wall adapter, etc.
Motors without internal speed regulators are used for many functions in
consumer electronics as well as toys and small appliances.
The wire color code will probably be red (or warm color) for the positive (+)
lead and black (or dark cool) color for the minus (-) lead.
Reviving a partially shorted or erratic PM motor
Dirt or grime on the commutator can result in intermittent contact and erratic
operation. Carbon or metal particle buildup can partially short the motor
making it impossible for the controller to provide enough voltage to maintain
desired speed. Sometimes, a quick squirt of degreaser through the ventilation
holes at the connection end will blow out the shorting material. Too much will
ruin the motor, but it would need replacement otherwise anyway. This has
worked on Pioneer PDM series spindle motors.
Disassembling and reassembling a miniature PM motor
Note: for motors with carbon brushes, refer to the section:
Disassembling and reassembling a universal or induction
motor. This procedure below is for those tiny PM motors with metal
brushes.
Inspect all components for physical damage or evidence of overheating or
burning. Bad bearings may result in very obvious wear of the shaft or
bushings or show evidence of the rotor scraping on the stator core.
Extended overloads, a worn commutator, or shorted windings may result in
visible or olfactory detected deterioration of wire insulation.
DC brushless motors
These are a variation on the small DC motors described above and uses a
rotating permanent magnet and stationary coils which are controlled by
some electronic circuitry to switch the current to the field magnets at
exactly the right time. Since there are no sliding brushes, these are
very reliable.
Disassembling and reassembling a DC brushless fan
This is the type you are likely to encounter - modify this procedure for
other types.
For fans with plain bearings, inspect and clean the shaft and the hole in the
bushing using a Q-tip and alcohol or WD40 (see there is a use for WD40!).
Check for any damage. Lubricate with a couple drops of electric motor oil
in the bushing and any felt pads or washers.
Synchronous timing motors
Miniature synchronous motors are used in mechanical clock drives as found
in older clock radios or electric clocks powered from the AC line,
appliance controllers, and refrigerator defrost timers. These assemblies
include a gear train either sealed inside the motor or external to it.
If the motor does not start up, it is probably due to dried gummed up
lubrication. Getting inside can be a joy but it is usually possible to
pop the cover and get at the rotor shaft (which is usually where the
lubrication is needed). However, the tiny pinion gear may need to be
removed to get at both ends of the rotor shaft and bearings.
Disassembling and reassembling a small timing motor
The best approach is usually replacement. In some designs, just the rotor
and gear unit can be replaced while retaining the stator and coils.
Motor bearing problems
A dry or worn bearing can make the motor too difficult to turn properly or
introduce unacceptable wobble (runout) into the shaft as it rotates.
Motor noise
If the noise is related to the rotating motor shaft, try lubricating the motor
(or other suspect) bearings - a single drop of electric motor oil, sewing
machine oil, or other light oil (NOT WD40 - it is not a suitable lubricant),
to the bearings (at each end for the motor). This may help at least as a
temporary fix. In some cases, using a slightly heavier oil will help with
a worn bearing. See the section: Lubrication of
appliances and electronic equipment.
Finding a replacement motor
In many cases, motors are fairly standardized and you may be able
to find a generic replacement much more cheaply than the original
manufacturer's part. However, the replacement must match the following:
MCM Electronics, Dalbani, and Premium Parts stock a variety of small DC
replacement motors. Appliance repair shops and distributors may have
generic replacements for larger motors. Junk and salvage yard or your
local dump may actually have what you want for pennies on the pound or less!
Is motor rebuilding economical?
So you left your electric cement mixer mixing away and forgot about it - for
3 days. Now the motor is a black charred ruin. You can rent a jack hammer
to break up the cement but the motor is a lost cause. The manufacturer has
been out of business for 20 years. What should you do besides give the tool
a decent burial?
Motor armature testing - or - what is a growler?
A common fault that cannot always be reliably identified with a simple
ohmmeter test is a couple of shorted turns in the winding that do not
affect the total resistance significantly.
Small motor repair and replacement
(From: mjsrnec (mjsrnec@prairie.lakes.com).)
Large Appliances
Web resources for large appliance troubleshooting
There are a number of Web sites dedicated to large appliance repair. Most
are companies selling parts or manuals but they may also have on-line forums,
replies to requests for assistance via email, or other free DIY information.
However, very few, if any, have the sort of in-depth treatment of appliance
repair provided by a good book on the subject.
Please go to the "Appliance Sites" sections of
Sam's Neat, Nifty, and
Handy Bookmarks.
Electric oven calibration
If your cakes come out all drippy or your chicken breasts end up hard as a
rock and charred, this discussion is for you! It is possible that the
thermostat on your oven needs calibration. However, major errors in
temperature may be the result of a bad heating element, blown fuse or
tripped breaker, a door that doesn't close or seal properly, etc. Confirm
that the oven is in otherwise good operating condition before attempting
calibration.
Heat control in electric range surface units
The typical electric range surface unit has two spiral elements. In
older ranges, they are used in various combinations across the 120 and
240. We have a GE range like this which has 5 heat settings (and off)
for each 'burner'.
Electric range top element does not work properly
If all the elements are dead, check for blown fuses/tripped circuit breakers.
There may be some in the range unit itself in addition to your electrical
service panel.
Improvised welding repair of heating elements
Due to the high temperatures at which they operate, welding may provide
better long term reliability of heating elements than mechanical fasteners.
However, in most cases, the following extreme measures are not really needed.
Then I touched the carbon rods together and drew them apart, producing a
carbon arc. I moved the carbon rods and arc to position the tip of the
heater wire pigtail in the arc. I slowly moved the arc in along the
pigtail until a molten ball of nichrome formed between the two wires of the
pigtail. When this happened, I immediately withdrew the arc.
Induction cooktops
These operate by generating a high frequency current in a coil under the
cooking container using it's bottom as the (shorted) secondary of a
transformer. The very high currents result in heating of the contain and
its contents, but little power is wasted elsewhere (though the power drive
circuits aren't 100 percent efficient).
Range, oven, and furnace electronic ignition
Many modern gas stoves, ovens, furnaces, and other similar appliances use an
electronic ignition rather than a continuously burning pilot flame to ignite
the fuel. These are actually simple high voltage pulse generators.
The Harper-Wyman Model 6520 Kool Lite(tm) module is typical of those found in
Jenne-Aire and similar cook-tops. Input is 115 VAC, 4 mA, 50/60 Hz AC. C1
and D1 form a half wave doubler resulting in 60 Hz pulses with a peak of about
300 V and at point A and charges C2 to about 300 V through D2. R2, C3, and
DL1 form a relaxation oscillator triggering SCR1 to dump the charge built up
on C2 into T1 with a repetition rate of about 2 Hz.
           C1                A       D1                     T1 o
    H o----||----------------+-------|>|-------+-------+       +-----o HVP+
         .1 uF     D2 1N4007 |     1N4007      |       |  o ::(
         250 V   +----|>|----+                 |       +--+ ::(
                 |           |                 |           )::(
                 +---/\/\----+                 |       #20 )::( 1:35
                 |  R1 1M    |             C2 _|_          )::(
                 |        R2 /           1 uF ---      +--+ ::(
                 |       18M \    DL1   400 V  |     __|__  ::(
                 |           /    NE-2         |     _\_/_     +-----o HVP-
                 |           |    +--+         |     / |
                 |           +----|oo|----+---------'  | SCR1
                 |       C3  |    +--+    |    |       | S316A
                 |  .047 uF _|_        R3 /    |       | 400 V
                 |    250 V ---       180 \    |       | 1 A
                 |           |            /    |       |
         R4 2.7K |           |            |    |       |
    N o---/\/\---+-----------+------------+----+-------+
Before you blame the ignition module for either lack of spark or continuous
spark, make sure the wiring is in good condition and completely dry and clean
(well reasonably clean!). Confirm that proper voltage is reaching the module
with a multimeter or neon test lamp. The modules are actually quite robust:
These are probably standard modules and replacements should be available from
your local appliance repair shop or parts supplier. An exact mechanical match
is not needed as long as the specifications are compatible.
Oven door seal repair
(From: Brian Symons (brians@mackay.net.au).)
If you are handy, you can narrow down the problem and possible fix it - a
defrost timer can be easily replaced. See the section:
Defrost system operation and wiring.
Refrigerator not cooling after a week
First, clean the condenser coils. It is amazing how much dust collects there
and interferes with proper cooling.
Defrost system operation and wiring
The most common type of defrost system on a no-frost refrigerator or freezer
usually consists of:
Testing: It should be possible to easily identify the bad components. For
the following, it is assumed that the main thermostat is set such that the
compressor is on.
Defrost timers are readily available at appliance parts distributors. A
generic timer will cost about $12. An exact replacement, perhaps up to $35.
If you call in a service person, expect to pay over $100 for the part and
labor.
Black (4)
Gray (3) /o---------o Normal position - Compressor, evaporator fan.
H* o-----+------/
| o---o Blue (2)
Timer | Defrost heater Defrost Thermostat
Motor (3180 o------------/\/\/\------------o/o----------+
| ohms) 31 ohms 32 F |
| |
| Orange (1) |
o---------------------------------------------------------+--o Common
Compressor starting relays
Most refrigeration compressors use a current mode relay to engage the
starting winding of their split phase induction motor. However, a
PTC (Positive Temperature Coefficient) thermistor might also be used.
Refrigeration compressor wiring
The following applies to a typical GE refrigerator compressor. YOURS MAY BE
DIFFERENT! There may be a wiring diagram tucked in with your customer
information, attached to the back of the unit, or hidden underneath somewhere.
                      |<- Starting Relay ->|<---- Compressor Motor ---->|

               ___            L
     AC H o----o o--------------+--o/   S    S
            "Guardette"         |    o---->>-------------+
             (Thermal           +-+                      |
             Protector)            )||                   +-+
                        Relay Coil )||                      )||
                                   )||                      )|| Start
                                +-+                         )|| Winding
                                |                           )||
                                |      M    R/M          +-+
                                +-------->>------+       |
                                                  )||    |
                                         Run/Main )||    |
                                          Winding )||    |
                                                  )||    |
                                               +-+       |
                                            C  |         |
     AC N o------------------------------>>----+---------+
The Starting Relay engages when power is applied due to the high current
through the Run winding (and thus the relay coil) since the compressor rotor
is stationary. This applies power to the Start winding. Once the compressor
comes up to speed, the current goes down and the Starting Relay drops out.
Changing the temperature range of a small refrigerator
It is simple in principle. The cold control - the thing with the knob -
needs to be modified or replaced. It is a simple on/off thermostat.
You may be able to figure out how to adjust its limits (mechanical) or
simply locate a suitable thermostat and install it in place of the
existing unit. Note: if it uses a capillary tube to a sensing bulb, don't
attempt to modify that part - it is sealed and should remain that way.
The mechanism it operates may still be adjustable. However, you will
likely loose the low end of your temperature range.
Washer sometimes spins
When it should be spinning, is the motor running? Does it complete the
cycle in the normal time?
Clothes washer does not fill (cold or hot)
This assumes the unit has power and otherwise operates normally. However,
determining this may be difficult if the completion of the cycle is dependent
on a water weight or volume sensor.
Maytag washer timer motor repair
The following applies to many Maytag models manufactured
over the last 25 or 30 years. A typical example is "A106" of
1970s vintage but much more recent models use the same mechanism.
After 20 or 30 years, even a Maytag washer may need a service
call. :) It also likely applies to other makes of washers.
Window air conditioner preventive maintenance
Very little needs to be done to get many years of service from a typical
window air conditioner.
Window air conditioner doesn't cool
This means the fan runs but you do not hear the compressor kick in.
Except for a bad compressor, all these are repairable relatively inexpensively
but if it is real old, a new high efficiency model may be a better solution.
Air conditioner freezes up
When this happens, airflow is reduced greatly since ice is blocking the
evaporator. Turning the unit off for a while or running it on fan-only
will clear the ice but this may indicate the need for maintenance or an
actual problem. Similar comments apply to window and central air conditioners
as well as heat pumps.
If it is 90 degrees F and you have full air flow with the fan set on high and
still get the freezup on a part of the evaporator, then low Freon is likely.
Comments on electric clothes dryer problems and repair
For quite a lot of useful information, do a web search for 'appliance
repair'. There are a couple of decent sites with DYI information.
The only problem for the past two years has been the dryer throwing the
exhaust fan belt. Cleaning up the fluff fixes it for another year.
Dryer shuts down after a few minutes
There are multiple thermostats in a dryer - one that sets the air temperature
during normal operation (and controls power to the heating element) and one or
more that sense fault conditions (and may shut everything down) such as those
described below.
You cannot completely check the thermostat with a meter -- they are either
open or closed. To test it properly you would have to know the temperature
at which it opens (from the manufacturer's specs), and then measure the
temperature of the exhaust air with a probe while watching the thermostat.
Why has my dryer (or other high current) plug/socket burned up?
This sort of failure is not unusual. The brass (or whatever) corrodes a
bit over time and/or the prongs loosen up. It doesn't take much resistance
at 20 or 30 Amps to produce a substantial amount of heat. The hotter it gets,
the more the resistance goes up, heating increases, it loosens more, and so
on until something melts. The power is I*I*R (where I is current and R
is the resistance) so at 20 A, a .1 ohm resistance at the contact results
in 40 W - think of the heat of a 40 W light bulb.
Four year old gas dryer just started popping GFCI
Why is it on a GFCI in the first place? A grounded outlet is all the
protection that is needed and any type of appliance with a motor or transformer
could be a potential nuisance tripper with a GFCI (though not always).
Checking dishwasher solenoids
(From: Filip "I'll buy a vowel" Gieszczykiewicz (filipg@repairfaq.org).)
Electrical Wiring Information and Problems
Safe electrical wiring
This chapter is in no way intended to be a comprehensive coverage of wiring
issues but includes a discussion of a few of the common residential wiring
related questions. For more information, see the official Usenet Electrical
Wiring FAQ or a DIY book on electrical wiring. The NEC (National Electrical
Code) handbook which is updated periodically is the 'bible' for safe wiring
practices which will keep honest building inspectors happy. However, the NEC
manual is not what you would call easy to read. A much more user friendly
presentation can be found at the CodeCheck
Web Site. This site includes everything you always wanted to know about
construction codes (building, plumbing, mechanical, electrical) but were
afraid to ask.
What is a GFCI?
A Ground Fault Circuit Interrupter (GFCI) is a device to protect against
electric shock should someone come in contact with a live (Hot) wire and
a path to ground which would result in a current through his/her body. The
GFCI operates by sensing the difference between the currents in the Hot and
Neutral conductors. Under normal conditions, these should be equal. However,
if someone touches the Hot and a Ground such as a plumbing fixture or
they are standing in water, these currents will not be equal as the path is
to Ground - a ground fault - and not to the Neutral. This might occur
if a short circuit developed inside an ungrounded appliance or if someone
was working on a live circuit and accidentally touched a live wire.
GFCIs, overloads, and fire safety
A GFCI is NOT a substitute for a fuse or circuit breaker (unless it is a
combined unit - available to replace circuit breakers at the service panel).
How does a GFCI work?
GFCIs typically test for the following condition:
More on how the GFCI detects a N-G short
To detect a Neutral to Ground fault there is a second transformer placed
upstream of the H-G sense transformer (see the illustration of the internal
circuitry of the GFCI at: http://www.national.com/pf/LM/LM1851.html). A small
drive signal is continuously injected via the 200 T winding which induces
equal voltages on the H and N wires passing through its core.
GFCIs and safety ground
Despite the fact that a Ground Fault Circuit Interrupter (GFCI) may be
installed in a 2 wire circuit, the GFCI does not create a safety ground.
In fact, shorting between the Hot and Ground holes in the GFCI outlet
will do absolutely nothing if the GFCI is not connected to a grounded
circuit (at least for the typical GFCI made by Leviton sold at hardware
stores and home centers). The Ground holes are only connected to the
green screw on the outside of the GFCI, not to any circuitry inside the GFCI
and it will trip only if a fault occurs such that
current flows to a true ground. If the original circuit did not have a
safety ground, the Ground Holes aren't going anywhere. What this means is that
an appliance with a 3 prong plug can develop a short between Hot and the
(supposedly) grounded case but the GFCI will not trip until someone
touches the case and an earth ground (e.g., water pipe, ground from
some other circuit, etc.) at the same time.
Where are 3 wire grounded outlets required?
If you move into a house or apartment where some or all of the outlets are the
old 2 prong ungrounded type, don't panic. There is no reason to call an
electrician at 2:00 AM in the morning to upgrade them all at great expense.
(This also applies to 3 prong outlets that don't have their third prong
hooked up.)
In most cases, there will only be a few circuits where this is needed and only
these need to be upgraded. To what extent the wiring plan of your residence
separates lighting type circuits from those with outlets that will be used for
3 wire equipment will determine how easy it is to upgrade only those outlets
that are affected. It may be cheaper to just add new branch circuits for
specific equipment needs.
Why you should NOT connect G to N
The question often arises: "Why can't I just connect the G to the N if my
outlets are only two prong?"
             +-----------------+
             |                 |        Open Fault
  Hot o---------o-o----/\/\---------+------ X -----o Neutral
             | Switch  Load    |    |
             |  (On)           |----+ Case should be G but is connected to N
             +-----------------+
With the appliance 'on', current passes through the internal wiring/motor/etc.
of the appliance to the N but this is now connected to the case as well. If
the house wiring opens (or even if the plug is loose, it is possible to have
line voltage on the case.
Testing installed GFCIs
These tests should be performed periodically to assure that the GFCIs are
providing the protection for which they were designed. It is possible for
the GFCI's circuitry to go bad or for the contacts to get stuck. The usual
recommendation is once a month but more frequently won't hurt.
"In this case, the test button mechanically trips the GFCI by simply pushing
the latch which holds the contacts closed. We satisfy the UL requirements
for testing the electronics when you press the reset button. When you
press the reset button the test circuit described above is invoked and
creates the current imbalance. If the GFCI is operating properly, it
will sense this and fire the solenoid used to trip the GFCI. We use
the firing of the solenoid to move shutters blocking the latching
mechanism for the contacts. The result is, if the GFCI does not sense
the ground fault and fire the solenoid correctly, you will not be able
to reset the GFCI - no power without protection. An added benefit is
that the SmartLock GFCI will also block the reset button if the GFCI
is wired incorrectly."
John's comments on the use of GFI breakers
(From: John Grau (affordspam@execpc.com).)
There is no compulsory language in the National Electrical Code the forces an
update to current code standards, unless you repair, replace or update the
affected component. Not all changes in the 1996 code made sense, and I would
not update the wiring in my own home (built in 1995) to current standards.
Antique Electronics and GFCIs
The following applies to a great deal of really old electronics, not just
the radios described below. They were often called something like "AC/DC
sets" with no power transformer, no isolation, and the metal chassis and
other user accessible parts connected directly to one side of the AC line.
Phantom voltage measurements of electrical wiring
When making measurements on household wiring, one expects to see one of three
voltages: 0, 115 VAC, or 230 VAC (or very similar). However, using a typical
multimeter (VOM or DMM) may result in readings that don't make sense. For
example, 2 VAC between Neutral and safety Ground or 40 VAC between a Hot wire
(with its breaker off) and Neutral or safety Ground.
There may also be resistive leakage in an actual wiring installation but
capacitance alone can easily mess up your multimeter readings if you have
unconnected conductors! Adding any sort of load like a 25 W bulb in parallel
with the multimeter will make the voltage drop nearly to zero if either of
these are the cause of the phantom readings.
Checking wiring of a 3-wire outlet
The following assumes a simple duplex outlet, not split or switched.
For each of the tests below, check both halves of the outlet.
Determining wiring of a 2-wire outlet
Connect a wire between one prong of a neon outlet tester and a known ground -
cold water pipe if copper throughout, heating system radiator, ground rod, etc.
Outlet wiring screwed up?
So your $6 outlet tester displays a combination of lights that doesn't
make sense or one or more lights is dim. For example, all three lights
are on but K and X (see below) are dim.
I suspect at the very least that your ground is not connected at the
service panel. I may run from some/all the outlets but ends somewhere.
You are seeing capacitive/inductive pickup between the floating ground
and the other wires in the circuit. Your N and H may be reversed as well
but this cannot be determined without checking with a load between H/N
and a proper ground.
For a computer or other 3 wire appliance, you should really install a
proper 3 prong outlet wired correctly. Otherwise, any power line filters
and surge suppressors will not have the safety ground (which a GFCI does
NOT create). Some UPSs may get away without one but then their surge
suppressor and/or line filters will not work correctly.
220 V outlet reads 0 VAC between slots
"I have a 220 outlet that I need to plug an AC unit into. The AC unit works
fine in another outlet, but not in this specific outlet. I pulled out my
handy dandy meter and checked the voltage across the two line slots - the
meter read 0.
Testing for fault in branch circuit
This may trip the breaker or blow a fuse - or trip a GFCI if so protected.
The procedure below is specifically for GFCI tripping. You will need a
multimeter.
Assuming the circuit is at fault:
Assuming the line is separate from any other wiring:
One of these will show a fault - possibly the N-G test indicating a short or
improperly wired outlet since this would not result in any operational
problems until a GFCI is installed (though it does represent a safety
hazard).
Locating wires inside a wall
There are gadgets you can buy that look like test lights but sense the
electric field emitted by the Hot wire. One is called 'Volt Tick' and may be
available at your local home center or large hardware or electrical supply
store.
Lights dim when high current load is switched on
Heating appliances space heaters toasters draw a large current when their
operating. Appliances with large motors like air conditioners and washing
machines draw a very large current momentarily when starting. And, tools
like bench grinders and power saws draw a large current until they get up
to speed. All of these conditions increase the voltage drop of the wiring
in the branch circuit they are on and thus reduces voltage to lights
on the same circuit. Normally, this isn't anything to worry about but
do make sure your wiring is properly rated for the equipment in use AND
that the fuses or circuit breakers are of the correct rating. If the amount
of dimming is erratic, it could mean that there are some corroded or loose
high resistance connections due to age/use and/or aluminum wiring. These
are serious conditions that can result in an electrical fire and would need
to be found and repaired. Where lights brighten under these
conditions, a bad Neutral connection may be the problem. See the next
section.
Bad Neutral connections and flickering lights or worse
Residential service comes from a centertapped 110-0-110 V transformer on the
utility pole. There are 3 wires into your house - 2 Hot or live wires and the
Neutral which is the centertap of the transformer. If the connection between
the Neutral bus in your service panel and the pole transformer centertap
becomes loose and opens or develops a high resistance, then the actual voltage
on either of the Hots with respect to the Neutral bus (which is divided among
your branch circuits) will depend on the relative loads on either side much in
the way of a voltage divider using resistors. Needless to say, this is an
undesirable situation.
Lightning storm trips GFCIs protecting remote outdoor outlets
"I have several outdoor 110V outlets, protected by GFCI breakers. These
circuits nearly always trip when there are nearby lightening strikes.
I am satisfied that there is no short circuit caused by water as:
GFCI trips when it rains (hard)
Most likely, moisture/water is getting into some portion of the GFCI's
protected wiring (at the GFCI or anywhere downstream) and the GFCI is
simply doing its job. You will have to trace the wiring through all
junction boxes and outlets to determine where the problem is located.
Yes, I know this may not be your idea of fun!
Why a GFCI should not be used with major appliances
A Ground Fault Circuit Interrupter is supposed to be a valuable safety
device. Why not use them everywhere, even on large appliances with
3 wire plugs?
Nuisance tripping of GFCIs
When used with highly inductive loads like motors or even fluorescent lamps,
GFCIs may occasionally (or more frequently) trip due to the voltage/current
spikes at power on/off. While the NEC/UL specifications apparently allow for
some time delay in their response to combat this problem, it is not known if
all manufacturers of GFCIs incorporate this into their product. However, the
very common Leviton GFCI outlet probably does use the National chip (LM1851
Ground Fault Interrupter) referred to below. Also see the section:
How does a GFCI work?.
Toasters and GFCIs
The following is a reason to use GFCIs on kitchen outlets that may not
be obvious:
Problems with outlets getting hot
With normal loads, electrical outlets should get at most just warm to the
touch. A number of factors can result in hot or dangerously hot outlets.
Check the following:
Reverse polarity outlets - safety and other issues
"Our new home has reverse polarity in all of the electrical outlets. The
house inspector didn't seem to think this was a major problem, and neither
did he think it was worth fixing. Can anyone explain how this might matter
for us? The best I understand this is that when something is plugged in, even
when it's not turned on, there is still a current going through it--is that
true at all, or is that normal? Our biggest concern is our computers, and the
possibility that our surge protectors won't be effective. If anyone could
clear this up, that would be great."
"I was checking some outlets in my apartment. As I recall, the narrow prong
should be hot, i.e., there should be 120 V between it and the wide prong or
the ground prong. The wide prong should be neutral, i.e., it should show no
voltage relative to the ground prong. Well, it appears that the Neutral
and Hot wires are reversed in some outlets. In others, they are correct."
"In still others, I get some voltage between ground and either the wide or
narrow prong. Ack. Should I worry? Should I do more than worry?"
Comments on whole house surge suppressors
These are typically offered your power company:
"I have a surge suppressor that was put between my meter and the service
panel. It's rented from my power company. The advertised product is part of
a 'package' that includes plug in surge suppressors. The package price is
$4.95/month. I didn't want the plug in suppressors so they said that it
would be $2.75/month. Is this a good deal?"
(From: Kirk Kerekes (redgate@oklahoma.net).)
Electric tingles or shocks from plumbing
This it not what is meant by a stimulating shower. :-)
All About Wire and the AWG (American Wire Gauge) Numbers
Some types of wire
Note: For an understanding of the AWG numbers, you may want to first see the
section: American Wire Gauge (AWG) table for annealed
copper wire.
So, where did AWG come from?
Nearly everyone who has done any sort of wiring probably knows that the AWG or
American Wire Gauge number refers to the size of the wire somehow. But how?
For the marginally mathematically inclined
Each increase of 3 in the gauge halves the cross sectional area. Each
reduction by 3 doubles it. So, 2 AWG 14 wires is like one AWG 11.
Diameter(mils) = 5 * 92^((36-AWG)/39)
That is, 460 mils is 92 times 5 mils, and the exponent accounts for 39 steps
of AWG number starting at 36 gauge.
Diameter(inches) = 0.3252 * e^(-0.116 * AWG)
where 'e' is the base of the natural logarithms, 2.728182....
A(circular mils) = 2^((50 - AWG) / 3)
Here's a Web site that has a program to calculate most of the useful
specifications based on the AWG number, diameter, or cross-sectional area:
They also have a bunch of other useful CAD programs at:
American Wire Gauge (AWG) table for annealed copper wire
(Similar tables exist for other types of wire, e.g., aluminum.)
   AWG  Dia in  Circ.  Square  Ohms per lbs per Feet/   Feet/    Ohms/
  gauge  mils   Mils   MicroIn 1000 ft  1000 ft Pound    Ohm     Pound
 ---------------------------------------------------------------------------
  0000  460.0  211600  166200  0.04901  640.5   1.561   20400   0.00007652
  000   409.6  167800  131800  0.06180  507.9   1.968   16180   0.0001217
  00    364.8  133100  104500  0.07793  402.8   2.482   12830   0.0001935

   0    324.9  105500  82890   0.09827  319.5   3.130   10180   0.0003076
   1    289.3  83690   65730   0.1239   253.3   3.947   8070    0.0004891
   2    257.6  66370   52130   0.1563   200.9   4.977   6400    0.0007778
   3    229.4  52640   41340   0.1970   159.3   6.276   5075    0.001237
   4    204.3  41740   32780   0.2485   126.4   7.914   4025    0.001966
   5    181.9  33100   26000   0.3133   100.2   9.980   3192    0.003127

   6    162.0  26250   20620   0.3951   79.46   12.58   2531    0.004972
   7    144.3  20820   16350   0.4982   63.02   15.87   2007    0.007905
   8    128.5  16510   12970   0.6282   49.98   20.01   1592    0.01257
   9    114.4  13090   10280   0.7921   39.63   25.23   1262    0.01999
  10    101.9  10380   8155    0.9989   31.43   31.82   1001    0.03178
  11    90.74  8234    6467    1.260    24.92   40.12   794     0.05053

  12    80.81  6530    5129    1.588    19.77   50.59   629.6   0.08035
  13    71.96  5178    4067    2.003    15.68   63.80   499.3   0.1278
  14    64.08  4107    3225    2.525    12.43   80.44   396.0   0.2032
  15    57.07  3257    2558    3.184    9.858   101.4   314.0   0.3230
  16    50.82  2583    2028    4.016    7.818   127.9   249.0   0.5136
  17    45.26  2048    1609    5.064    6.200   161.3   197.5   0.8167

  18    40.30  1624    1276    6.385    4.917   203.4   156.6   1.299
  19    35.89  1288    1012    8.051    3.899   256.5   124.2   2.065
  20    31.96  1022    802.3   10.15    3.092   323.4   98.50   3.283
  21    28.46  810.1   636.3   12.80    2.452   407.8   78.11   5.221
  22    25.35  642.4   504.6   16.14    1.945   514.2   61.95   8.301
  23    22.57  509.5   400.2   20.36    1.542   648.4   49.13   13.20

  24    20.10  404.0   317.3   25.67    1.223   817.7   38.96   20.99
  25    17.90  320.4   251.7   32.37    0.9699  1031.0  30.90   33.37
  26    15.94  254.1   199.6   40.81    0.7692  1300    24.50   53.06
  27    14.20  201.5   158.3   51.47    0.6100  1639    19.43   84.37
  28    12.64  159.8   125.5   64.90    0.4837  2067    15.41   134.2
  29    11.26  126.7   99.53   81.83    0.3836  2607    12.22   213.3

  30    10.03  100.5   78.94   103.2    0.3042  3287    9.691   339.2
  31    8.928  79.70   62.60   130.1    0.2413  4145    7.685   539.3
  32    7.950  63.21   49.64   164.1    0.1913  5227    6.095   857.6
  33    7.080  50.13   39.37   206.9    0.1517  6591    4.833   1364
  34    6.305  39.75   31.22   260.9    0.1203  8310    3.833   2168
  35    5.615  31.52   24.76   329.0    0.09542 10480   3.040   3448

  36    5.000  25.00   19.64   414.8    0.07568 13210   2.411   5482
  37    4.453  19.83   15.57   523.1    0.06001 16660   1.912   8717
  38    3.965  15.72   12.35   659.6    0.04759 21010   1.516   13860
  39    3.531  12.47   9.793   831.8    0.03774 26500   1.202   22040
  40    3.145  9.888   7.766   1049.0   0.02993 33410   0.9534  35040
  41    2.808  7.860   6.175   1319     0.02379 42020   0.758   55440

  42    2.500  6.235   4.896   1663     0.01887 53000   0.601   88160
  43    2.226  4.944   3.883   2098     0.01497 66820   0.476   140160
  44    1.982  3.903   3.087   2638     0.01189 84040   0.379   221760
  45    1.766  3.117   2.448   3326     0.00943 106000  0.300   352640
  46    1.572  2.472   1.841   4196     0.00748 133640  0.238   560640
  47    1.400  1.951   1.543   5276     0.00595 168080  0.190   887040
What about stranded wire?
(From: Calvin Henry-Cotnam (cal@cate.ryerson.ca).)
         Overall gauge      Typical stranded wires made up of:
        --------------------------------------------------------------
            #32              7 x #40
            #30              7 x #38
            #28              7 x #36
            #26              7 x #34
            #24              7 x #32    19 x #36
            #22              7 x #30    19 x #34
            #20              7 x #28    10 x #30    19 x #32
            #18             16 x #30
            #16             19 x #29    26 x #30
            #14             41 x #30
            #12             65 x #30
            #10             65 x #28
             #8             84 x #27
Comments on Magnet Wire and Coil Winding
Motors, transformers, and other electrical and electronic components using
magnetic fields have coils that are wound with (usually) copper wire having
very thin but tough insulation, rather than the types of plastic used
on building wire and hookup wire. The purpose is to minimize the space
taken up by the insulation to allow for a higher packing density of
current carrying conductors.
Estimating the Number of Turns of Wire in a Coil
Suppose you have a solenoid or relay and it would be desirable to know
the number of turns on it without disassembly or even being able to
measure the wire size? It is possible simply based on the resistance
and the coil cross sectionall area (which may be easier to estimate).
                          A
   Number of turns = N = ----
                          w2
where A is the cross sectional area of the winding (bobbin) and w is the
diameter of the wire. Defining a variable called r = resistance/inch of wire:
R = N*2*pi*D*r
where D = average diameter of the coil and r is the resistance in ohms
per unit length. So:
           R
   N = ----------
        2*pi*D*r
But r can also be expressed in terms of the wire diameter:
        k
   r = ---
        w2
where k is a constant dependent on the units for length and may be
determined from the wire tables or the basic properties of copper.
For copper magnet wire, k is 8.643x10⁻⁷ ohm-inches. Note that
the value of k does not depend on the shape of the wire (round or square)
as long as the packing factor of the turns is the same for both. Also:
              A
   w = sqrt(-----)
              N
Then with some simple manipulation:
        A*r        R
   N = ----- = ----------
         k      2*pi*D*r

               k*R
   r = sqrt(----------)
             2*pi*D*A
For example, consider a solenoid with the following parameters:
            k*R              8.643x10-7 * 120         0.01209 ohms    145 ohms
r = sqrt(----------) = --------------------------- = ------------- = ----------
          2*pi*D*A      2 * 3.14159 * 0.6 * 0.188        inch         1000 ft.
Checking part of the AWG wire table:
   AWG  Dia in  Circ.  Square  Ohms per lbs per Feet/   Feet/    Ohms/
  gauge  mils   Mils   MicroIn 1000 ft  1000 ft Pound    Ohm     Pound
 ---------------------------------------------------------------------------
   30   10.03  100.5   78.94   103.2    0.3042  3287    9.691   339.2
   31   8.928  79.70   62.60   130.1    0.2413  4145    7.685   539.3
   32   7.950  63.21   49.64   164.1    0.1913  5227    6.095   857.6
   33   7.080  50.13   39.37   206.9    0.1517  6591    4.833   1364
This would be somewhere between #31 and #32 wire. Then.
        A*r     0.188 * 0.01209
   N = ----- = ----------------- = 2,629 turns
         k         8.643x10⁻⁷
Since this doesn't take into consideration the insulation thickness or
circular cross-section of actual manget wire, there will need to be a
fill factor adjustment.  This is left as an exercise for the student. :)
Items of Interest
Editor's note: Not all of these actually apply to small appliances but may
be of use nonetheless.
Determining electricity usage
So, where does all the electricity (or money, same thing) go?
How your electric (kW-hour) meter works
While there have been a variety of technologies used to measure the amount of
electric power used by residential and industrial customers, the most common
is probably the one that uses a rotating aluminum disk to operate a clockwork
mechanism with a visible readout in kW-hours.
Taking equipment overseas (or vice-versa)
When does it make sense to take an appliance or piece of electronic equipment
to a country where the electric power and possibly other standards differ?
For example, going to a country with 220 VAC 50 Hz power from the U.S.:
Controlling an inductive load with a triac
Thyristor based controllers need to be designed with inductive loads
in mind or else they may not work correctly or may be damaged when
used to control a motor or even a transformer or large relay.
Where feasible, adding a light bulb in parallel with the load will decrease
the effect of the inductance. There is no way of knowing whether it will be
effective without analyzing the design or trying it.
Dan's notes on low voltage outdoor lighting
(From: Dan Hicks (danhicks@millcomm.com).)
Effects of brownouts and blackouts on electronic equipment and appliances
Brownouts down to 100 V, maybe even 90 volts should not affect electronic
equipment. It is possible that there is a no-man's land in between 0 and 90
volts (just an estimate) where strange things may happen. Whether this will
cause permanent damage I cannot say. The surge, spikes, and overvoltage
possibly associated with repeated brownouts or blackouts can damage
electronics, however.
Grounding of computer equipment
While electronic equipment with 3 prong plugs will generally operate properly
without an earth ground (you know, using those 3-2 prong adapters without
attaching the ground wire/lug), there are 3 reasons why this is a bad idea:
Removing gummed labels (or other dried or sticky gunk)
My order of attack: water, alcohol, WD40, Windex, then stronger stuff like
ammonia, acetone, degreaser, flux-off, carburetor cleaner, lacquer thinner,
gasoline.
Preventing radio frequency interference from whacking out appliances
This probably applies to many of the new high tech appliances including touch
lamps, smart irons and coffeemakers, etc.
Yard lights cycling and maintenance humor
(From: John Rowe (johnrowe@lightresource.com).)
Will a hard-wired appliance save energy over a plugged in variety?
The resistance of the connection may be slightly lower - .05 versus .1
ohm, for example. Other than the reduced amount of power lost in this
wiring, there is otherwise no functional difference.
A short history of heat
(From: Bill (bill394@juno.com).)
When the thermostat no longer calls for heat:
About those automatic toilets
I bet you will probably never have to repair one of these but I also bet that
you were curious as to how they work. :) In addition to what is said below, I
should add that only the initial push to open or close the valve comes from
the solenoid. Most of thw work is done by a clever hydraulic amplifier which
uses water pressure as the power source.
Service Information
Wiring diagrams
Many larger appliances like washing machines and microwave ovens have
a wiring diagram or connection diagram pasted inside the cover. However,
this is rare for small appliances.
Removing screw with stripped head
Even if a Phillips head screw head is severely damaged, it is sometimes
possible to free it just by applying enough pressure while turning with
a properly shaped screwdriver. This can only be attempted if it is possible
to press hard without risk of breaking or damaging anything.
Take care to avoid excessive mechanical shock to delicate equipment and avoid
allowing metal particles to fall into the interior of the appliance.
Fil's tips on improvised parts repair
(From: Filip "I'll buy a vowel" Gieszczykiewicz (filipg@repairfaq.org).)
As long as you know what the part does (you need not HAVE it...
as long as you can see where it goes in, what it moves, what
activates it, etc).
Fixing stripped plastic threaded holes
(From: Gordon S. Hlavenka (cgordon@worldnet.att.net).)
Interchangeability of components
The question often arises: If I cannot obtain an exact replacement or
if I have another appliance carcass gathering dust, or
I just have some extra parts left over from a previous project, can I
substitute a part that is not a precise match? Sometimes, this is simply
desired to confirm a diagnosis and avoid the risk of ordering an expensive
replacement and/or having to wait until it arrives.
The following are usually custom parts and substitution of something from
your junk box is unlikely to be successful even for testing: SMPS (power
supply) transformers, microcontrollers, other custom programmed chips,
display modules, and entire power supplies unless identical.
Appliance repair books
Your local large public or university library should have a variety of
books on appliance repair and general troubleshooting techniques.
Gene B. Williams
Chilton Book Company, 1986
Radnor, PA 19089
ISBN 0-8019-7718-5
Gene B. Williams
Chilton Book Company, 1986
Radnor, PA 19089
ISBN 0-8019-7687-1
Billy C. Langley
Regents/Prentice Hall, A Division of Simon and Schuster, 1993
Englewood Cliffs, NJ 07632
ISBN 0-13-544834-4
Darell L. Rains
TAB Books, Inc., 1987
Blue Ridge Summit, PA 17214
ISBN 0-8306-0747-1 (Paperback: ISBN 0-8306-0747-2)
Edwin P. Anderson
Theodore Audel & Co., A Division of Howard W. SAMS & Company, Inc., 1969
2647 Waterfront Parkway, East Drive
Indianapolis, IN 46214
Telephone: 1-800-428-7267
David L. Heisserman
Prentice-Hall, Inc. 1974
Englewood Cliffs, NJ 07632
ISBN 0-13-381749-0
Time-Life Books, Alexandria, VA
ISBN 0-8094-6268-0, ISBN 0-8094-6269-9 (lib. bdg.)
The Readers Digest Association, 1996
Pleasantville, New York/Montreal
ISBN 0-89577-871-8
variety of other categories of household repair (furniture, plumbing, etc.)
is quite comprehensive.
Frank W. Coggins
Tab Books, 1992
Blue Ridge Summit, PA 17214
ISBN 0-8306-0258-5 (hardback), 0-8306-0358-1 (paperback)
Arthor Darack and the Staff of Consumer Group, Inc.
Prentice-Hall, Inc. 1983
Englewood Cliffs, NJ 07632
ISBN 0-13-430835-2 (hardcover), ISBN 0-13-430827-1 (paperback)
Hearst Books, NY, 1981
ISBN 0-910990-75-1
Based on the Readers Digest Complete Do-It-Yourself Guide
The Readers Digest Association, 1991
Microsoft, 1996
ISBN 0-57231-259-9
Manufacturer support
Major manufacturers may provide a variety of types of support for their
products including technical assistance, parts sourcing, unadvertised repair
or replacement beyond the expiration of the warranty, upgrade or replacement
to fix known defects whether covered by official recalls or not, etc.
Parts suppliers
Common parts like cordsets, plugs, wire, and some light bulbs can be found
a larger hardware stores, home centers, or electrical supply houses. Small
electronic components like resistors and capacitors, can be found at any
electronics distributor - including even Radio Shack in a pinch.
Also see the documents: "Troubleshooting of Consumer Electronic Equipment" and
"Electronics Mail Order List" for additional parts sources.
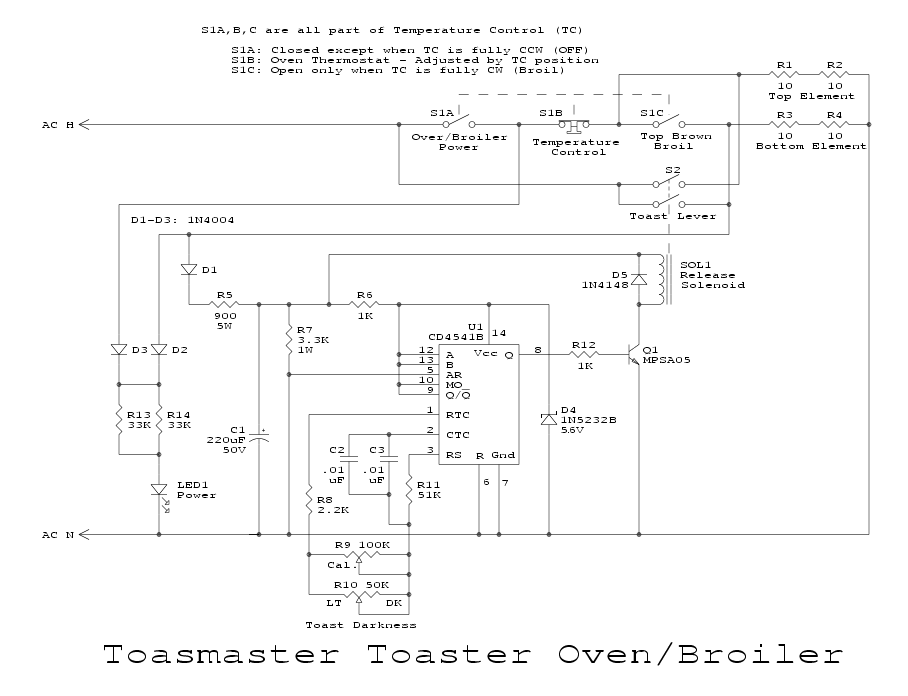